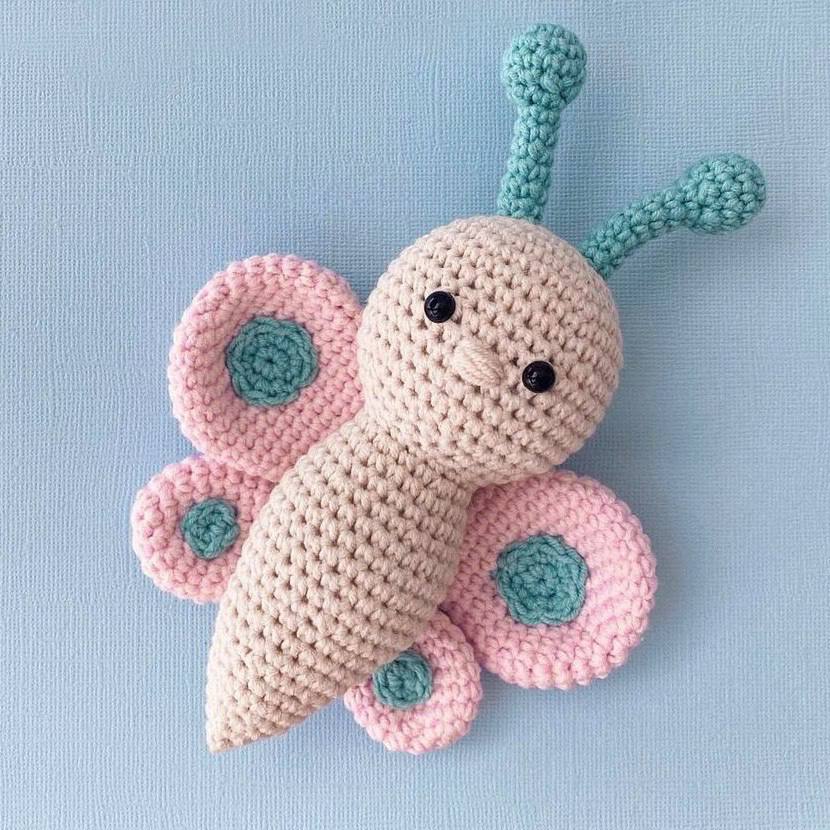
Flutter into Creativity: Create Your Own Adorable Crochet Butterfly
Adorable Crochet Butterfly Amigurumi Pattern
Create your own sweet and whimsical crochet butterfly with this detailed step-by-step guide. This amigurumi project is perfect for beginners and experienced crocheters alike, resulting in a charming toy that makes a wonderful gift or a cute addition to any collection.
Materials Needed
- Yarn in your choice of colors (suggested: beige for the body, pink for the wings, and teal for the accents)
- Crochet hook suitable for your yarn weight
- Safety eyes
- Fiberfill stuffing
- Yarn needle
- Scissors
Abbreviations (US Terms)
- MR: Magic Ring
- sc: Single crochet
- inc: Increase (two sc in one stitch)
- dec: Decrease (sc two stitches together)
- sl st: Slip stitch
- st: Stitch
Pattern Instructions
Head and Body
Work in continuous rounds.
- MR 6 sc (6)
- 6 inc (12)
- (1 sc, inc) * 6 (18)
- (2 sc, inc) * 6 (24)
- (3 sc, inc) * 6 (30)
- (4 sc, inc) * 6 (36)
- – 14. sc in each st around (36)
Note: Insert safety eyes between rounds 10 and 11.
- (4 sc, dec) * 6 (30)
- (3 sc, dec) * 6 (24)
- (2 sc, dec) * 6 (18)
- sc in each st around (18)
- (2 sc, inc) * 6 (24)
- – 21. sc in each st around (24)
- (3 sc, inc) * 6 (30)
- – 27. sc in each st around (30)
- (3 sc, dec) * 6 (24)
- – 31. sc in each st around (24)
- (2 sc, dec) * 6 (18)
- – 34. sc in each st around (18)
- (1 sc, dec) * 6 (12)
- sc in each st around (12)
- 6 dec (6)
- – 39. sc in each st around (6)
Fasten off, leaving a tail to sew the opening closed. Stuff firmly.
The Wings
The butterfly has two sets of wings: large and small.
Large Wing (Make 2)
- MR 6 sc (6)
- 6 inc (12)
- (1 sc, inc) * 6 (18)
- (2 sc, inc) * 6 (24)
- (3 sc, inc) * 6 (30)
- – 8. sc in each st around (30)
- (dec, 13 sc) * 2 (28)
- (dec, 12 sc) * 2 (26)
- (dec, 11 sc) * 2 (24)
- (dec, 10 sc) * 2 (22)
- (dec, 9 sc) * 2 (20)
- (dec, 8 sc) * 2 (18)
Finish with a sl st and fasten off.
Small Wing (Make 2)
- MR 6 sc (6)
- 6 inc (12)
- (1 sc, inc) * 6 (18)
- – 6. sc in each st around (18)
- (dec, 7 sc) * 2 (16)
- (dec, 6 sc) * 2 (14)
- (dec, 5 sc) * 2 (12)
- (dec, 4 sc) * 2 (10)
Do not fasten off. Join the small wing to the large wing.
Joining and Finishing Wings
- Round 11: Working along the large wing: 9 sc, dec, 7 sc. Transition to the small wing: 5 sc, dec, 3 sc. (Ensure decreases align with the previous round’s decreases). (26)
- Round 12: 9 sc, dec, 11 sc, dec, 2 sc (24)
- Round 13: 8 sc, dec, 10 sc, dec.
Leave the final round unfinished. Fold the wing in half and sc across the edges to close it. Repeat this entire process to create the second wing.
Final Wing Assembly: Place the two completed wings together. Join them by working sl st through one loop of each wing to create the full butterfly wing set.
Antennae (Make 2)
- MR 6 sc (6)
- 6 inc (12)
- – 4. sc in each st around (12)
- 6 dec (6)
- – 12. sc in each st around (6)
Finish with a sl st. Leave a long tail for sewing. Attach the antennae to the top of the head.
Wing Spots
Small Spots: MR 6 sc, finish with a sl st.
Large Spots:
- MR 6 sc (6)
- 6 inc (12)
Finish with a sl st and leave a long tail for sewing. Sew the spots symmetrically onto the wings.
Final Assembly
- Sew the completed wing set to the center of the body.
- Use a contrasting color of yarn to embroider a small nose between the eyes.
- Trim any loose ends and your crochet butterfly is complete