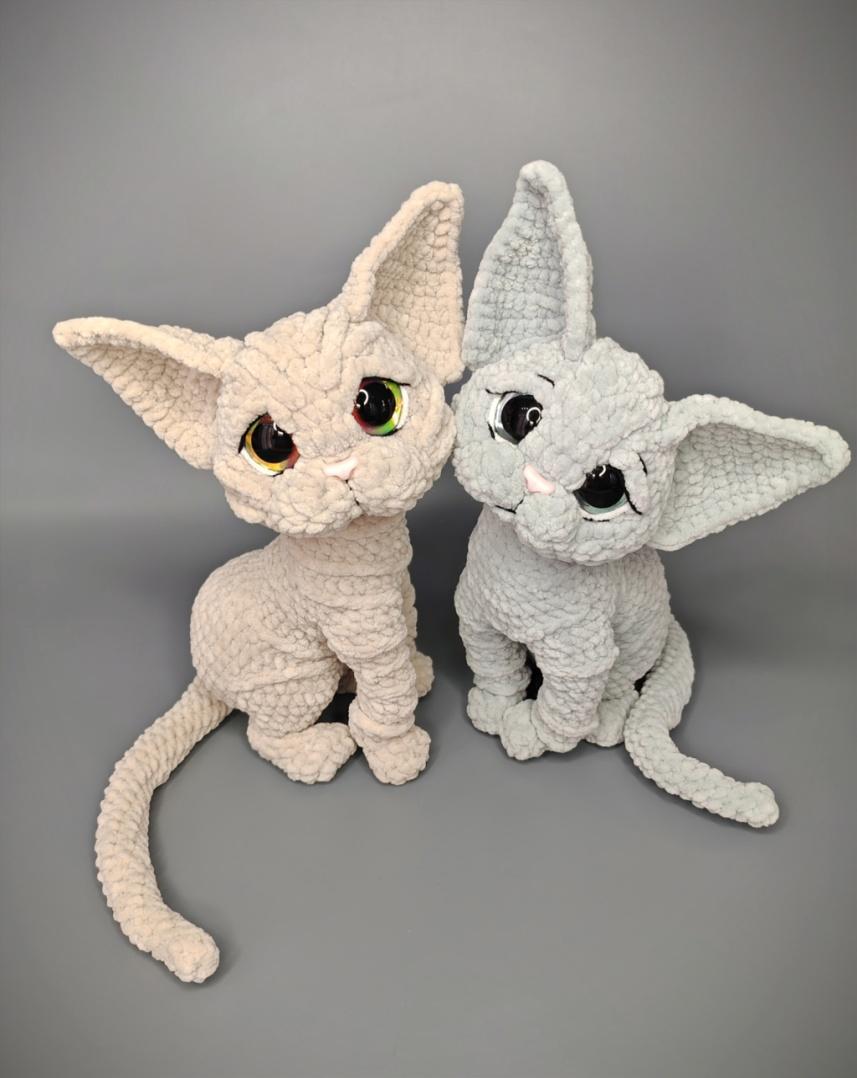
Sphynx Cat Crochet Pattern: A Wrinkly Hairless Amigurumi
Attach Front Legs
- Round 53 (watch the video!):
- BO: 3 sl st, 1 sc, dec, 4 sc
- 1 sc together with left front leg (3rd sc from the marker on the leg)
- FLO: 6 sl st
- BO: 1 sc together with right front leg (next sc from marker)
- 4 sc, dec, 1 sc, 3 sl st (26)
Using the leftover tail from the left front leg, work 3 sc through the leg and body loops, 2 sc along the body, and 3 sc through the right leg and body loops. Fasten off and cut the yarn.
Begin stuffing the lower body. The back legs should be stuffed very lightly (only the heel area) or not at all.
- Round 54 (watch the video!):
- 4 sc, dec, 3 sc
- Decrease at seam/2 sc of leg
- Dec, 6 sc along leg
- 1 sc into the seam
- Along body: 2 inc
- 1 sc into the seam
- 6 sc along leg
- Dec
- Decrease at 2 sc of leg/seam
- 3 sc, dec, 4 sc (38)
- Round 55: 4 sc, dec, 1 sc, dec, 7 sc, dec, 2 sc, dec, 7 sc, (dec, 1 sc) × 2, 3 sc (32)
- Round 56 (BLO): 4 sl st, BO: 6 sc, dec, 9 sc, dec, 6 sc, BLO: 3 sl st (30)
- Round 57 (FLO from previous row): 4 sl st, BO: 23 sc, FLO from previous row: 3 sl st (30)
- Round 58: 4 sl st, dec, 4 sc, dec, (2 sc, dec) × 2, 4 sc, dec, 4 sl st (25)
- Round 59: 8 sc, dec, 6 sc, dec, 7 sc (23)
- Round 60: 11 sc, dec, 10 sc (22)
- Round 61: dec, 1 sc, dec, 5 sc, inc, 2 sc, inc, 5 sc, dec, 1 sc (21)
- Round 62: 3 sc, (dec, 3 sc) × 3, dec, 1 sc (17)
If you are using a sew-on head, finish here. Fasten off and cut the yarn.
- Round 63 (for jointed head): Firmly stuff the body, install the chosen joint in the neck, then work 6 dec. Fasten off, leaving a tail to close the opening around the joint leg.
IMPORTANT: Watch the video tutorials for final body stuffing and for choosing the correct joint size (35 mm disc with cotter pin). Do not skip these resources!
Body Wrinkles
Crochet wrinkle chains on the body before attaching the head. The video tutorial shows exactly where and how to place them.
Part 5: Head
Work with main color plush yarn.
- Foundation: Ch 6. From 2nd ch from hook: inc, 3 sc, in first ch of chain: 4 sc, along opposite side: 3 sc, inc (14)
- Round 2 (BO): 2 inc hdc, 1 sc, BLO: 1 sl st, BO: 1 sc, 2 inc hdc, 1 hdc, inc hdc, 3 sl st, inc hdc, 1 hdc (20)
- Round 3 (watch the video!):
- BO: inc, 3 sc
- BLO: 1 sl st
- 1 sl st with visible loops of the central column on the wrong side of the lower muzzle
- 1 sl st
- BO: 3 sc, 2 inc, 2 sc
- BLO: 3 sl st
- BO: 2 sc, inc (24)
- Round 4: inc, 11 sc, inc, 4 sc, 4 sl st, 3 sc (26)
- Round 5 (BO): 1 hdc, inc hdc, 2 hdc, 1 sc, BLO: 6 inc hdc, BO: 1 sc, 2 hdc, inc hdc, 1 hdc, 10 sc (34)
- Round 6: 1 sc, inc hdc, 1 hdc, inc hdc, 16 sc, inc hdc, 1 hdc, inc hdc, 11 sc (38)
- Round 7: 2 sc, inc hdc, 1 hdc, inc hdc, 7 sc, 5 hdc, 7 sc, inc hdc, 1 hdc, inc hdc, 11 sc (42)
- Round 8: 15 sc, 3 hdc, 24 sc (42)
- Round 9: 4 sc, dec, 7 sc, (inc hdc, 2 hdc) × 2, inc hdc, 7 sc, dec, 13 sc (43)
- Round 10: 5 sc, dec, 21 sc, dec, 13 sc (41)
Install Eyes and Nose
- Eyes (25 mm): Install between Rounds 6 and 7. Count 5 stitches outward from the center for each eye.
- Nose (15-18 mm): Install between Rounds 3 and 4, centered on the muzzle.
- Head joint: Install between Rounds 8 and 9, centered on the lower part of the head.
Continue Head
- Round 11: 4 sc, dec, (10 sc, dec) × 2, 11 sc (38)
- Round 12: 38 sc (38)
- Round 13: 4 sc, dec, 19 sc, dec, 11 sc (36)
- Round 14: (4 sc, dec) × 2, 1 sc, dec, 1 sc, (dec, 4 sc) × 2, 3 sc, dec, 3 sc (30)
- Round 15: (3 sc, dec) × 6 (24)
Firmly stuff the head – but not rock hard. Pay special attention to the muzzle area.
- Round 16: (2 sc, dec) × 6 (18)
- Round 17: 9-10 dec (approximately)
Fasten off, leaving a tail to close the opening.
Part 6: Face Shaping (Tugging)
Watch the video tutorial carefully! Use strong thread to create the characteristic Sphynx face wrinkles.
Part 7: Eyelids (Make 2)
- Ch 7. Fasten off, leaving tails for sewing.
Sew the eyelids above the eyes as shown in the video tutorial.
Part 8: Eye Detailing
- Using black YarnArt Jeans, embroider the arrows (eyeliner) and the lower part of the eye. Embroider the bridge under the nose.
- Using white YarnArt Dolce Baby with two strands, embroider the white highlights along the outer edge of each eye.
Part 9: Face Wrinkle Chains
Crochet chains for the wrinkles on the muzzle:
- 4 chains of 7 ch
- 4 chains of 5 ch
- 2 chains of 6 ch
Sew these chains onto the face following the video tutorial.
Part 10: Ears (Make 2)
Work with main color plush yarn.
- Foundation: Ch 2. In the first ch of the chain: 2 sc, ch 1, turn (2)
- Row 2: inc, 1 sc, ch 1, turn (3)
- Row 3: 2 sc, inc, ch 1, turn (4)
- Row 4: inc, 3 sc, ch 1, turn (5)
- Row 5: inc, 3 sc, inc, ch 1, turn (7)
- Row 6: (1 sc, inc) × 3, 1 sc, ch 1, turn (10)
- Row 7: 10 sc, ch 1, turn (10)
- Row 8: 10 sc, ch 1, turn (10)
- Row 9: 6 sl st, 3 sc, inc, ch 1, turn (11)
- Row 10 (shortened row): 6 sc, 1 sl st, ch 1, turn (7)
- Row 11: Skip 1 sl st, then work 1 sl st, 5 sc, ch 1, turn (6)
- Row 12: inc, 10 sc, ch 1, turn (12)
- Row 13: 7 sl st, 2 sc, inc (11 – this row is also shortened)
Do not cut the yarn yet! Transition to edging the ear:
- Ch 1, into the “leg” of the last stitch: 1 sl st, 1 sl st into the base of the stitch
- Along the side edge: inc, 12 sc
- At the top of the ear: inc
- Down the other side: 10 sc, then 1 sl st into the base
Fasten off, leaving a tail for sewing.
Attaching the Ears
Use the marked points on the head diagram:
- Rounds 10-11 are the attachment area
- Marker 1: 3 sc from center
- Marker 2: 2 rows back from Marker 1
- Marker 3: 9 sc down and 1 row forward from Marker 1
- Marker 4: 5 sc down and 1 row back from Marker 2
Sew the ears securely between these markers.
Part 11: Final Assembly
- Attach the head to the body using your chosen method (sewing or joint).
- If using a joint, close the opening neatly around the joint leg.
- Weave in all ends.
- Add any final wrinkle chains or details