Adorable Crochet Baby Bottle Pattern: An Easy Amigurumi Tutorial
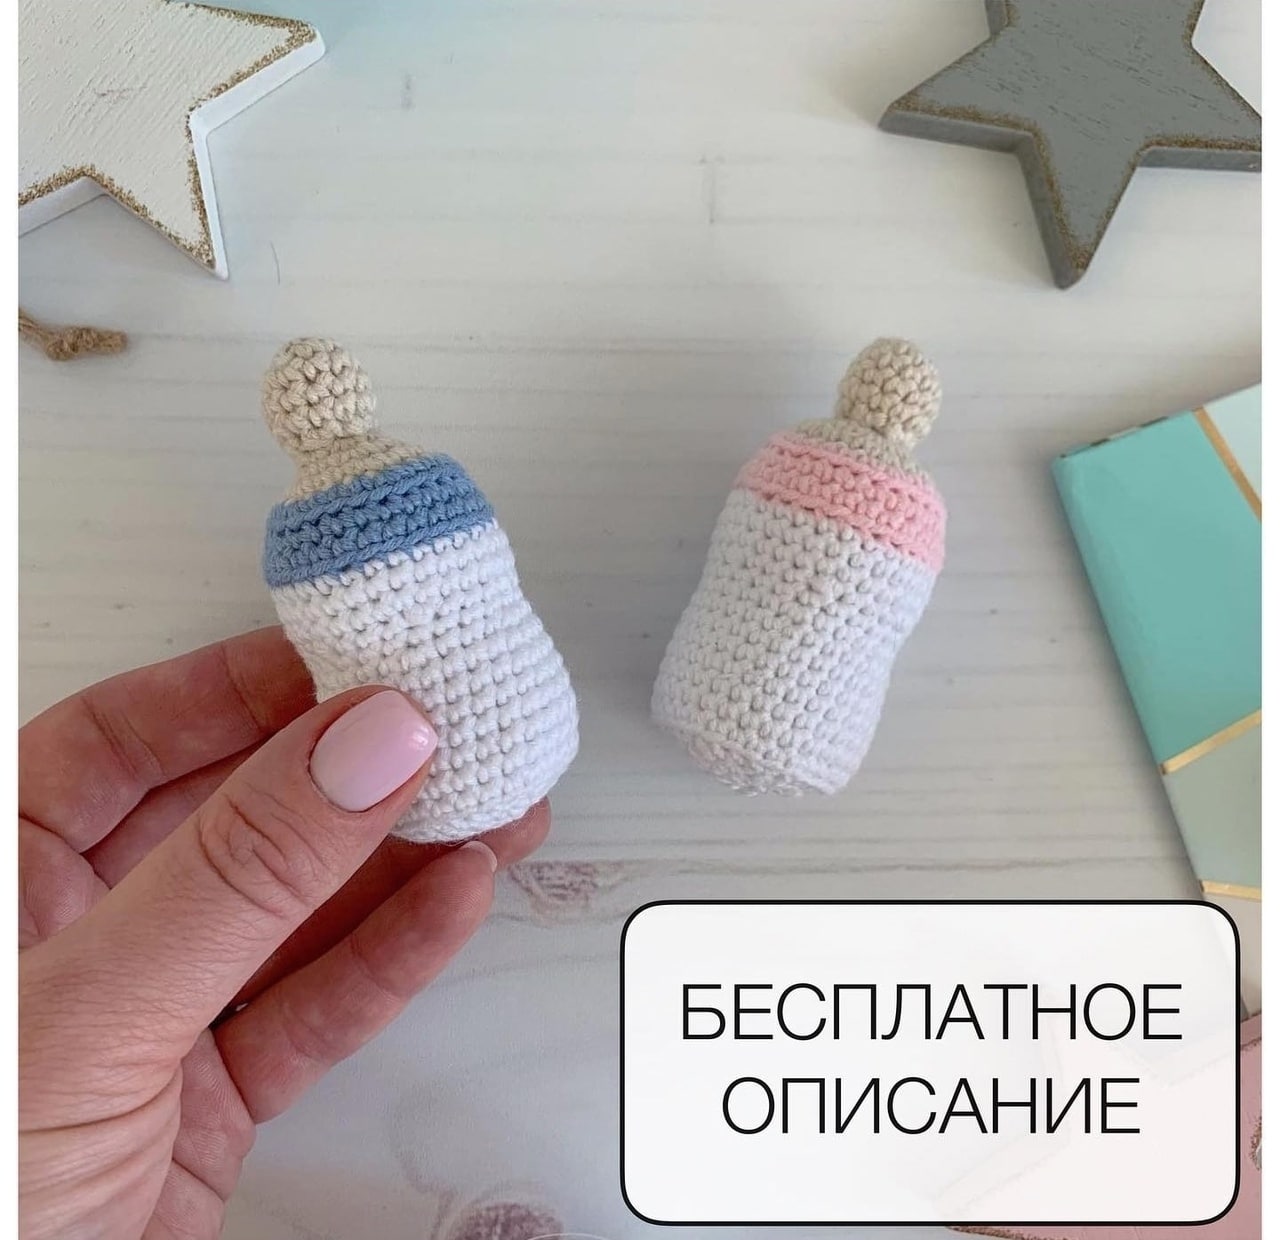
Are you looking for the perfect, tiny project to add to your crochet collection? Whether you are making adorable accessories for a dollhouse, creating a unique baby shower gift, or looking for cute nursery decor, this crochet baby bottle pattern is exactly what you need. This amigurumi-style bottle is incredibly charming, simple to make, and works up quickly, making it a fantastic project for both beginners and seasoned crocheters alike.
In this tutorial, we will walk through every single stitch to create a miniature, realistic-looking baby bottle. We will cover the beige nipple, the colorful cap, and the classic white bottle body. By the end of this guide, you will have a finished piece that is perfect for stuffing into a gift basket or attaching to a themed keepsake.
Materials and Abbreviations
Before we dive into the stitches, let’s make sure you have everything you need on your crochet hook. Since this is a miniature amigurumi project, using the right tools is key to achieving that tight, professional look that keeps the stuffing inside.
What You Will Need
- Yarn: Use a medium weight (worsted or DK) cotton or acrylic yarn. Cotton is highly recommended for amigurumi because it provides excellent stitch definition and doesn’t stretch as much as acrylic, keeping your bottle shape crisp. You will need three colors:
- Beige (for the nipple)
- Light Blue or Light Pink (for the bottle cap)
- White (for the main bottle body)
- Crochet Hook: A 2mm crochet hook. Using a smaller hook than the yarn label suggests helps ensure your stitches are tight enough so the stuffing doesn’t peek through.
- Stuffing: Polyester fiberfill (poly-fill) to give the bottle its shape.
- Tools: A tapestry needle for weaving in ends, scissors, and a stitch marker to keep track of your rounds.
Abbreviations (US Terms)
This pattern uses standard US crochet terminology. If you are used to UK terms, please be sure to convert them before starting!
- MR: Magic Ring (or Magic Circle)
- sc: Single crochet
- inc: Increase (2 single crochets in the same stitch)
- dec: Decrease (sc 2 stitches together)
- BLO: Back Loop Only
- st(s): Stitch(es)
- rep: Repeat
Step-by-Step Instructions
Amigurumi is worked in continuous rounds. To avoid a visible seam, do not join each round with a slip stitch; instead, simply work into the first stitch of the previous round. Use a stitch marker to mark the beginning of every round.
Part 1: The Nipple (Beige Color)
We begin with the beige yarn to create the soft nipple of the bottle. This part is worked in a spiral to create a small, rounded shape.
- Round 1: Create a Magic Ring and work 6 sc into the ring. (6 stitches)
- Round 2: 6 inc in each stitch around. (12 stitches)
- Rounds 3-5: sc in each stitch around for 3 rounds. (12 stitches)
- Round 6: 6 dec around. (6 stitches)
- Round 7: 6 inc in each stitch around. (12 stitches)
- Round 8: (1 sc, 1 inc) rep 6 times. (18 stitches)
- Round 9: (2 sc, 1 inc) rep 6 times. (24 stitches)
Part 2: The Bottle Cap (Blue or Pink Color)
Now, we will transition to the color of your choice. This creates the ring or “collar” of the bottle. To make a clean color change, pull your new color through the final two loops of the last stitch of the previous round.
- Round 10: (3 sc, 1 inc) rep 6 times. (30 stitches)
- Round 11: 30 sc in the BLO (Back Loop Only). This creates a ridge that helps define the transition between the cap and the bottle.
- Round 12: 30 sc in both loops. (30 stitches)
Part 3: The Bottle Body (White Color)
It is time to switch to your white yarn to form the main body of the bottle. Again, ensure your color change is neat.
- Round 13: 30 sc in the BLO (Back Loop Only). This creates the bottom edge of the bottle body.
- Rounds 14-15: 30 sc for 2 rounds. (30 stitches)
- Round 16: (3 sc, 1 dec) rep 6 times. (24 stitches)
- Round 17: 24 sc. (24 stitches)
- Round 18: (3 sc, 1 inc) rep 6 times. (30 stitches)
- Rounds 19-25: 30 sc for 7 rounds. (30 stitches)
- Round 26: (3 sc, 1 dec) rep 6 times, working specifically into the BLO. (24 stitches)
Part 4: Closing and Stuffing
Before we close the bottle, we need to give it its shape with some stuffing.
- Stuffing: Take your polyester fiberfill and stuff the bottle firmly. Make sure to push the stuffing up into the beige nipple section as well, but be careful not to overstuff the very tip.
- Round 27: (2 sc, 1 dec) rep 6 times. (18 stitches)
- Round 28: (1 sc, 1 dec) rep 6 times. (12 stitches)
- Round 29: 6 dec. (6 stitches)
- Final Step: Fasten off the yarn, leaving a long tail (about 4-5 inches) for sewing. Use your tapestry needle to weave through the remaining stitches and pull tight to close the hole completely.
Finishing
Once the bottle is closed, you will likely have a yarn tail sticking out from the bottom. Use your tapestry needle to weave this tail into the inside of the bottle. This hides the end of the yarn and prevents it from unraveling. Ensure the tail is tucked deep inside so it doesn’t affect the shape of the base.
Take a moment to squeeze the bottle to ensure the stuffing is evenly distributed. If there are any lumps, you can use your crochet hook to gently push the stuffing around from the outside.
Tips for Success
Crocheting amigurumi is a rewarding skill, but it does come with its own set of challenges. Here are a few professional tips to help you achieve the best results with this baby bottle pattern:
Work with Tight Tension
The most common mistake in amigurumi is working too loosely. If your stitches are loose, the white stuffing will eventually peek through the holes, making the bottle look messy. If you find your stitches are too loose, try using an even smaller hook (like a 1.75mm or 1.5mm) or simply focus on pulling your yarn a bit tighter with every stitch.
Master the Magic Ring
If you are new to crochet, the Magic Ring might feel intimidating. However, it is the best way to start amigurumi because it allows you to pull the center hole completely shut. If you struggle with the ring, you can alternatively chain 2 and work your first 6 stitches into the first chain.
Mind Your Color Changes
To get that professional, “store-bought” look, pay close attention to your color changes. When switching from beige to blue/pink, or blue/pink to white, do not finish the stitch with the old color. Instead, on the final pull-through of the last stitch of the old color, pick up the new color. This creates a seamless transition between the parts of the bottle.
Use a Stitch Marker
Because amigurumi is worked in a continuous spiral, it is incredibly easy to lose your place. Without a marker, you might accidentally skip a round or repeat a round, which will throw off the entire shape of the bottle. Always use a stitch marker at the start of every new round.
Happy crocheting! We hope you enjoy making this adorable little baby bottle!