Adorable Amigurumi Bunny Crochet Pattern: A Step-by-Step Guide
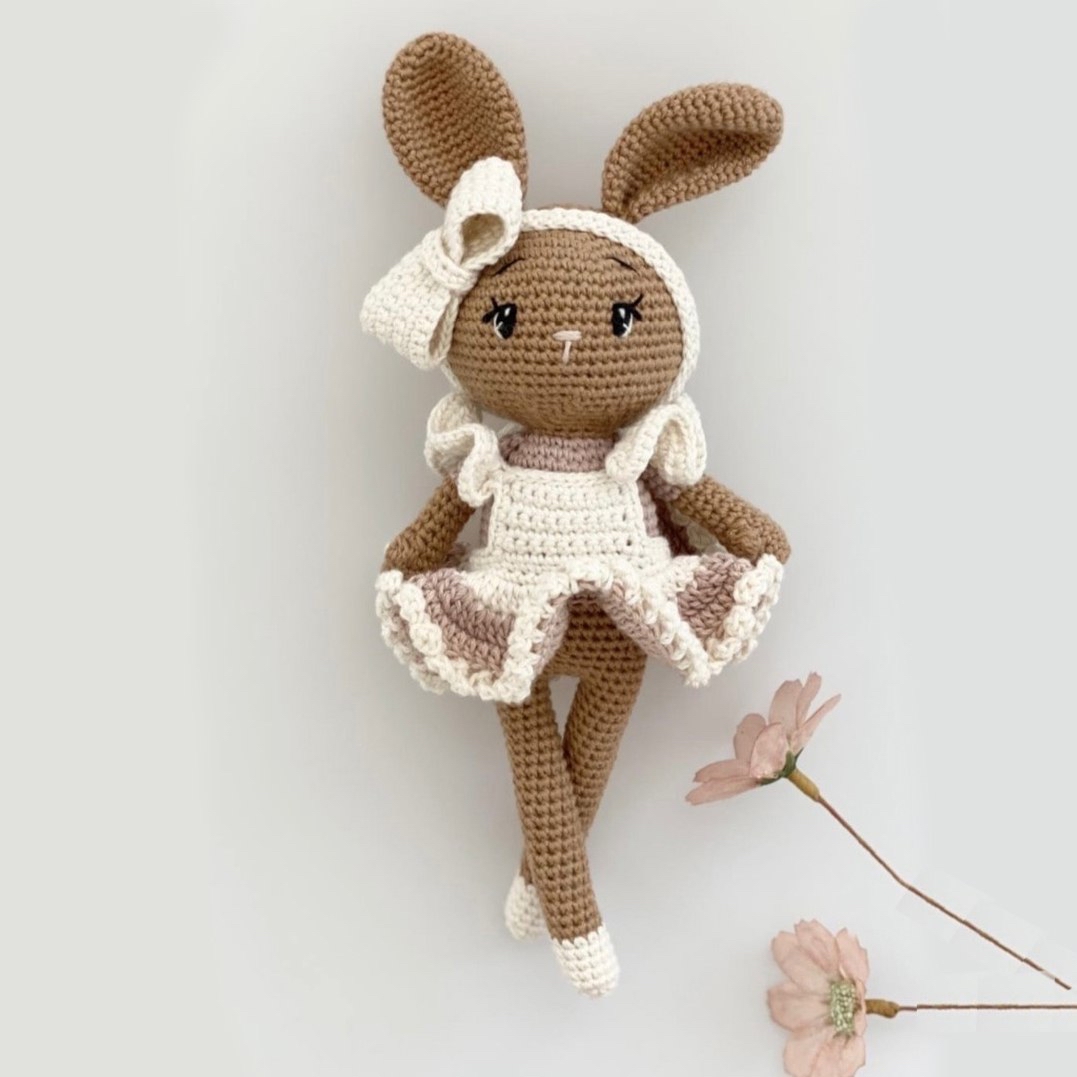
Are you looking for your next heartwarming crochet project? Whether you are looking to create a unique gift for a baby shower or want to add a whimsical character to your own collection of amigurumi, this adorable bunny doll is the perfect project. With her sweet expression, delicate ruffled dress, and charming headband, this little bunny is sure to capture hearts.
This tutorial is designed to be beginner-friendly. While amigurumi requires a bit of focus on tension and stitch counts, the instructions below are broken down into manageable steps. Grab your favorite crochet hook, find a cozy spot, and let’s bring this sweet bunny to life!
Materials & Abbreviations
To ensure your bunny turns out as beautiful as the photos, I recommend using high-quality cotton yarn. Cotton provides great stitch definition, which is essential for amigurumi.
Materials Needed
- Yarn: Cotton yarn (Weight 4 / DK weight recommended). You will need the following colors:
- Beige (approx. 1 ball)
- Natural White (approx. 1/2 ball)
- Dusty Rose (approx. 1/4 ball)
- Powder Pink (a small amount)
- Crochet Hook: 2.5 mm (US size C/2 or similar)
- Safety Eyes: 8 mm or 9 mm
- Stuffing: Polyfill or similar fiberfill
- Tools: Tapestry needle, scissors, stitch markers, and sewing pins
- Embroidery Thread: Black and white thread for the facial details
Abbreviations (US Terms)
- MR: Magic Ring
- sc: Single crochet
- inc: Increase
- dec: Decrease
- dc: Double crochet
- hdc: Half double crochet
- sl st: Slip stitch
- ch: Chain
- BLO: Back loops only
- FLO: Front loops only
- st(s): Stitch(es)
- inc hdc: Increase using half double crochet
- Puff Stitch: A 5-dc puff stitch (bobble)
Note: The number in parentheses at the end of a round indicates the total number of stitches in that round.
Step-by-Step Instructions
Head and Torso
We will work the head and body as one continuous piece. Start with Beige yarn.
Round 1: 6 sc in MR (6)
Round 2: 6 inc (12)
Round 3: (1 sc, 1 inc) x 6 (18)
Round 4: (2 sc, 1 inc) x 6 (24)
Round 5: (3 sc, 1 inc) x 6 (30)
Round 6: (4 sc, 1 inc) x 6 (36)
Round 7: (5 sc, 1 inc) x 6 (42)
Round 8: (6 sc, 1 inc) x 6 (48)
Round 9: (7 sc, 1 inc) x 6 (54)
Round 10: (8 sc, 1 inc) x 6 (60)
Rounds 11-20: 60 sc (60)
Round 21: (3 sc, 1 dec) x 12 (48)
Round 22: (2 sc, 1 dec) x 12 (36)
Round 23: (4 sc, 1 dec) x 6 (30)
Round 24: (3 sc, 1 dec) x 6 (24)
Round 25: (2 sc, 1 dec) x 6 (18)
Rounds 26-27: 18 sc (18)
Color Change: On the last stitch of Round 27, change to Dusty Rose yarn. If your stitch marker is not centered at the back of the body, adjust it by adding or removing a few stitches so your rounds stay even. Firmly stuff the head with fiberfill.
Note on Eyes: If using safety eyes, place them between rounds 15 and 16, roughly 8-9 stitches apart. If you prefer to embroider the eyes, do so now.
Continuing the Body:
Round 28: (2 sc, 1 inc) x 6 (24)
Round 29: (3 sc, 1 inc) x 6 (30)
Rounds 30-31: 30 sc (30)
Round 32: (4 sc, 1 inc) x 6 (36)
Rounds 33-40: 36 sc (36). Change to Beige yarn on the last stitch of Round 40.
Round 41: 36 sc in BLO (36)
Rounds 42-44: 36 sc (36)
Round 45: (4 sc, 1 dec) x 6 (30)
Rounds 46-48: 30 sc (30)
Stuff the body firmly.
Legs (Make 2)
Before starting, mark 3 stitches in the center of the front of the body and 3 stitches in the center of the back. This helps you anchor the legs so they are centered with the head.
Leg 1: Using Beige yarn, join to the body at the marked location. Work a total of 12 sc around the leg, ensuring you connect the front and back to form a tube (work in a clockwise direction).
Rounds 50-70: 12 sc (12)
Note: Add a few extra sc at the end of Round 70 to ensure you finish at the back of the leg.
Color Change: Change to Natural White on the last stitch of Round 70.
Rounds 71-75: 12 sc (12)
Round 76: 6 dec (6). Fasten off, leaving a long tail to sew the opening closed.
Leg 2: Repeat the same process, joining the beige yarn to the inner side of the body to start the second leg.
Ears (Make 2)
Do not stuff the ears. Use Beige yarn.
Round 1: 6 sc in MR (6)
Round 2: 6 inc (12)
Round 3: (3 sc, 1 inc) x 3 (15)
Round 4: (4 sc, 1 inc) x 3 (18)
Round 5: (5 sc, 1 inc) x 3 (21)
Round 6: (6 sc, 1 inc) x 3 (24)
Rounds 7-12: 24 sc (24)
Round 13: (1 dec, 10 sc) x 2 (22)
Round 14: 22 sc (22)
Round 15: (1 dec, 9 sc) x 2 (20)
Round 16: 20 sc (20)
Round 17: (1 dec, 8 sc) x 2 (18)
Round 18: 18 sc (18)
Round 19: (1 dec, 7 sc) x 2 (16)
Round 20: 16 sc (16)
Make 2 additional sc, leave a long tail for sewing, and cut the yarn. Fold the ear in half lengthwise and sew the bottom edge closed. Attach the ears to the head between rounds 4 and 5.
Arms (Make 2)
Stuff lightly as you go. Use Beige yarn.
Round 1: 6 sc in MR (6)
Round 2: (1 inc, 1 sc) x 3 (9)
Round 3: 1 inc, 4 sc, 1 inc, 3 sc (11)
Rounds 4-5: 11 sc (11)
Round 6: 5 sc, 1 Puff Stitch (5 dc in one stitch), 5 sc (11)
Round 7: 4 sc, 2 dec, 3 sc (9)
Rounds 8-12: 9 sc (9). Change to Dusty Rose on the last stitch of Round 12.
Note for Right Arm: To hide the color change, work 2-4 extra stitches before switching colors.
Rounds 13-18: 9 sc (9). Fasten off, leaving a long tail. Sew the arms to the body at Round 28, ensuring the “thumb” (puff stitch) faces forward.
Headband and Bow
Use Natural White yarn.
The Bow: Worked in rows.
Foundation: Ch 34.
Row 1: Skip first ch, 33 sc, 1 ch, turn (33)
Rows 2-6: 33 sc, 1 ch, turn (33)
Row 7: 33 sc (33). Fasten off, leaving a long tail. Use the tail to sew the two ends of the bow together to form a loop. Wrap yarn around the middle to pinch the bow shape and tie off.
Bow Center: Ch 14. Turn, skip first ch, 13 sc (13). Fasten off. Wrap this strip around the center of your bow and sew it in place.
The Headband: Ch 54. Skip first ch, 53 hdc (53). Adjust the size to fit the head before fastening off. Sew the headband around the head, securing it behind the ears and attaching it to the neck.
The Dress and Apron
The Dress: Use Natural White yarn.
Foundation: Ch 40, join with a sl st to the first ch to form a ring.
Rounds 1-2: 40 sc (40)
Round 3: 3 ch, 1 dc in same st, inc hdc in each st to end. Change to Dusty Rose on the last stitch. (80)
Round 4: 3 ch, (inc hdc, 1 dc) x 40. Change to Powder Pink on the last stitch.
Round 5: 3 ch, dc in every stitch (120). Change to Natural White on the last stitch.
Round 6: 3 ch, dc in same st, skip 1 st, sl st in next st. Repeat around.
The Apron: Worked in rows using Natural White yarn.
Body: Rows 1-7: 10 sc (worked on the middle 10 stitches of Round 1 of the dress).
Ruffled Straps: Ch 16, starting in 2nd ch from hook, 15 inc hdc (30), 2 ch, turn. Inc hdc in every stitch (60), 1 ch, turn. 60 sc. Repeat for the second strap and sew to the apron and dress.
Finishing & Facial Details
The face brings the bunny to life! Use black and white embroidery thread.
Eyes: Mark the position between rounds 14-16. Embroider the black eye shape, leaving about 8 stitches between them. Add a small white highlight for a “sparkle” effect.
Brows: Embroider small angled lines between rounds 9-11.
Nose: Use the Powder Pink yarn to embroider a small nose between rounds 16-18.
Tips for Success
- Tension is Key: For amigurumi, keep your stitches tight so that the stuffing doesn’t peek through the holes.
- Use Stitch Markers: It is very easy to lose track of your place when working in continuous rounds. Always use a marker at the start of your round.
- Color Changes: To get a clean color change, always change the yarn on the very last stitch of the previous round.
- Assembly: Use sewing pins to position the ears, arms, and legs before you permanently sew them on. This allows you to check the symmetry.