How to Crochet an Enchanting Ice Queen Amigurumi Doll: A Step-by-Step Tutorial
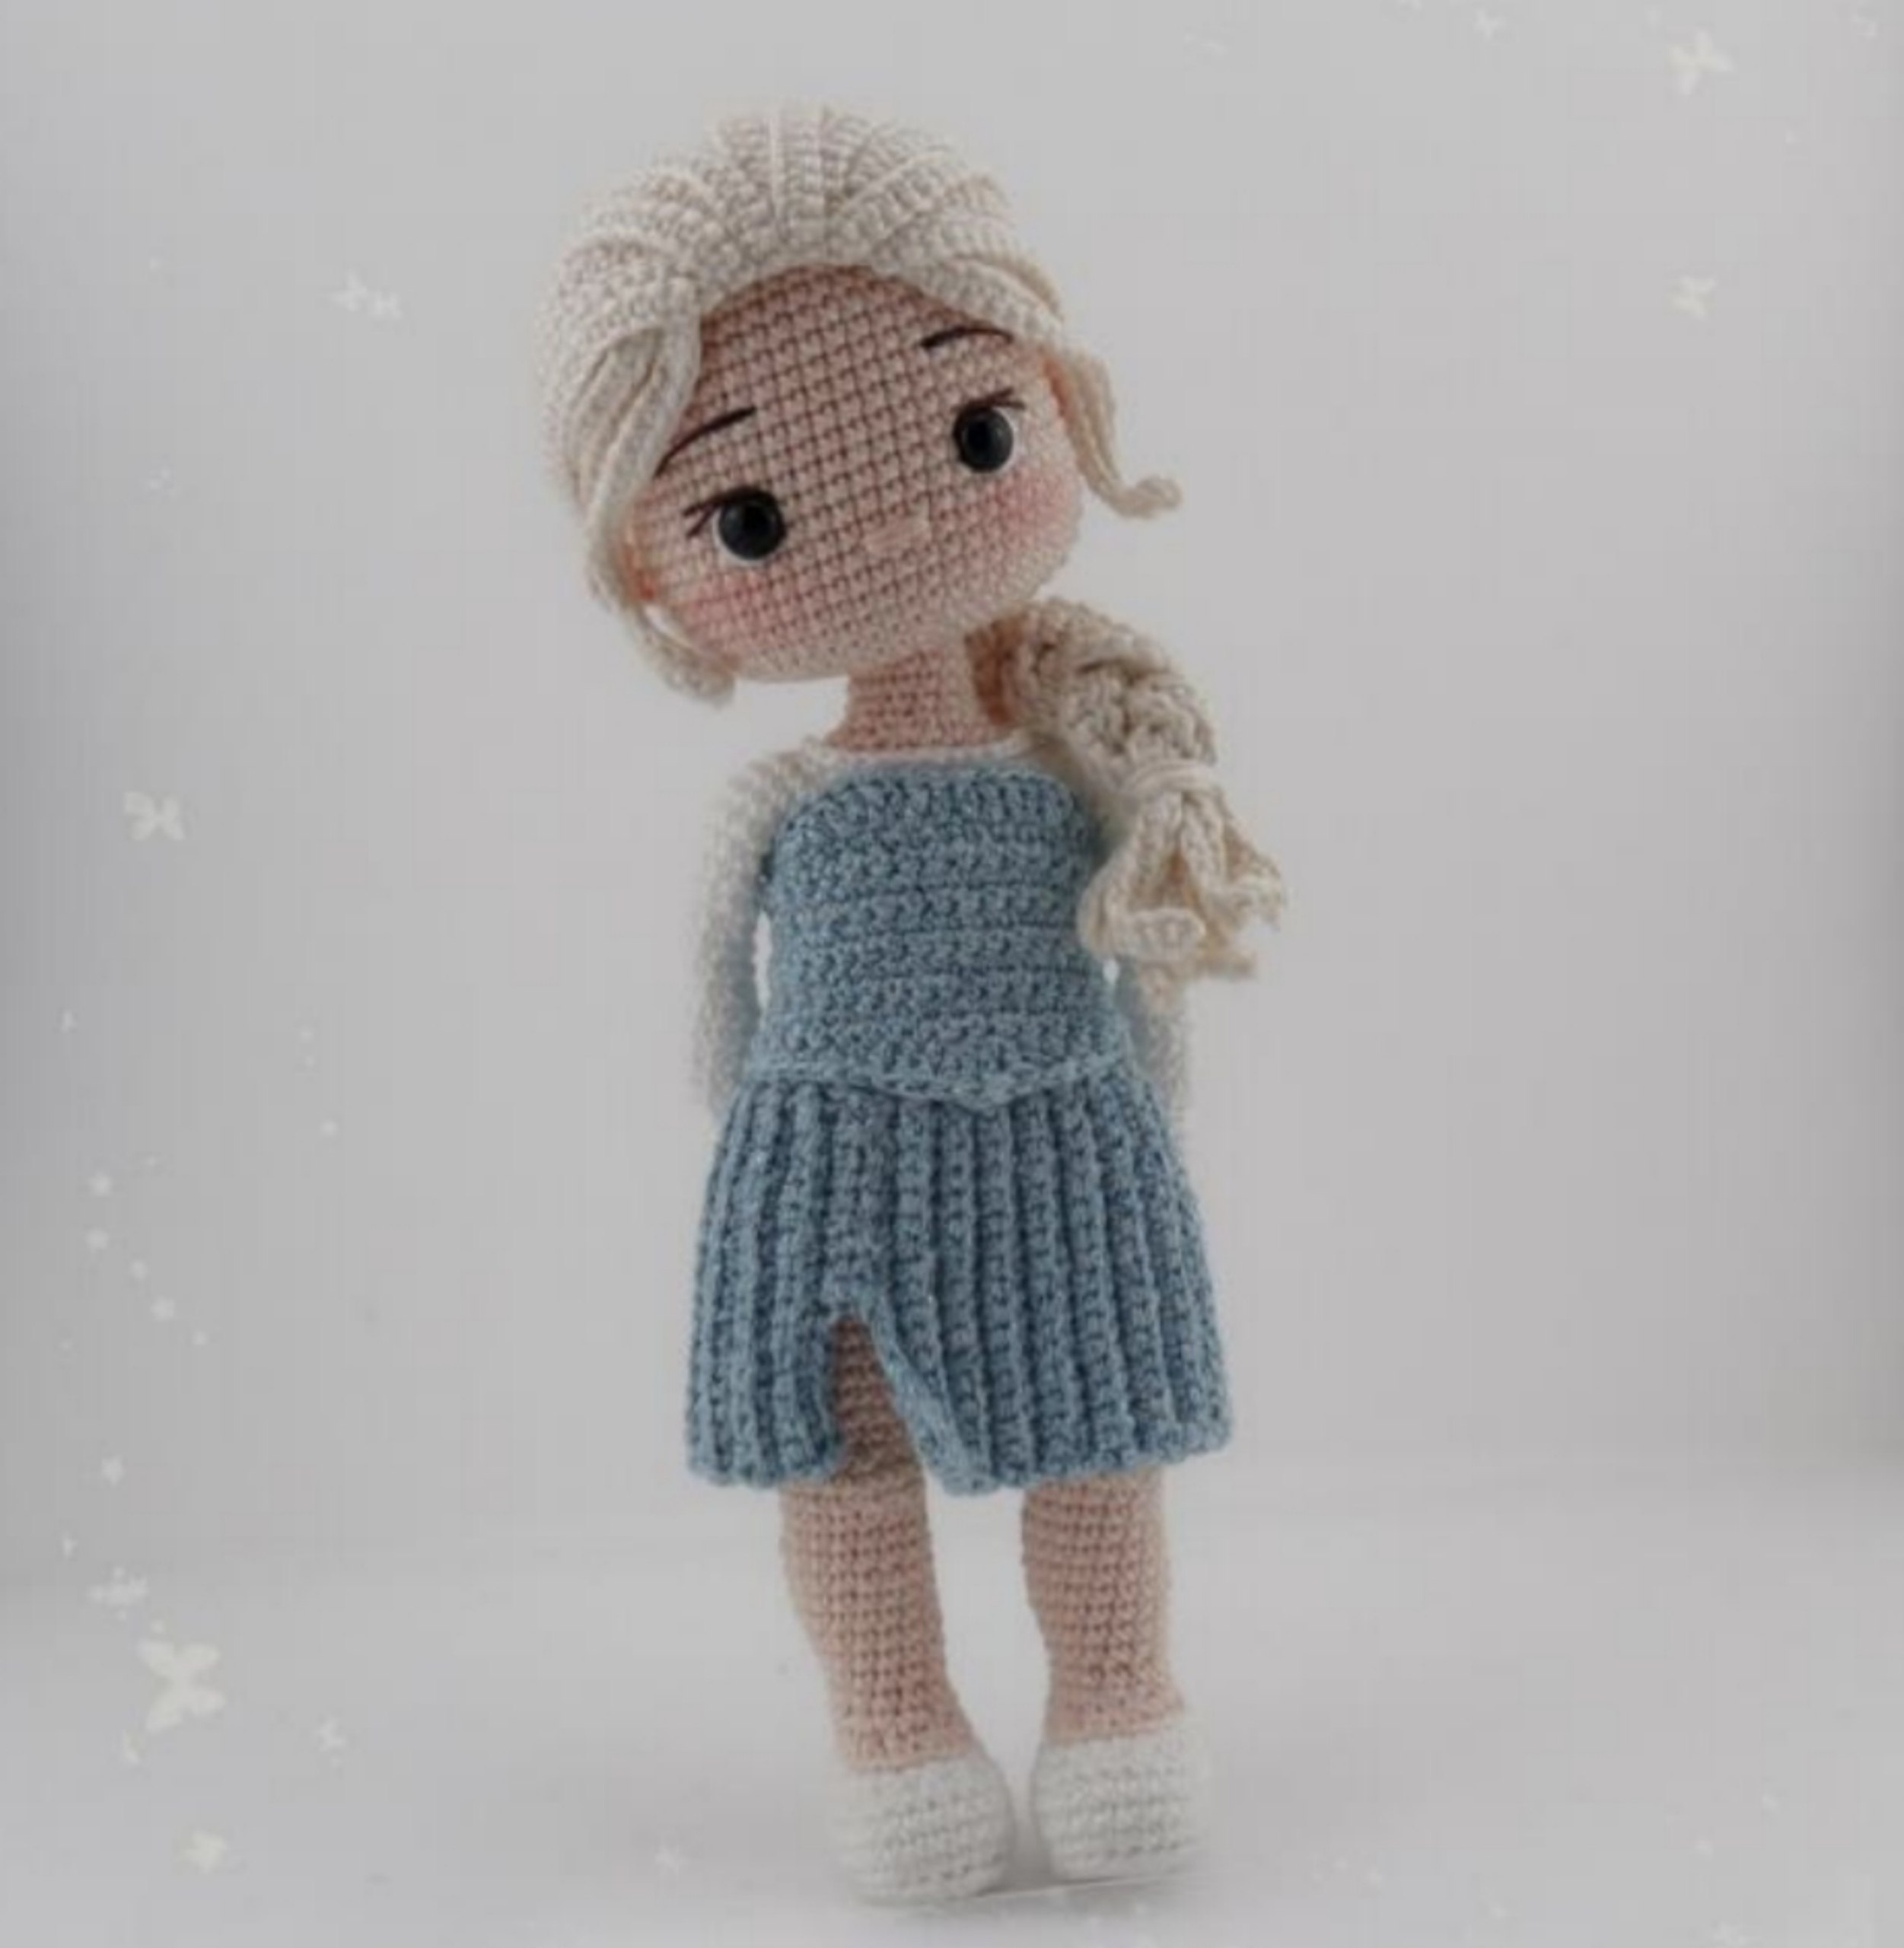
If you are looking for the perfect project to capture the magic of a winter wonderland, you have come to the right place! This enchanting amigurumi doll, inspired by a beloved ice queen, is a stunning piece of crochet art. Whether you are making this as a gift for a little one or as a beautiful decorative piece for your own shelf, this doll is sure to impress.
In this detailed tutorial, I will walk you through the entire process of creating this doll from scratch. We will cover everything from the tiny little arms to the flowing, braided hair. While this pattern is detailed, I have written it with a beginner-friendly voice in mind, so don’t be intimidated by the technical terms. Grab your favorite hook, find a cozy spot, and let’s bring this magical character to life!
Materials & Abbreviations
To ensure your doll turns out looking professional and sturdy, I recommend using high-quality cotton yarn. Cotton provides excellent stitch definition, which is crucial for the detailed features of an amigurumi doll.
Materials Needed
- Yarn: Cotton yarn (such as Scheepjes Catania) in Beige, White, Milk/Cream, and a shimmering Light Blue.
- Crochet Hook: 2.00mm (approximately 0.08 inches)
- Eyes: 9mm (approximately 3/8 inch) safety eyes
- Stuffing: Polyester fiberfill
- Wire: 2mm thin craft wire (for poseability)
- Tools: Tapestry needle, scissors, glue, and a stitch marker
US Crochet Abbreviations
- MR: Magic Ring
- ch: Chain
- sl st: Slip stitch
- sc: Single crochet
- hdc: Half double crochet
- dc: Double crochet
- tr: Treble crochet
- inc: Increase (2 sc in the same stitch)
- dec: Decrease (sc 2 together)
- BLO: Back Loop Only
- FLO: Front Loop Only
- st(s): Stitch(es)
Step-by-Step Instructions
The Blue Bodice (Top)
Start with your shimmering light blue yarn. We will be working in rows rather than rounds for this piece to create the structure of the top.
Round 1: Ch 3. Starting in the 2nd ch from the hook, work 32 sc in BLO. Ch 1, turn.
Rounds 2-4: 32 sc, ch 1, turn.
Round 5: 1 sc, 4 sc, inc, 4 sc, inc, 10 sc, inc, 4 sc, inc, 5 sc, ch 1, turn.
Rounds 6-8: 36 sc, ch 1, turn.
Round 9: 1 sc, 7 sc, inc, 18 sc, inc, 8 sc, ch 1, turn.
Round 10: 38 sc, ch 1, turn.
Round 11: 1 sc, 13 sc, 2 hdc, 2 dc, in the next stitch work (dc, tr, tr, dc), in the next stitch work (tr, tr, dc, dc), 2 hdc, 14 sc. (Total 40 stitches).
Top Edge: Using your blue yarn, work 1 ch, 1 sc, 9 sc, 1 hdc, 1 dc, 2 inc from the dc, 1 dc, 2 hdc, 1 dc, 2 inc from the dc, 1 dc, 1 hdc, 10 sc. (Total 36 stitches).
The Blue Skirt
We will now create the textured skirt. This part uses a mix of BLO and FLO to create a pleated effect.
Round 1: Ch 37. Starting in the 2nd ch from the hook, work 36 sc. Sl st to join in a ring.
Round 2: Ch 17. Starting in the 2nd ch from hook, sc in BLO until the end. Skip 1 st, sl st, ch 1, turn. (Total 18 stitches).
Round 3: BLO 16 sc, sl st, ch 1, turn. (Total 16 stitches).
Rounds 4-6: Repeat Round 3.
Round 7: BLO 1 sc, 15 sc, skip 1 st, sl st, ch 1, turn.
Rounds 8-12: Repeat Round 3.
Round 13: BLO 1 sc, 15 sc, skip 1 st, sl st, ch 1, turn.
Rounds 14-22: Repeat Round 3.
Round 23: BLO 1 sc, 15 sc, skip 1 st, sl st, ch 1, turn.
Rounds 24-32: Repeat Round 3.
Round 33: BLO 1 sc, 15 sc, skip 1 st, sl st, ch 1, turn.
Rounds 34-42: Repeat Round 3.
Round 43: BLO 1 sc, 15 sc, skip 1 st, sl st, ch 1, turn.
Rounds 44-48: Repeat Round 3.
Round 49: BLO 1 sc, 15 sc, skip 1 st, sl st, ch 1, turn.
Rounds 50-54: Repeat Round 3.
Round 55: BLO 1 sc, 15 sc, skip 1 st, sl st, ch 1, turn.
Round 56: BLO 1 sc, 7 sc, sl st. Leave a long tail for sewing.
The Arms (Make 2)
Start with beige yarn using a 2mm hook.
Round 1: 6 sc in MR.
Round 2: (1 sc, inc) x 3.
Round 3: 9 sc.
Round 4: (2 sc, inc) x 3.
Round 5: 3 dc in one stitch (shared peak), then 11 sc.
Round 6: (dec, 2 sc) x 3.
Round 7: 1 sc, (dec, 2 sc) x 2.
Switch to white yarn at Round 8.
Round 8: 7 sc.
Round 9: BLO inc, 3 sc, inc, 2 sc.
Round 10: 4 sc, inc, 4 sc.
Rounds 11-12: 10 sc.
Round 13: 4 sc, dec, 4 sc.
Round 14: 9 sc.
Round 15: dec, 3 sc, dec, 2 sc.
Round 16: 4 sc, inc, 2 sc.
Round 17: 1 sc, inc, 6 sc.
Round 18: 4 sc, inc, 4 sc.
Round 19: 1 sc, inc, 8 sc.
Rounds 20-23: 11 sc.
For the Left Arm: Round 24 is 8 sc.
For the Right Arm: Round 24 is 3 sc. Join white yarn at Round 8, ch 1, 7 sl st. Do not stuff the arms.
The Legs (Make 2)
Start with white yarn.
Round 1: Ch 8. Starting in 2nd ch from hook, 5 sc, 3 sc in the last stitch, 5 sc, inc. (Total 15 stitches).
Round 2: inc, 5 sc, 3 dec, 5 sc, 2 inc.
Round 3: 1 sc, inc, 6 sc, 5 inc, 5 sc, (1 sc, inc) x 2.
Round 4: BLO 30 sc.
Rounds 5-7: 30 sc.
Round 8: 7 sc, 8 dec, 6 sc, sl st, ch 1. Switch to beige yarn.
Round 9: BLO 22 sc.
Round 10: BLO 7 sc, 4 dec, 7 sc.
Round 11: 5 sc, 4 dec, 5 sc.
Round 12: 14 sc.
Round 13: inc, 13 sc.
Round 14: 2 sc, inc, 11 sc, inc.
Round 15: 17 sc.
Round 16: 3 sc, inc, 11 sc, inc, 1 sc.
Rounds 17-19: 19 sc.
Round 20: 3 sc, dec, 11 sc, dec, 1 sc.
Round 21: 17 sc.
Round 22: 1 sc, dec, 6 sc, 3 inc, 5 sc.
Round 23: 19 sc.
Round 24: inc, 1 sc, inc, 5 sc, 1 dec, 5 sc.
Round 25: 18 sc.
Rounds 26: (inc, 5 sc) x 3.
Rounds 27-30: 21 sc.
Round 31: 21 sc. Leave tail for sewing.
For the Left Leg: Round 32 is 11 sc. Leave tail for sewing.
The Body
Using beige yarn, we will join the legs to form the body.
Round 1: Ch 3. Starting in 2nd ch from hook, work 21 sc along the left leg, 3 sc in the ch, 21 sc along the right leg, 2 sc, sl st to join. (Total 48 stitches). Place a stitch marker.
Rounds 2-6: 48 sc.
Round 7: 5 sc, dec, (10 sc, dec) x 3, 5 sc.
Round 8: 44 sc.
Round 9: (dec, 9 sc) x 4.
Round 10: 4 sc, dec, (8 sc, dec) x 3, 4 sc.
Now, join the blue skirt to the bottom of the body.
Round 11: (Skirt + Body) 36 sc.
Rounds 12-13: 36 sc.
Round 14: (dec, 7 sc) x 4.
Rounds 15-20: 32 sc.
In the next round, we will attach the arms.
Round 21: 8 sc on body, 3 sc through both arm and body, 13 sc on body, 3 sc through both arm and body, 5 sc on body.
Round 22: 8 sc on body, 8 sc on arm, 13 sc on body, 8 sc on arm, 5 sc on body.
Round 23: 42 sc.
Round 24: 7 sc, dec, (1 sc, dec) x 3, 10 sc, dec, (1 sc, dec) x 3, 3 sc. Switch to white yarn.
Rounds 25-40: Work various sc and dec rounds to taper the neck. (Refer to full pattern for specific dec counts). At the very end, finish with 1 ch, 34 sl st around the opening.
The Head
Using beige yarn.
Round 1: 9 sc in MR.
Round 2: 9 inc.
Rounds 3-12: 18 sc.
Round 13: 18 inc.
Round 14: (5 sc, inc) x 6.
Round 15: 3 sc, inc, (6 sc, inc) x 5, 3 sc.
Round 16: (7 sc, inc) x 6.
At this stage, you can insert the neck cavity into the head.
Rounds 17-22: 54 sc.
Round 23: 13 sc, dc, 8 sc, ch 1, skip 1 st, 9 sc, ch 1, skip 1 st, 7 sc, dc, 13 sc.
Round 24: 22 sc, sc under ch, 9 sc, sc under ch, 21 sc.
Rounds 25-30: 54 sc.
Final Rounds: Continue decreasing to close the head. (Refer to full pattern for dec sequence). Stuff the head firmly.
The Hair
Use milk/cream yarn. This is a multi-strand process to create a voluminous look.
The Cap: Start with 6 sc in MR. Work rounds of increases (Round 2: 6 inc, Round 3: BLO (1 sc, inc)x6, etc.) until you reach 54 stitches at Round 10. Continue working 54 sc until Round 17.
The Strands: You will create 17 individual strands (S1 through S17). Each strand is made by chaining a specific length and working sc back down the chain. For example, S1 might be a 26 ch, while S10 might be a 71 ch. Join each strand to the base of the cap using a sl st.
Finishing
Assembly & Face Details
Once all pieces are crocheted, it is time for the magic to happen!
- Eyes: Insert the 9mm safety eyes between rounds 20 and 21 of the head. Use black thread to embroider delicate eyelashes and eyelid lines. Add a tiny white stitch to each eye for a “glint” to make them look alive.
- Nose: Embroider a small nose about 3 stitches wide between rounds 20 and 21.
- Connecting Head to Body: Use a long, sharp needle and two 20-inch pieces of yarn. Thread them through the neck of the body and up through the top of the head. Pull firmly to secure the head and knot the ends inside.
- Hair Styling: Place the hair cap on the doll. Arrange the strands so that strands 1-10 are in the front, and strands 5 and 6 are in the center. Use pins to hold the hair in place while you braid it into a side ponytail. Once you are happy with the look, sew or glue the strands securely.
Tips for Success
Use Stitch Markers: When working in continuous rounds (amigurumi style), it is very easy to lose your place. Always use a marker at the start of your round.
Tension is Key: Aim for tight, even stitches. This prevents the stuffing from peeking through the holes in your work.
Poseability: If you want your doll to be able to sit up or hold poses, insert a piece of craft wire through the center of the body and legs before you finish stuffing.
The Hair Braid: To get a perfect braid, use bobby pins or sewing pins to hold the hair strands in position while you work. Once the braid is finished, you can remove the pins and the hair will stay in place!
Happy crocheting! You’ve just created a beautiful, handcrafted piece of magic.