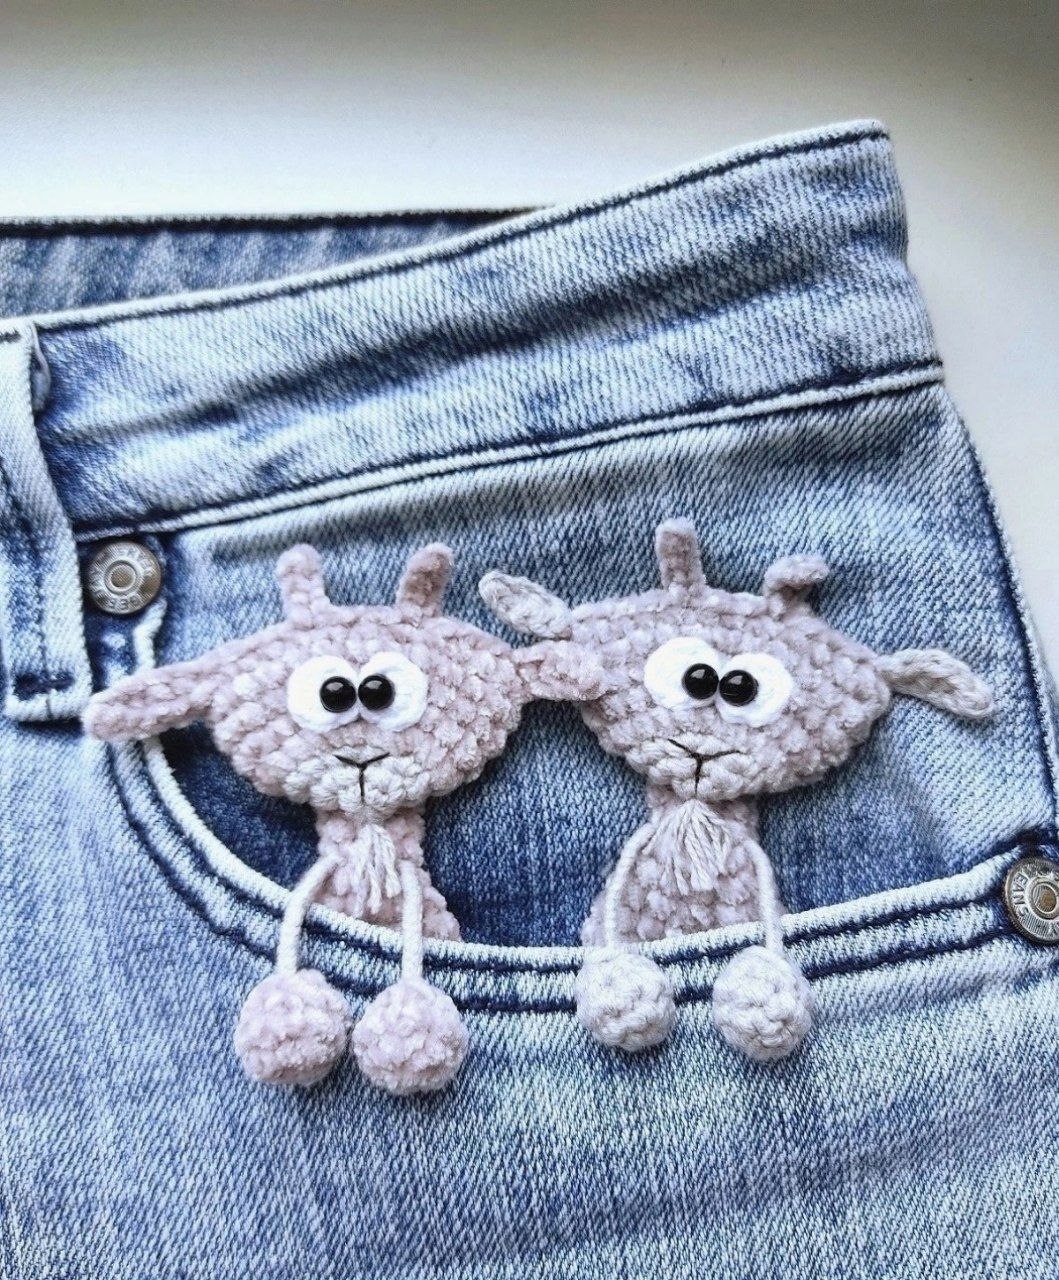
How to Crochet a Cute Amigurumi Pocket Goat: A Beginner-Friendly Pattern
Are you looking for a quick, adorable, and portable crochet project? There is nothing quite as charming as a tiny amigurumi friend that can sit on your desk, hang from a keychain, or peek out of a pocket. This miniature crochet goat is the perfect project for both beginners and seasoned makers. Because it is worked in small pieces, it is a great way to practice your tension and shaping without committing to a massive project.
In this tutorial, we will walk you through the process of creating your very own “Pocket Goat.” This little guy features soft, velvety textures and a whimsical design that makes it an instant favorite for kids and adults alike. Whether you are making one for yourself or crafting a batch to sell at a local craft fair, this pattern is designed to be simple, fun, and highly rewarding.
Materials & Abbreviations
To ensure your goat turns out as cute as the photos, I recommend using soft, high-quality yarns. While you can certainly experiment with different colors, the texture plays a huge role in the “cuddly” feel of this toy.
What You Will Need:
- Main Body Yarn: A soft micro-velvet or chenille-style yarn (approx. 2mm weight). You will be working with two strands held together to create a plush, thick texture.
- Accent Yarn: A cotton or acrylic blend (such as a DK or Sport weight yarn) in a contrasting color for the face, paws, and beard.
- Eye Yarn: A small amount of white yarn (baby weight works best) for the eyes.
- Safety Eyes: 5mm safety eyes or small black beads.
- Crochet Hook: A 2.5mm (B) hook is recommended to keep the stitches tight, especially when working with velvet yarn.
- Embroidery Floss: Black floss for the nose.
- Other Tools: A tapestry needle, scissors, and fiberfill stuffing.
Abbreviations (US Terms):
- MR: Magic Ring
- ch: Chain
- sc: Single crochet
- inc: Increase (2 sc in the same stitch)
- dec: Decrease (sc 2 stitches together)
- hdc: Half double crochet
- sl st: Slip stitch
- st(s): Stitch(es)
Step-by-Step Instructions
Note: For the body, remember to hold two strands of your micro-velvet yarn together as you crochet.
The Body
Using the micro-velvet yarn (2 strands held together), start with a Magic Ring and 6 sc. Work in a continuous spiral.
- Round 1: 12 sc (inc in every stitch).
- Round 2: 18 sc (inc in every 2nd stitch).
- Rounds 3-4: 18 sc.
- Round 5: 15 sc (dec in every 5th stitch).
- Round 6: 15 sc.
- Round 7: 12 sc (dec in every 4th stitch).
- Round 8: 12 sc.
- Round 9: 8 sc (dec in every 2nd stitch).
- Rounds 10-11: 8 sc.
Fasten off, leaving a long tail for sewing. Fold the piece in half and sew the sides together through 4 sc to create a hollow shape. Stuff lightly with fiberfill.
The Head
We will start the head using the accent (cotton/acrylic) yarn to create a firmer base, then switch to the velvet yarn for the rest of the head.
- Round 1: 6 sc in a Magic Ring.
- Round 2: 12 sc (inc in every stitch).
- Round 3: 18 sc (inc in every 2nd stitch).
Switch to the micro-velvet yarn now.
- Round 4: 24 sc (inc in every 3rd stitch).
- Rounds 5-6: 24 sc.
Fold the head piece in half. To create the shape, crochet 4 sc across the folded edge. Next, we will create the horns. Chain 5, then working in the opposite direction, work 4 sl st back into the chain. On the main part of the head, crochet 3 more sc. Repeat this process for the second horn. Finally, finish the edge by chaining 5 and working 4 sl st back into the chain to close the shape.
The Ears
Do not cut the yarn after making the first ear; use the same strand to make the second ear.
Chain 6. Working in the opposite direction (starting from the 2nd ch from the hook): 1 sl st, 1 sc, 1 hdc (in the 3rd ch), 1 sc (in the 4th ch), and 1 sl st (in the 5th ch). Fasten off, leaving a tail for sewing. Repeat the entire process for the second ear, moving the yarn to the other side of the head.
The Legs and Hooves
The legs are created using a unique braided method to give them a natural, rustic look.
The Legs: Take 6 strands of your accent yarn, each approximately 5 inches long. Insert them into the body at your desired placement for the top and bottom legs. Braid these strands together. Measure the length for the legs, tie a knot, and trim the excess.
The Hooves: Using the micro-velvet yarn, start with a Magic Ring of 6 sc.
- Round 1: 8 sc (Work: 2 sc, inc, 2 sc, inc).
- Round 2: 8 sc.
- Round 3: 4 sc (dec in every 2nd stitch).
Pro-Tip: For a perfect fit, crochet only 3 sc, slide the hoof onto the braided leg, and then perform the final decrease directly over the leg to secure it. Pull tightly!
The Tail and Face
Tail: Using the main accent yarn, chain 5 and join into a Magic Ring with a sl st. Fasten off.
The Eyes: Using the white yarn, create a small circle (6 sc in a Magic Ring). Attach these white circles to the head and glue your 5mm safety eyes onto the center of the white circles.
The Nose: Using black embroidery floss, stitch a small “Y” shape onto the snout to give your goat its character.
The Beard: Cut one or two pieces of accent yarn to about 1.5 inches. Fold them in half and pull them through the chin area of the head using your hook. Pull the ends through the loop and tie a knot to secure the beard.
Finishing
Now it is time for the most satisfying part: assembly! Use your tapestry needle to sew the head onto the top of the body. Ensure it is centered so your goat looks straight ahead. Double-check that the ears and horns are symmetrical. If you want a more realistic look, you can add a tiny bit of pink shading (toning) to the cheeks or snout using a little bit of makeup or specialized crochet shading powder.
Tips for Success
- Tension Matters: When working with velvet or chenille yarn, it is very easy to accidentally stitch into the “pile” of the yarn rather than the base. Try to keep your hook focused on the core of the yarn to avoid gaps.
- Stuffing: Don’t be afraid to stuff the body firmly, but be careful with the head. You want the head to hold its shape without becoming too heavy for the body.
- Yarn Substitutions: If you don’t have velvet yarn, you can use a standard cotton yarn for the entire project, though the goat will be smaller and less “squishy.”
- Make it a Set: Since this pattern is so quick, try making a few in different colors! A white goat, a brown goat, and a grey goat make for a wonderful gift set.