Amigurumi Elephant Crochet Pattern: A Cute & Easy Keychain Tutorial
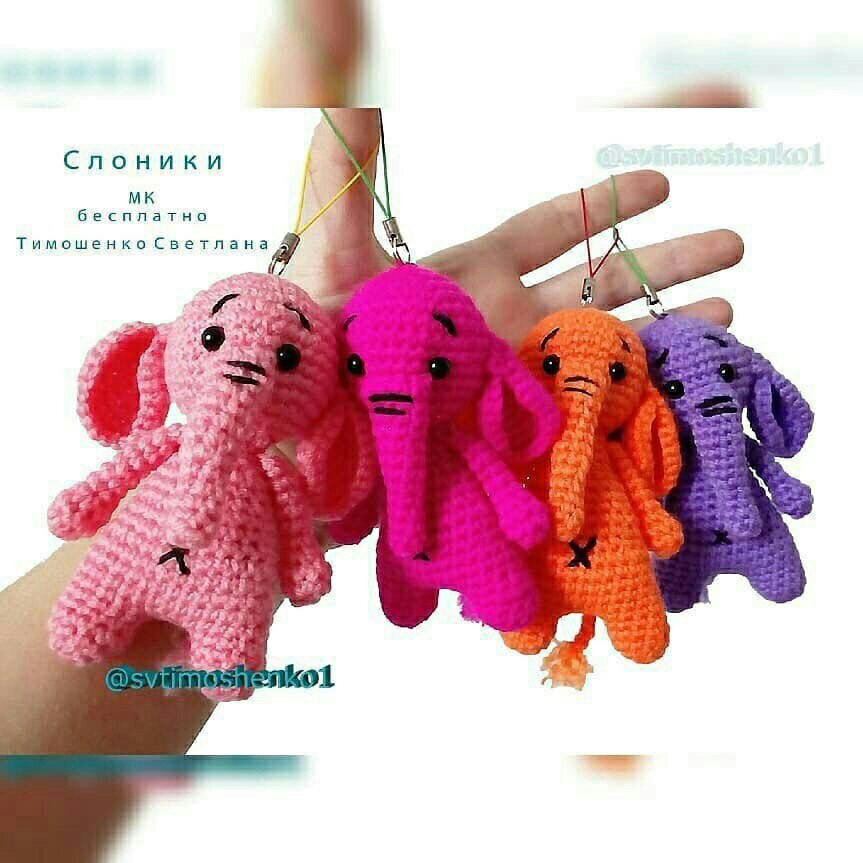
Are you looking for a quick, adorable crochet project that you can whip up in a single afternoon? This tiny amigurumi elephant is the perfect solution! Whether you want to create a charming keychain for your backpack, a cute bag charm, or a small gift for a friend, this little elephant is designed to be both simple and incredibly sweet.
This pattern is beginner-friendly and focuses on fundamental crochet techniques like the magic ring, increasing, and decreasing. Because of its small size, it is an excellent way to practice your tension and amigurumi shaping without committing to a massive project. Let’s dive into how you can make your very own miniature elephant friend!
Materials & Abbreviations
Before you pick up your hook, make sure you have all your supplies ready. Since this is a small project, you won’t need much, but having the right materials will make the process much smoother.
What You’ll Need:
- Yarn: Medium weight (worsted) cotton or acrylic yarn. You can use any color you like—bright pinks, soft blues, or classic grey all look wonderful!
- Crochet Hook: A hook appropriate for your yarn weight (typically 3.5mm or 4.0mm) to ensure your stitches are tight enough to prevent stuffing from showing through.
- Stuffing: Poly-fill or any soft fiberfill.
- Safety Eyes or Black Thread: For the eyes. If you prefer a more “handmade” look, you can simply embroider the eyes with black thread.
- Tapestry Needle: A blunt-tipped needle for sewing the pieces together and embroidering details.
- Scissors: For trimming your yarn.
- Keychain Ring: (Optional) If you want to turn your elephant into a keychain.
Abbreviations (US Terms):
- MR: Magic Ring
- sc: Single crochet
- inc: Increase (2 sc in the same stitch)
- dec: Decrease (sc 2 stitches together)
- ch: Chain
- sl st: Slip stitch
- st(s): Stitch(es)
- BLO: Back loops only
Note: Unless otherwise stated, work in a continuous spiral. Use a stitch marker to keep track of the beginning of each round.
Step-by-Step Instructions
The Head
The head is a simple sphere that provides the base for your elephant’s features. Make sure to stuff this piece quite firmly to maintain its round shape.
- Round 1: 6 sc in a MR (6)
- Round 2: 6 inc (12)
- Round 3: (1 sc, 1 inc) repeat 6 times (18)
- Round 4: (2 sc, 1 inc) repeat 6 times (24)
- Round 5: (3 sc, 1 inc) repeat 6 times (30)
- Round 6: (4 sc, 1 inc) repeat 6 times (36)
- Rounds 7-11: 36 sc (36) — 5 rounds total
- Round 12: (4 sc, 1 dec) repeat 6 times (30)
- Round 13: (3 sc, 1 dec) repeat 6 times (24)
- Round 14: (2 sc, 1 dec) repeat 6 times (18)
- Round 15: (1 sc, 1 dec) repeat 6 times (12)
- Round 16: 6 dec (6)
Stuff the head firmly as you go. Once finished, fasten off, pull the tail through the loop to close, and hide the yarn end inside the head.
The Arms (Make 2)
These tiny limbs are worked as small tubes. You will only stuff the very bottom portion.
- Round 1: 6 sc in a MR (6)
- Round 2: (1 sc, 1 inc) repeat 3 times (9)
- Round 3: 9 sc (9)
- Round 4: (1 sc, 1 dec) repeat 3 times (6)
Stuff the bottom section of the arm lightly. Do not stuff the top. To finish, fold the piece in half so the open ends meet, and work 3 sc through both layers to close the arm. Fasten off and leave a tail for sewing.
The Trunk
The trunk is worked in rows (turning at the end of each row) to give it a more structured, elongated look.
- Round 1: 6 sc in a MR (6)
- Round 2: 6 sc in BLO (Back Loops Only) (6)
- Rounds 3-6: 6 sc (6) — 4 rounds total
Stuff the trunk lightly. Now, we transition to working in rows:
- Round 7: (1 inc, 2 sc) repeat 2 times (8)
- Rounds 8-10: 8 sc (8) — 3 rounds total
- Round 11: (1 inc, 3 sc) repeat 2 times (10)
- Rounds 12-14: 10 sc (10) — 3 rounds total
To finish the rows: Sl st, ch 1, turn. Work 6 sc. Fasten off, leaving a long tail for assembly and for creating the eye indentations later.
The Body and Legs
This piece is unique because the legs and the body are crocheted as one continuous unit. This creates a sturdy, seamless base for your elephant.
- Round 1: 6 sc in a MR (6)
- Round 2: 6 inc (12)
- Rounds 3-5: 12 sc (12) — 3 rounds total
For the first leg: Sl st, then fasten off.
For the second leg: Do NOT fasten off. Continue working immediately.
- Connecting the legs: Ch 3, then join to the first leg with a sl st.
- Round 6: Work 12 sc along the first leg, 3 sc in the chains, 12 sc along the second leg, and 3 sc in the other side of the chains (30)
- Rounds 7-10: 30 sc (30) — 4 rounds total
- Round 11: (3 sc, 1 dec) repeat 6 times (24)
- Rounds 12-13: 24 sc (24) — 2 rounds total
- Round 14: (2 sc, 1 dec) repeat 6 times (18)
- Rounds 15-16: 18 sc (18) — 2 rounds total
- Round 17: (1 sc, 1 dec) repeat 6 times (12)
- Round 18: 12 sc (12)
Stuff the body and legs firmly. Attaching the arms: In Round 19, you will attach the arms. Work 2 sc, then work 3 sc together using both the edge of the arm and the edge of the body (this secures the arm to the side). Work 3 sc, then work 3 sc together with the second arm and the body, and finish with 1 sc (12). Round 20: 12 sc (12). Sl st, fasten off, leaving a long tail to sew the head on.
The Ears (Make 2)
The ears are wide, flat circles that are folded to create their characteristic shape.
- Round 1: 6 sc in a MR (6)
- Round 2: 6 inc (12)
- Round 3: (1 sc, 1 inc) repeat 6 times (18)
- Round 4: (2 sc, 1 inc) repeat 6 times (24)
- Round 5: (3 sc, 1 inc) repeat 6 times (30)
To shape the ear: Fold the circle in half and work 3 sc through both layers at the center fold to close the edge. Fasten off and leave a tail for sewing.
The Tail
- Ch 1, leave a small tail, then ch 5.
- Attach the chain to the bottom of the body with a sl st.
- To give the tail some detail, you can work a series of small stitches or simply leave it as a cute, simple chain tail.
Finishing
Assembly is where your elephant truly comes to life! Follow these steps carefully to get that adorable expression.
Step 1: Attaching the Head and Trunk
Sew the head to the top of the body using the yarn tail you left earlier. Next, position the trunk in the center of the face, between rounds 9 and 10 of the head. Secure it firmly.
Step 2: Creating the Eyes
This pattern uses a clever “eye pull” technique. Thread your needle with a long piece of black yarn. Pass the needle through the head where you want the eyes to be, then bring the thread down through the trunk. Pull the thread slightly to create a small indentation in the head—this makes the eyes look deep and expressive. Repeat this for both eyes. Finally, glue your safety eyes onto these indentations or embroider small black eyes over them.
Step 3: Adding the Ears and Details
Sew the ears to the sides of the head at a slight angle. Pro Tip: To prevent the ears from flopping outward too much, you can secure them with a single small stitch at the base. Finally, use black thread to embroider the eyebrows and a few small lines on the trunk to add character. If you like, you can even embroider a tiny “x” on the belly for extra cuteness!
Tips
- Tension is Key: When making amigurumi, aim for tight, consistent stitches. If your stitches are too loose, the stuffing will peek through, making the elephant look messy.
- Use Stitch Markers: Because amigurumi is worked in continuous rounds, it is incredibly easy to lose your place. Always use a marker!
- Eye Placement: Before sewing anything permanently, use sewing pins to test the placement of the ears, trunk, and eyes. This allows you to adjust the “expression” of your elephant before it’s too late.
- Customization: Don’t feel limited by the colors in the photo. A rainbow elephant or a pastel-colored one can be just as wonderful!