Crochet Little Cat Pattern: An Easy Amigurumi Tutorial for Beginners
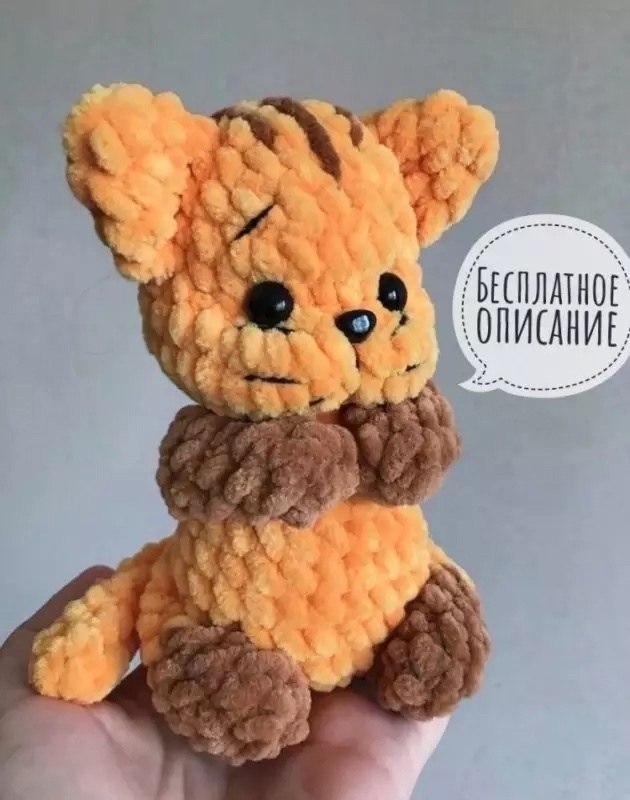
There is nothing quite as heartwarming as a handmade plushie, especially one as adorable and chubby as this little kitty! If you are looking for your next amigurumi project, this “Little Cat” is the perfect choice. With its oversized head, tiny limbs, and incredibly soft texture, this kitty is designed to be a cuddle companion or a charming desk buddy.
This pattern is specifically designed to work beautifully with velvet or chenille-style yarn, which gives the cat that ultra-soft, high-end boutique look. While the construction is straightforward, the result is a professional-looking character that looks much more complicated than it actually is. Whether you are a beginner looking to practice your shaping or an experienced crocheter wanting a quick, relaxing project, this tutorial will guide you through every single stitch.
Materials & Abbreviations
Before we dive into the stitches, let’s make sure you have everything you need on your crochet hook. Because we are working with bulky, plush yarn, your tension will be important to ensure the stuffing doesn’t peek through the stitches.
Materials
- Yarn: Bulky weight chenille or velvet yarn in two colors:
- Main Color (Orange/Peach)
- Secondary Color (Dark Brown)
- Crochet Hook: A 4.0mm (G) or 4.5mm hook, depending on your yarn brand and preferred tension.
- Safety Eyes: Small black safety eyes (approx. 8mm to 10mm).
- Stuffing: High-quality polyester fiberfill.
- Embroidery Thread: Black thread for the nose, whiskers, and facial details.
- Tools: A tapestry needle, scissors, and stitch markers.
Abbreviations (US Terms)
This pattern uses standard US crochet terminology. Please ensure you are using US terms rather than UK terms to avoid mistakes in your stitch counts!
- MR: Magic Ring
- sc: Single Crochet
- inc: Increase (2 sc in the same stitch)
- dec: Decrease (sc 2 together; invisible decrease is highly recommended for amigurumi)
- sl st: Slip Stitch
- st(s): Stitch(es)
Step-by-Step Instructions
The Body and Head (One-Piece Construction)
To make this kitty extra huggable, the head and body are worked as one continuous piece. This creates a seamless, “egg-shaped” look that is characteristic of cute amigurumi.
Using your Main Color, start with a Magic Ring:
- 6 sc in MR (6)
- 6 inc (12)
- (1 sc, inc) repeat 6 times (18)
- (2 sc, inc) repeat 6 times (24)
- 5, 6, 7. 24 sc (3 rounds)
- (10 sc, dec) repeat 2 times (22)
- (3 sc, dec) repeat 4 times, then 2 sc (18)
- 18 sc (10)
- (1 sc, dec) repeat 6 times (12)
- 12 sc (12)
- 12 inc (24)
- 10 sc, then [3 inc, 4 sc] repeat 2 times (30)
- 15, 16. 30 sc (2 rounds)
- 12 sc, 3 dec, 2 sc, 3 dec, 4 sc (24)
- 18, 19. 24 sc (2 rounds)
- (2 sc, dec) repeat 6 times (18)
- 21. 18 sc (21)
- (1 sc, dec) repeat 6 times (12)
- 23. 6 dec, sl st to close the hole. Fasten off, leaving a long tail for assembly.
Important: Face Placement
Before you finish stuffing the body, you must place the features. If you are using safety eyes, insert them between rounds 17 and 18. Space them approximately 4 to 5 stitches apart. The nose should be placed between rounds 16 and 17, centered between the eyes.
The Legs
We will start the legs using the Secondary Color (Brown) to create a cute contrast.
- 6 sc in MR (6)
- (1 sc, inc) repeat 3 times (9)
- 3, 4. 9 sc (2 rounds)
Switch to Main Color (Orange)
- (1 sc, dec) repeat 3 times (6)
- 6, 7, 8. 6 sc (3 rounds)
Do not fasten off. Flatten the leg and sc through both layers (the front and back walls) to close it. Fasten off, leaving a long tail for sewing the legs to the body.
The Arms
Using the Secondary Color (Brown):
- 6 sc in MR (6)
- 2-6. 6 sc (5 rounds)
Flatten the arm and sc through both layers to close. Fasten off, leaving a long tail for sewing.
The Tail
Using the Main Color (Orange):
- 5 sc in MR (5)
- 2-11. 5 sc (10 rounds)
Flatten the tail and sc through both layers to close. Fasten off, leaving a long tail for sewing.
The Ears
Using the Main Color (Orange):
- 4 sc in MR (4)
- 2. 4 inc (8)
- 3. (3 sc, inc) repeat 2 times (10)
- 4. 5 sc, sl st.
Note: Leave the round unworked/unclosed. Fasten off, leaving a long tail. Use your tapestry needle to sew the ear closed through the center, creating a slightly folded, 3D effect. This will make the ears look much more realistic!
Finishing
The assembly phase is where your little kitty truly comes to life! Follow these steps carefully for the best results:
1. Eye Tensioning
If you used safety eyes, use your tapestry needle and a small piece of black yarn to pull the thread through the back of the eye well into the head. This “tensions” the eyes, pulling them slightly into the stuffing and giving the cat a more expressive, soulful look.
2. Embroidery
Using black embroidery thread, carefully stitch the facial details:
- Eyebrows: Two small, slightly curved lines above the eyes.
- Nose Line: A small vertical line or “Y” shape just below the nose area.
- Whiskers: A few delicate horizontal lines on each side of the muzzle.
- Head Stripes: Using your Secondary Color, embroider a few small stripes on the very top of the head to mimic the look of a real kitty.
3. Final Sewing
- Sew the ears to the top of the head, between rounds 2 and 5.
- Sew the arms to the sides of the body, just below the neck area.
- Sew the legs to the bottom of the body to ensure the kitty can sit upright.
- Sew the tail to the back of the body.
Tips for Success
To ensure your crochet kitty turns out as beautiful as the one in the photo, keep these professional tips in mind:
- Use Invisible Decreases: When working on the head and body, standard decreases can leave gaps. Use the “invisible decrease” method (inserting your hook only into the front loops of the next two stitches) to keep your amigurumi looking tight and professional.
- Don’t Under-Stuff: Velvet yarn is very forgiving, but if you don’t use enough stuffing, the kitty might look “lumpy” rather than “chubby.” Stuff firmly, but be careful not to overstuff to the point where the stitches stretch too much.
- Mind Your Tension: Especially with chenille yarn, try to keep your stitches consistent. If your tension is too loose, the stuffing will show through; if it’s too tight, you might struggle to get your hook through the stitches.
- Work in the Dark? Velvet yarn can be notoriously difficult to see because of its sheen. If you find yourself losing count, don’t hesitate to use stitch markers at the beginning of every round!