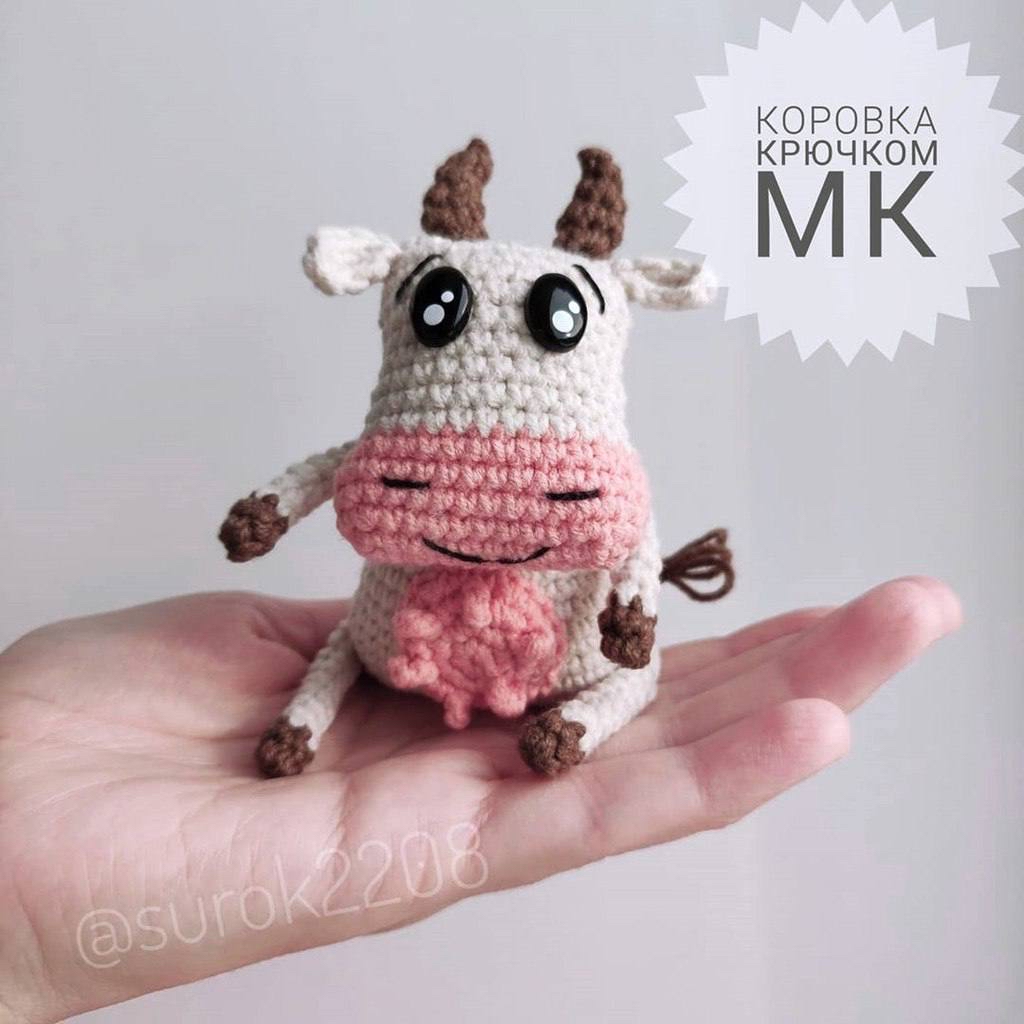
Adorable Amigurumi Cow Crochet Pattern: A Step-by-Step Tutorial
Are you looking for your next cute and cuddly crochet project? This adorable amigurumi cow is the perfect addition to your collection! With its tiny horns, sweet snout, and chunky little body, this little heifer is bound to charm anyone from toddlers to seasoned crochet enthusiasts. Whether you are making a nursery decoration, a gift for a friend, or just want to practice your amigurumi skills, this tutorial will guide you through every single stitch.
This pattern is designed with a beginner-friendly approach, making it a great way to practice color changes and working in the round. By the time you finish, you will have a palm-sized companion that is perfect for displaying on a desk or shelf. Grab your favorite cozy yarn, and let’s get started on making your very own crochet cow!
Materials & Abbreviations
To ensure your cow turns out looking just like the picture, I recommend using a medium-weight (worsted) cotton or acrylic yarn. Cotton is excellent for amigurumi because it has great stitch definition, making it easier to see your increases and decreases.
What You Will Need:
- Yarn: Approximately 50–75 yards of each color:
- Pale Pink (for the snout and udder)
- Milky/Cream (for the main body, head, ears, and legs)
- Brown (for the horns, hooves, and tail)
- Crochet Hook: A 3.5mm (E) or 4.0mm (G) hook, depending on your tension. You want your stitches to be tight so the stuffing doesn’t peek through.
- Safety Eyes: 6mm to 8mm black safety eyes.
- Stuffing: High-quality polyester fiberfill.
- Tools: A yarn needle for sewing, scissors, and stitch markers.
US Crochet Abbreviations:
Please note that all instructions are written using US terminology.
- MR: Magic Ring
- ch: Chain
- sc: Single crochet
- inc: Increase (2 sc in the same stitch)
- dec: Decrease (sc two stitches together)
- tr: Treble crochet
- st(s): Stitch(es)
- ( ) x 6: Repeat the instructions inside the parentheses 6 times.
Step-by-Step Instructions
The Head
We begin the head using the pale pink yarn to create the snout area. Once you reach the specified row, switch to the milky/cream yarn.
Row 1: Start with 11 ch. From the 2nd ch from the hook: inc, 8 sc, 3 sc in one stitch, 7 sc, (inc) x 2 (24 sts total).
Row 2: inc, sc, inc, 6 sc, (inc, sc) x 3, 8 sc, inc (30 sts).
Rows 3–5: sc in each stitch around (3 rows) (30 sts).
*Switch color to milky/cream yarn here.*
Row 6: dec, 13 sc, dec, 13 sc (28 sts).
Row 7: dec, 12 sc, dec, 12 sc (26 sts).
Rows 8–9: sc in each stitch around (2 rows) (26 sts).
Row 10: (dec, 11 sc) x 2 (24 sts).
Rows 11–13: sc in each stitch around (3 rows) (24 sts).
Row 14: (dec, 10 sc) x 2 (22 sts).
Important: Before closing the head, install your safety eyes between rows 10 and 12, stuff the head firmly with fiberfill, and then finish sewing the opening closed.
The Ears (Make 2)
Using milky/cream yarn.
Row 1: 4 ch. From the 2nd ch from the hook: inc, sc, 3 sc in one stitch, sc, inc (9 sts total).
The Body
Using milky/cream yarn.
Row 1: 13 ch. From the 2nd ch from the hook: inc, 10 sc, 3 sc in one stitch, 9 sc, (inc) x 2 (28 sts).
Row 2: inc, sc, inc, 8 sc, (inc, sc) x 3, 9 sc, inc, sc (34 sts).
Rows 3–6: sc in each stitch around (4 rows) (34 sts).
Row 7: (dec, 15 sc) x 2 (32 sts).
Row 8: sc in each stitch around (32 sts).
Row 9: (dec, 14 sc) x 2 (30 sts).
Row 10: sc in each stitch around (30 sts).
Row 11: (dec, 13 sc) x 2 (28 sts).
Row 12: sc in each stitch around (28 sts).
Row 13: (dec, 5 sc) x 4 (24 sts).
Row 14: (dec, 2 sc) x 6 (18 sts).
Rows 15–16: sc in each stitch around (2 rows) (18 sts).
Stuff the body firmly before you finish the final round.
The Hooves (Make 4)
Start with brown yarn, then switch to milky/cream yarn.
Row 1: 5 sc in a Magic Ring (5 sts).
Row 2: sc in each stitch (5 sts).
*Switch color to milky/cream yarn here.*
Rows 3–8: sc in each stitch around (6 rows) (5 sts).
The Horns (Make 2)
Using brown yarn.
Row 1: 6 sc in a Magic Ring (6 sts).
Row 2: sc in each stitch (6 sts).
Row 3: dec, 4 sc (5 sts).
Row 4: dec, 3 sc (4 sts).
Row 5: dec, 2 sc (3 sts).
Row 6: dec (2 sts).
Fasten off, leaving a long tail for sewing. Hide the yarn tail inside the horn.
The Tail
Using milky/cream yarn.
Row 1: 4 sc in a Magic Ring (4 sts).
Rows 2–8: sc in each stitch around (7 rows) (4 sts).
The Udder
Using pale pink yarn.
Row 1: 6 sc in a Magic Ring (6 sts).
Row 2: (inc) x 6 (12 sts).
Row 3: (tr, inc, sc) x 6 (18 sts).
Row 4: (inc, 2 sc) x 6 (24 sts).
Finishing
Now comes the fun part—bringing your cow to life! Use your yarn needle and the remaining tails to sew the pieces together in this order:
- Head to Body: Sew the head onto the top of the body. Ensure it is centered and facing forward.
- Ears: Sew the ears to the sides of the head, near the top.
- Horns: Sew the horns to the very top of the head.
- Hooves: Sew the four hooves to the bottom of the body.
- Tail: Attach the tail to the back of the body.
- Udder: Sew the pink udder to the belly area between the legs.
Tips for Success
To make your amigurumi look professional and polished, keep these tips in mind:
- Tension is Key: Try to maintain consistent tension. If your stitches are too loose, the stuffing will show. If they are too tight, the piece might become distorted.
- Use Stitch Markers: Amigurumi is worked in continuous spirals. It is very easy to lose your place! Always use a stitch marker to identify the first stitch of every round.
- The Magic Ring: If you are new to amigurumi, practicing the Magic Ring (MR) is essential. It allows you to pull your starting circle tight so there is no hole in the center of your work.
- Stuffing Technique: When stuffing, push the fiberfill into the corners and crevices. Don’t just dump it in the middle; you want the shape to be even and smooth.
- Color Changes: When changing colors, perform the last stitch of the old color and the first stitch of the new color in the same loop to ensure a seamless transition.