Crochet Amigurumi Raccoon Pattern: A Cute & Cuddly DIY Tutorial
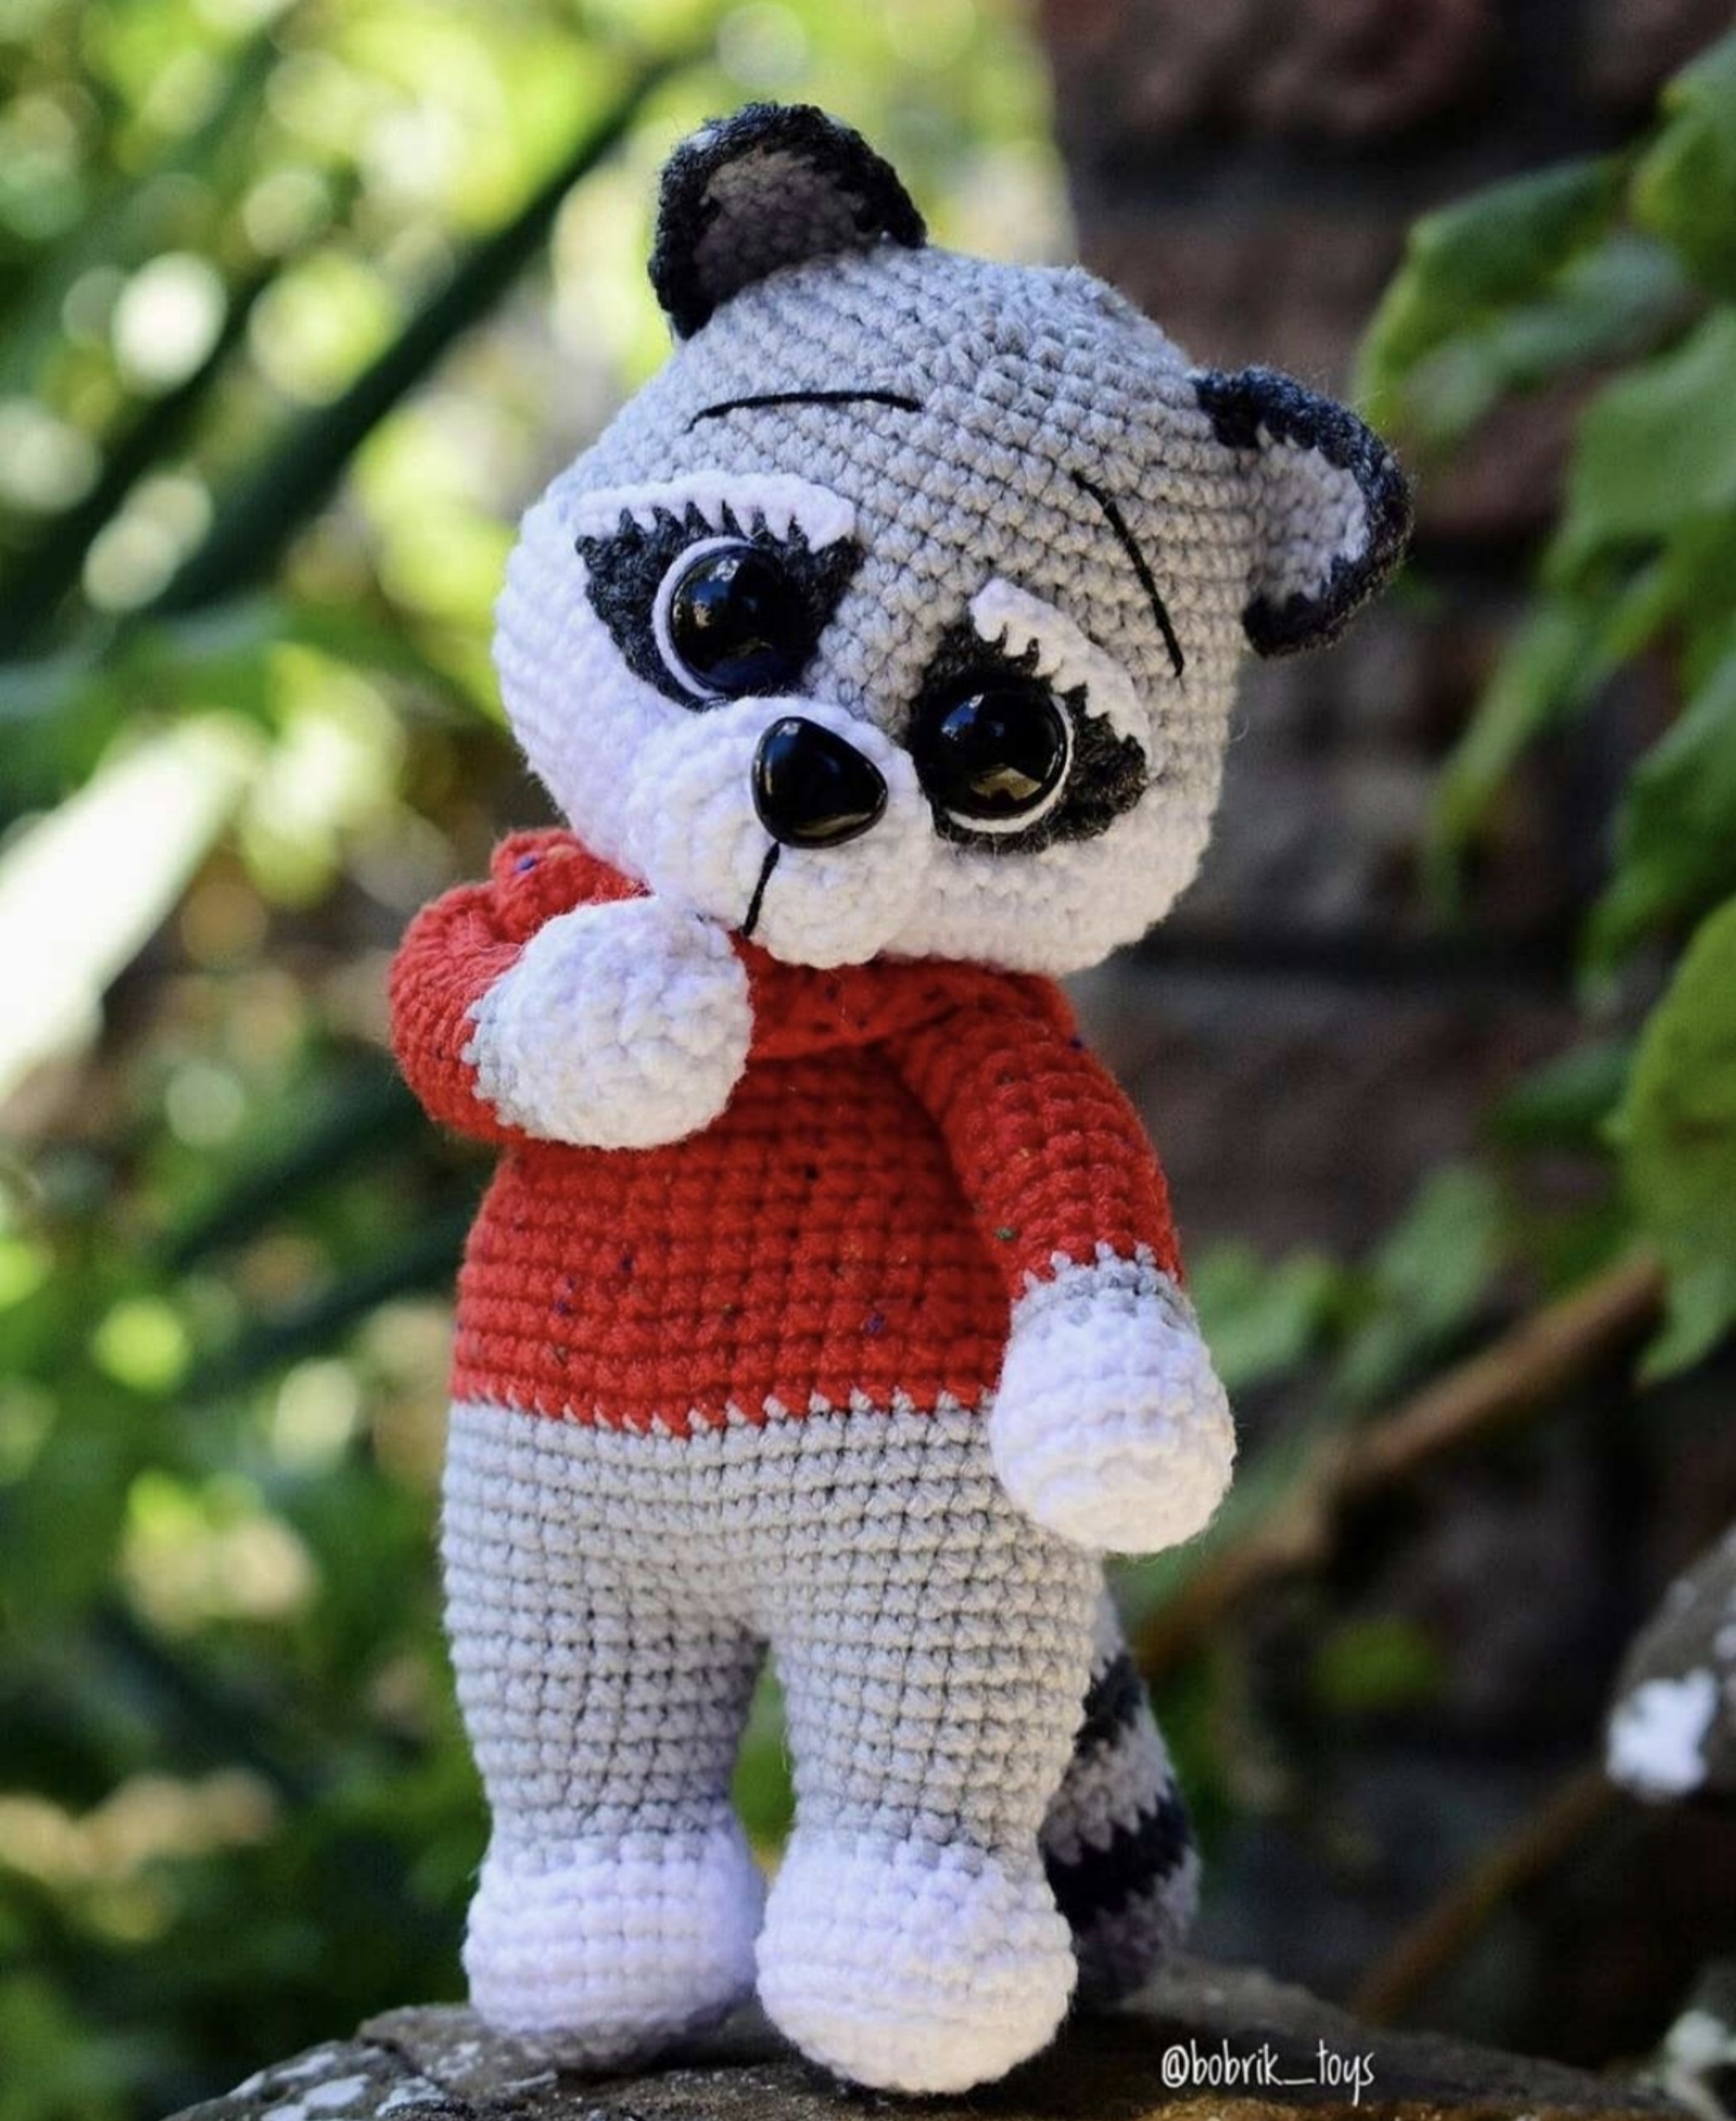
Are you looking for your next adorable crochet project? There is nothing quite as charming as a chubby, wide-eyed amigurumi animal. This project features a sweet little raccoon (or panda!) dressed in a cozy red sweater and a tiny matching scarf. With its expressive eyes and soft textures, this little friend is perfect for nursery decor, a handmade gift, or a new addition to your crochet collection.
This pattern is designed to be beginner-friendly, guiding you through the process of shaping, color changes, and assembly. While it may look detailed, once you break it down piece by piece, you will find it is a relaxing and rewarding way to practice your crochet skills!
Materials & Abbreviations
Before you pick up your hook, make sure you have all your supplies ready. Using high-quality cotton yarn will give your raccoon a clean, professional look with excellent stitch definition.
Materials Needed
- Yarn: Medium weight cotton yarn (DK or Worsted weight) in the following colors:
- Light Gray (for the main body and head)
- Dark Gray or Charcoal (for eye patches, ear edges, and tail stripes)
- Snow White (for the muzzle, paws, and eye patch edges)
- Crimson Red or Red Tweed (for the sweater and scarf)
- Eyes: 10 mm black safety eyes
- Nose: A small black safety nose (or black embroidery thread)
- Hook: 2 mm crochet hook
- Stuffing: Polyester fiberfill
- Extras: Black embroidery thread for eyebrows and nose detail, tapestry needle, and stitch markers
US Crochet Abbreviations
All measurements are in inches or standard crochet counts. Please ensure you are using US terms:
- MR: Magic Ring
- Ch: Chain
- Sc: Single Crochet
- Inc: Increase (2 sc in one stitch)
- Dec: Decrease (sc 2 together)
- BLO: Back Loops Only
- St(s): Stitch(es)
Step-by-Step Instructions
The Head
The head is worked in an oval shape to create a realistic skull structure. We begin with white yarn to create the snout area.
Start with White:
Ch 11. Starting in the 2nd chain from the hook:
- Row 1: 9 sc, 3 sc in the last chain. Now, working along the opposite side of the chain: 8 sc, 1 inc (22)
- Row 2: 1 inc, 8 sc, 3 inc, 8 sc, 2 inc (28)
- Row 3: 1 sc, 1 inc, 8 sc, (1 sc, 1 inc) x 3, 8 sc, (1 sc, 1 inc) x 2 (34)
- Row 4: 2 sc, 1 inc, 8 sc, (2 sc, 1 inc) x 3, 8 sc, (2 sc, 1 inc) x 2 (40)
- Row 5: 3 sc, 1 inc, 8 sc, (3 sc, 1 inc) x 3, 8 sc, (3 sc, 1 inc) x 2 (46)
- Row 6: 4 sc, 1 inc, 8 sc, (4 sc, 1 inc) x 3, 8 sc, (4 sc, 1 inc) x 2 (52)
- Rows 7-10: 52 sc (Change to Gray yarn)
Shaping the Snout (The “Tightening” Technique):
To give your raccoon its cute little nose, we need to sculpt the head. On Row 10, place pins at intervals of 4 stitches. From each pin, count 4 stitches up and place another pin. Pull the thread through these pins tightly to create the “bridge” of the nose. This will create a natural indentation for the muzzle.
Continuing the Head in Gray:
- Row 11: 1 sc, 1 dec, 19 sc, (1 sc, 1 dec) x 3, 15 sc, (1 sc, 1 dec) x 2 (46)
- Rows 12-19: 46 sc
- Row 20: 2 sc, (5 sc, 1 dec) x 6, 2 sc (40)
- Row 21: 2 sc, (4 sc, 1 dec) x 6, 2 sc (34)
- Row 22: 34 sc
- Row 23: 2 sc, (3 sc, 1 dec) x 6, 2 sc (28)
- Row 24: 2 sc, (2 sc, 1 dec) x 6, 2 sc (22)
- Row 25: 2 sc, (1 sc, 1 dec) x 6, 2 sc (16)
- Row 26: 8 dec
Fasten off, leaving a long tail for sewing.
Muzzle & Eye Patches
The Muzzle
Work in White:
- Row 1: 7 sc in MR (7)
- Row 2: 7 inc (14)
- Row 3: (1 sc, 1 inc) x 7 (21)
- Row 4: 21 sc
- Row 5: (1 sc, 1 dec) x 7 (14)
Insert your safety nose or embroider a small black nose. Leave a long tail for sewing to the head.
The Eye Patches
These are worked in rows using Dark Gray yarn to create those iconic raccoon markings.
- Row 1: Ch 7. Starting in 2nd ch from hook: 6 sc (7)
- Row 2: 1 dec, 4 sc, 1 dec (5)
- Row 3: 5 sc
- Row 4: 1 dec, 1 sc, 1 dec (3)
- Row 5: 1 sc, 1 dec (2)
- Row 6: 1 dec (1)
Finish the top point (Row 6) by sewing it upward. To finish the patches, join white yarn to the starting end and work a border around the edge. While working this border, add increases in the side stitches to create a triangular shape, as shown in your reference photos.
Ears
Work in Gray using Rows:
Each row must begin with a chain (ch).
- Row 1: Ch 8, 7 sc (7)
- Row 2: 1 dec, 3 sc, 1 dec (5)
- Row 3: 5 sc
- Row 4: 1 dec, 1 sc, 1 dec (3)
- Row 5: 1 sc, 1 dec (2)
- Row 6: 1 dec (1)
Finish by working a border around the entire ear using Dark Gray yarn. Remember to add increases at the top corners during the border work to maintain the ear’s shape.
Arms
The arms feature a color change to represent the sweater sleeves.
Start with White:
- Row 1: 6 sc in MR (6)
- Row 2: 6 inc (12)
- Row 3: (1 sc, 1 inc) x 6 (18)
- Rows 4-5: 18 sc
- Row 6: (1 sc, 1 dec) x 6 (12). Stuff lightly.
Change to Gray:
- Rows 7-8: 12 sc
Change to Red (Sweater Color):
- Rows 9-20: 12 sc
Closing: Fold the arm in half and sc through both layers for 6 stitches to close the end. Fasten off.
Legs & Body
The legs are worked first, then joined to create the body and the sweater.
The Legs
Start with White:
- Row 1: 6 sc in MR (6)
- Row 2: 6 inc (12)
- Row 3: (1 sc, 1 inc) x 6 (18)
- Row 4: (2 sc, 1 inc) x 6 (24)
- Row 5: 24 sc in BLO (Back Loops Only)
- Row 6: 24 sc
- Row 7: (6 sc, 1 dec) x 3 (21)
- Row 8: (5 sc, 1 dec) x 3 (18)
Change to Gray:
- Row 9: (4 sc, 1 dec) x 3 (15)
- Row 10: (4 sc, 1 inc) x 3 (18)
- Row 11: (5 sc, 1 inc) x 3 (21)
- Rows 12-13: 21 sc
- Row 14: (6 sc, 1 inc) x 3 (24)
- Row 15: 24 sc
Fasten off the first leg. Do NOT fasten off the second leg.
Joining for the Body
Connect the two legs using a slip stitch. You should now have 48 stitches total (24 + 24).
- Rows 16-22: 48 sc
Change to Red (Sweater):
- Rows 23-24: 48 sc
- Row 25: (6 sc, 1 dec) x 6 (42)
- Rows 26-28: 42 sc
- Row 29: (5 sc, 1 dec) x 6 (36)
- Rows 30-33: 36 sc
- Row 34: (4 sc, 1 dec) x 6 (30)
- Row 35: 30 sc
- Row 36: (3 sc, 1 dec) x 6 (24)
Change to Gray:
- Row 37: 24 sc
Stuff the body firmly.
Striped Tail
Start with Gray:
- Row 1: 6 sc in MR (6)
- Row 2: 6 inc (12)
- Row 3: (1 sc, 1 inc) x 6 (18)
- Row 4: (2 sc, 1 inc) x 6 (24)
Stripes:
From Row 5, add Dark Gray yarn. Alternate: 2 rows Dark Gray, then 3 rows Light Gray. Continue this pattern through Row 19.
- Rows 6-19: 24 sc
- Row 20: (2 sc, 1 dec) x 6 (18)
Fold the tail in half and sc through both layers for 9 stitches to close. Fasten off.
The Tiny Red Scarf
This simple accessory adds a huge amount of character!
- Row 1: Ch 5. Starting in 2nd ch from hook: 4 sc
- Rows 2-30: Work in rows, crocheting ONLY in the Back Loops Only (BLO). This makes the scarf narrow and textured. Each row should start with a ch.
Finishing
Now comes the best part: bringing your raccoon to life! Assembly is key to getting that cute expression.
- Attach the Eyes: Place the safety eyes into the eye patches. They should be positioned near the bottom corner of the patches to give that wide-eyed, adorable look.
- Sew the Muzzle: Sew the muzzle onto the head, right at the indentation you created during the shaping process.
- Add Facial Details: Using black embroidery thread, sew on the eyebrows and a small line extending down from the nose to add depth. You can also stitch a small white highlight into the eye to make them “sparkle.”
- Attach the Ears: Sew the ears to the top of the head, ensuring they are symmetrical.
- Attach the Arms: Sew the arms to the body at rows 36-37.
- Attach the Tail: Sew the tail to the back of the body at row 23.
- The Scarf: Wrap the scarf around the raccoon’s neck and sew it in place at the back.
Tips
- Tension is Key: For amigurumi, try to keep your stitches tight. This prevents the stuffing from peeking through the holes.
- Use Stitch Markers: Since you are working in rounds, it is very easy to lose track of your starting stitch. Always use a marker!
- Stuffing: When stuffing the head and body, use small pieces at a time. This allows you to push the fiberfill into the corners so the shape remains smooth.
- Safety First: If this toy is intended for a small child, please consider embroidering the eyes instead of using plastic safety eyes to prevent choking hazards.