Star and Heart Crochet Blanket Pattern: A Whimsical DIY Tutorial
Are you looking for a cozy, colorful, and incredibly charming project to brighten up your home or create the perfect handmade gift? This Star and Heart Crochet Blanket is a magical, modular project that combines celestial star motifs with sweet heart shapes. Because this blanket is made of individual motifs, it is a fantastic project for intermediate beginners or anyone looking to practice different crochet textures and color changes.
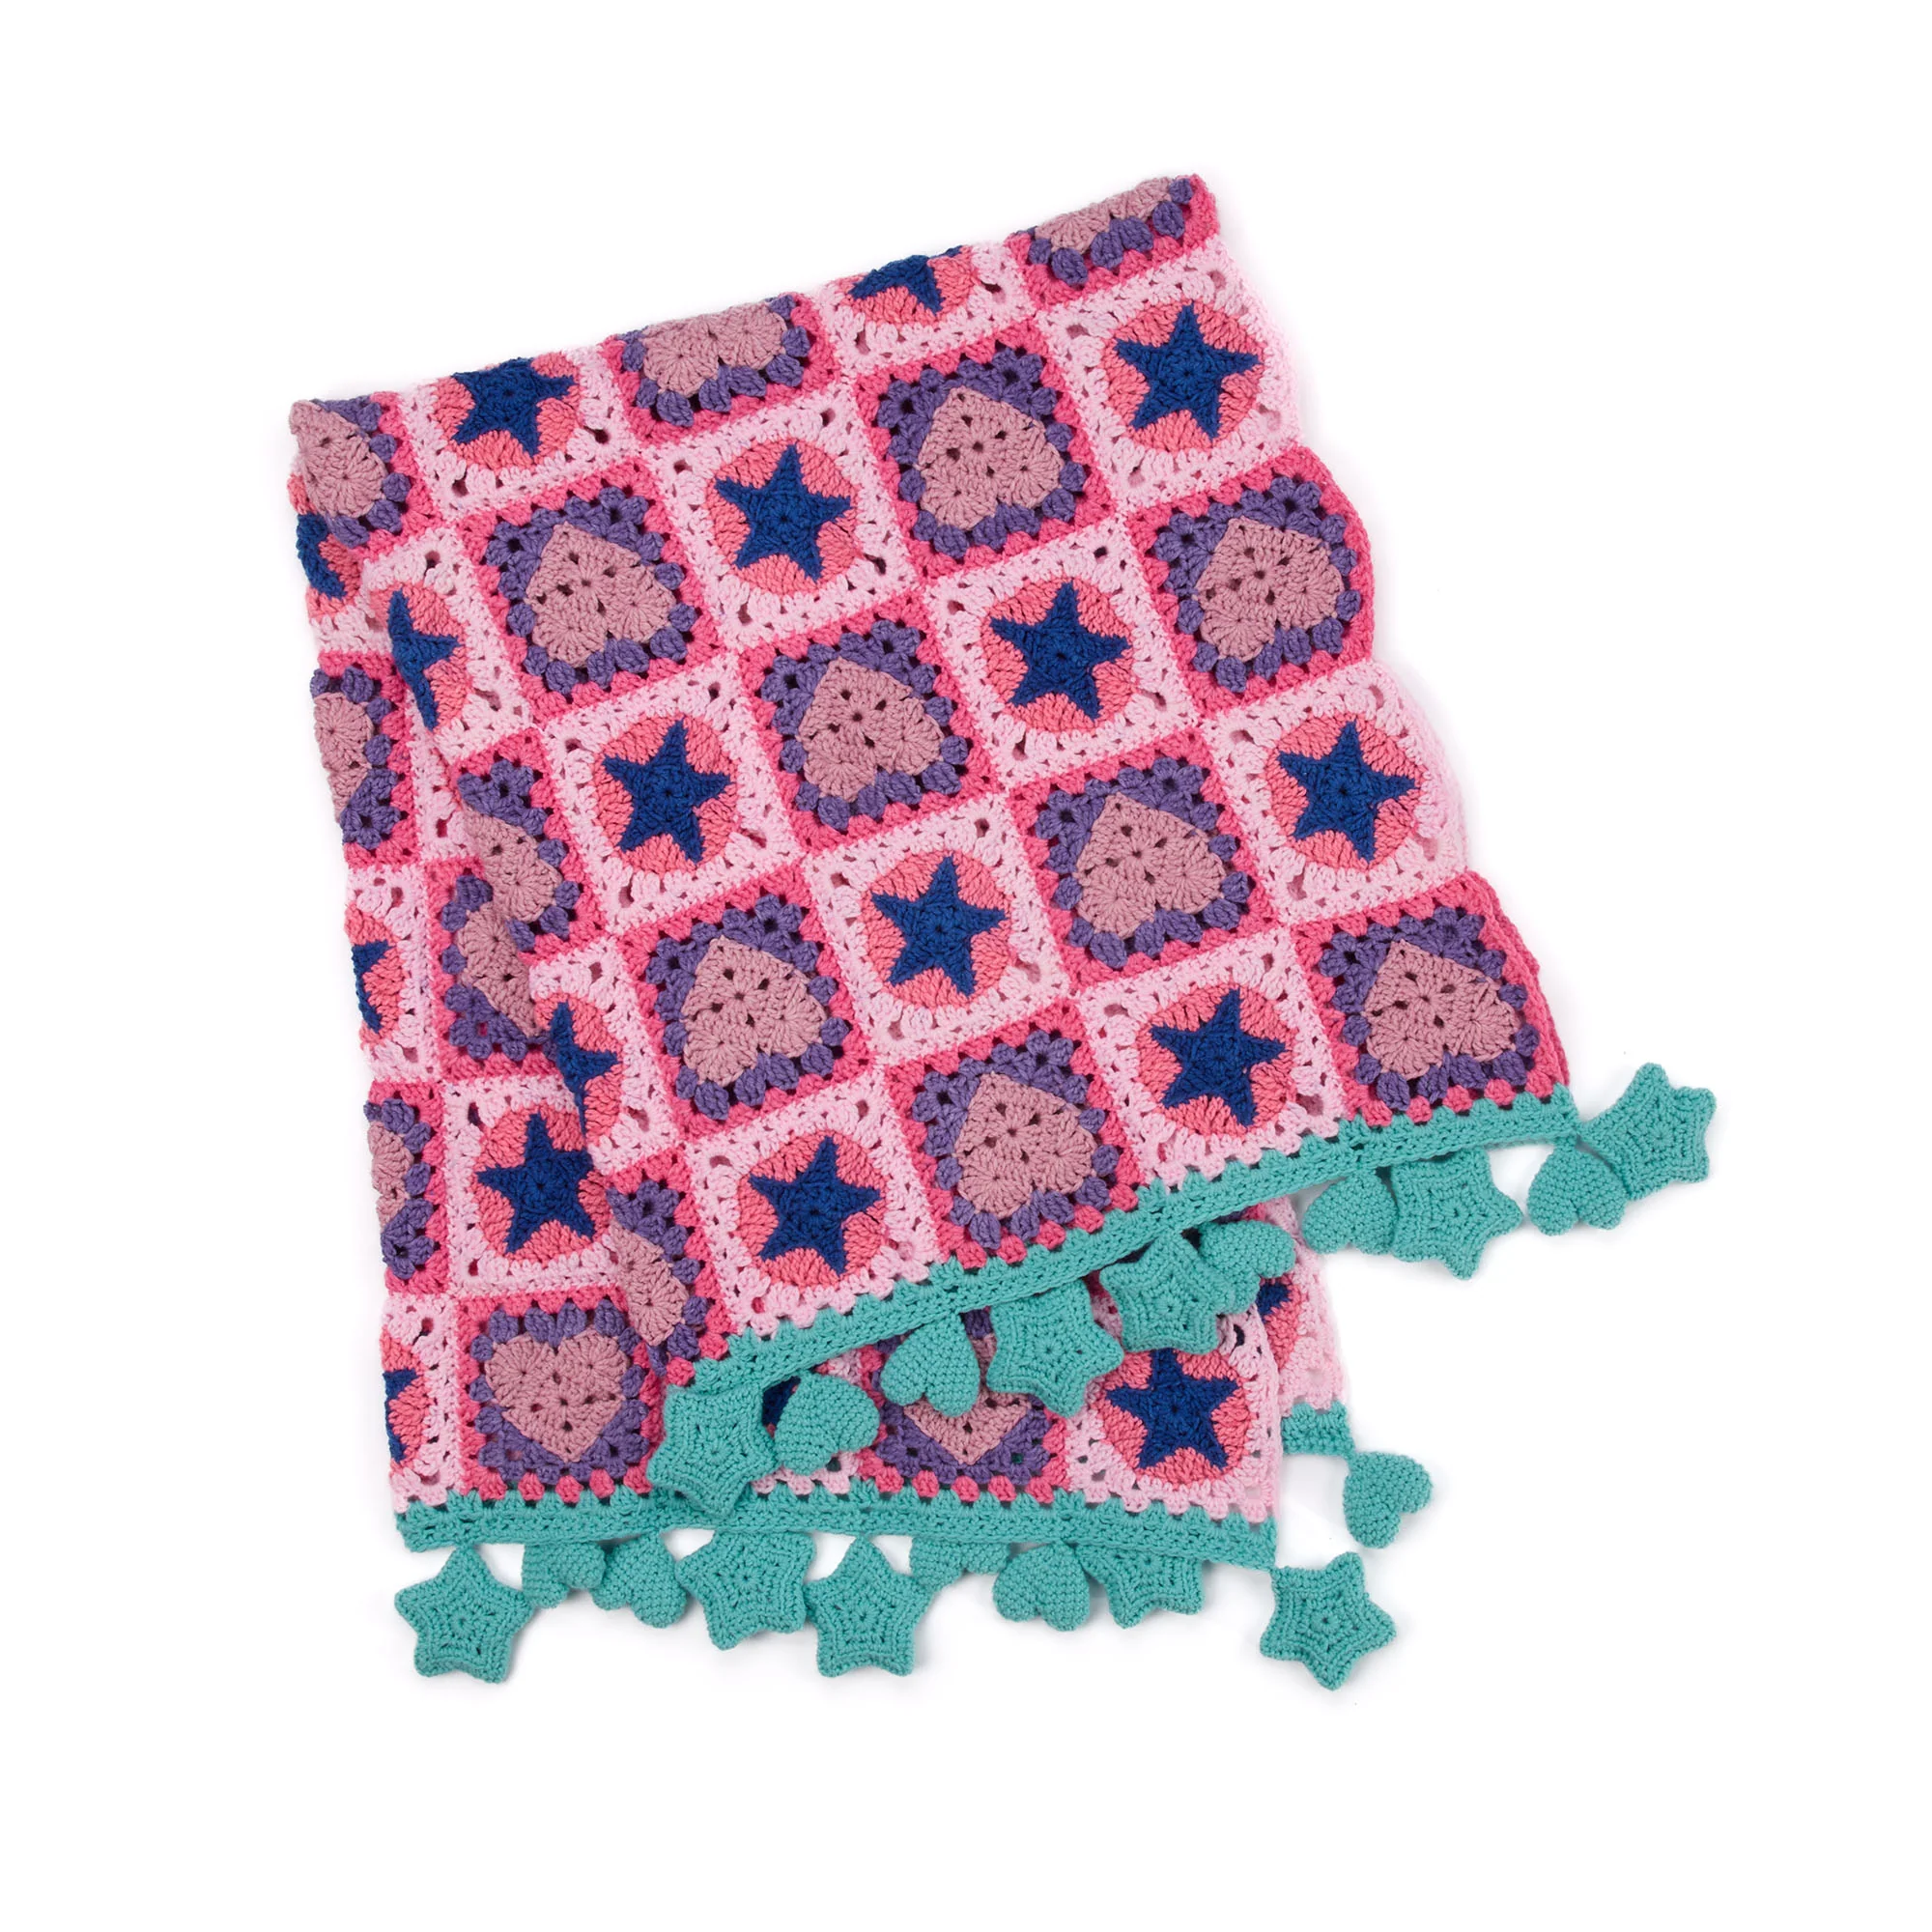
The finished blanket features a beautiful alternating pattern of stars and hearts, finished with adorable 3D pompoms along the edges for a playful, high-end look. Whether you are decorating a nursery or looking for a statement throw for your living room, this pattern is sure to become a favorite in your crochet collection.
Materials & Abbreviations
To ensure your blanket turns out perfectly, gather all your supplies before you begin. This project uses three different colors to create the variegated, layered effect seen in the motifs.
Yarn Requirements
- Color A (Star Motif): Approximately 1,800 yards of medium weight variegated yarn (45 motifs total).
- Color B (Heart Motif): Approximately 1,320 yards of medium weight variegated yarn (45 motifs total).
- Color C (Edging and Pompoms): Approximately 417 yards of solid medium weight yarn.
Tools & Extras
- Crochet Hook: Size US I/9 (5.5 mm), or a size that helps you achieve the correct gauge.
- Yarn Needle: For weaving in ends and sewing motifs together.
- Stitch Markers: To keep track of your rounds.
- Fiberfill Stuffing: For creating the 3D Star and Heart pompoms.
Gauge
- General Gauge: 12 sc and 15 rows = 4 inches.
- Motif Size: Each finished motif should measure a 6-inch square.
Crochet Abbreviations
All terms are in US terminology:
- Approx: Approximately
- Beg: Beginning
- Ch: Chain(s)
- Cont: Continue
- Dc: Double crochet
- Dc2tog: (Yarn over and draw up a loop in next space. Yarn over and draw through 2 loops on hook) twice. Yarn over and draw through all 3 loops on hook.
- Hdc: Half double crochet
- Invisible Scyuh2tog: Insert hook into front loop only in each of next 2 stitches. Yarn under hook (instead of typical yarn over) and draw up a loop. Yarn over and draw through 2 loops on hook.
- Rem: Remaining
- Rep: Repeat
- Rnd(s): Round(s)
- RS: Right side
- Sc: Single crochet
- Scbl: Single crochet in back loop only
- Scyuh: Yarn under single crochet (Insert hook, yarn under hook and draw up a loop, then yarn over and draw through 2 loops).
- Sl st: Slip stitch
- Sp(s): Space(s)
- St(s): Stitch(es)
- Tog: Together
- Tr: Treble crochet
- Long Tr2tog: [(Yarn over) twice and draw up a loop in indicated stitch. (Yarn over and draw through 2 loops on hook) twice] twice. (Yarn over and draw through 2 loops on hook) twice.
- WS: Wrong side
- Yoh: Yarn over hook
- Yuh: Yarn under hook
Step-by-Step Instructions
Making the Star Motifs (Type A)
Make 45 Star Motifs.
Note on Color Changes: Start with Color 1 (the shortest color repeat in your yarn). Rounds 1 and 2 use Color 1. Round 3 uses Color 2. Rounds 4 and 5 use Color 3. Ensure you leave a 24-inch tail at the end for seaming.
- Setup: With Color 1, ch 4. Join with a sl st to the first ch to form a ring.
- Round 1: Ch 3. Work 9 dc into the ring. Join with a sl st to the first dc. (Total 10 dc).
- Round 2: Working into the bumps at the back of the chain: Ch 5. In the 2nd ch from hook, 1 sc. In the next ch, 1 hdc. In the next ch, 1 dc. In the last ch, 1 tr. Skip the next dc from Round 1. Sl st in the next dc. This completes one “Star Point.” Repeat from * 4 more times, ending with a sl st into the top of the first dc of Round 1. Color 1 is complete.
- Round 3: With Color 2, working in the back loops only on both edges of the Star Points, sl st in each of the next 2 ch. Ch 4. *1 dc in next ch, 1 hdc in next ch, 1 sc in turning ch, 1 hdc in next st, 1 dc in next st, 1 tr in next st. Long Tr2tog over the next st and the first ch of the next Star Point. Repeat from * 3 times more, then from * to ** once, noting that the last leg of the Long Tr2tog will work into the same space as the first sl st. Join. Color 2 is complete.
- Round 4: With Color 3, ch 4. *2 dc in next st, ch 1, 1 dc in next st, 1 hdc in next st, 1 sc in next st, ch 1, 1 sc in next st, 1 hdc in next st, 1 dc in next st, ch 1, 2 dc in next st, 1 tr in next st. Ch 3 (for corner), 1 tr in next st. Repeat from * twice more, then from * to ** once. 1 dc in the top of the ch-4 to join.
- Round 5: Sl st around the post of the joining dc. Ch 2. Work 3 hdc around the post of the joining dc. *(Ch 1, 3 hdc) in each ch-1 sp to the next ch-3 sp. Ch 1. (3 hdc, ch 3, 3 hdc) in the next ch-3 sp. Repeat from * twice more, then from * to ** once. 3 hdc around the post of the joining dc. Ch 3. Join. Fasten off.
Making the Heart Motifs (Type B)
Make 45 Heart Motifs.
Note on Color Changes: Rounds 1, 2, and the first half of Round 3 use Color 1. The second half of Round 3 and Round 4 use Color 2. Round 5 uses Color 3. Leave a 24-inch tail for seaming.
- Setup: With Color 1, ch 4. Join with a sl st to the first ch to form a ring.
- Round 1: (RS) Ch 6. (3 dc, ch 3) 3 times in the ring. 2 dc in the ring. Join.
- Round 2: Sl st in the next ch-3 sp. Ch 6. 2 dc in the same sp as the last sl st. *1 dc in each of the next 3 dc. (2 dc, ch 3, 2 dc) in the next ch-3 sp. Repeat from * twice more. 1 dc in each of the next 3 dc. 1 dc in the first ch-3 sp. Join.
- Round 3: Sl st in the next ch-3 sp. (Skip next 3 dc, 8 tr in next dc, skip next 3 dc, sl st in next ch-3 sp) twice. Color 1 is complete.
- Round 4: With Color 2, *Skip next 3 dc, (1 tr, 2 dc, ch 3, 2 dc, 1 tr) in next dc, skip next 3 dc. Sl st in the back loop of the 2nd ch of the next ch-3. Repeat from * to ** once more. Join with sl st to the top of the ch-3 sp. Ch 4. 3 dc in the first tr. Ch 1. Skip next 2 tr. 3 dc in next tr. Ch 3. 3 tr in next tr. Ch 1. Skip next 2 tr. 2 tr in next tr. (1 tr, ch 1, 1 tr) in the ch-3 sp of Round 2. 2 tr in next tr. Ch 1. Skip next 2 tr. 3 tr in next tr. Ch 3. 3 dc in next tr. Ch 1. Skip next 2 tr. (3 dc in next tr, ch 1) twice. (3 dc, ch 3, 3 hdc) all in the next ch-3 sp. Ch 1. Skip next 2 dc. (3 hdc in next tr, ch 1) twice. (3 hdc, ch 3, 3 dc) all in the next ch-3 sp. Ch 1. Skip next 2 dc. 2 dc in next tr. Join with sl st to the 3rd ch of the ch-4. Color 2 is complete.
- Round 5: With Color 3, sl st in next ch-1 sp. Ch 3. 1 dc in the same sp as the last sl st. *Ch 1, (3 dc, ch 1) in each ch-1 sp to the next corner ch-3 sp. (3 dc, ch 3, 3 dc) in the next corner ch-3 sp. Repeat from * 3 times more. Ch 1, (3 dc, ch 1) in next ch-1 sp. 1 dc in the first ch-1 sp. Join with sl st to the top of the first ch-3. Fasten off.
Making the Star Pompoms
Make 20 Star Pompoms.
Note: Work in a continuous spiral. Move your stitch marker to the first stitch of every round.
- Setup: With Color C, ch 2.
- Round 1: 10 sc in the 2nd ch from hook. Join.
- Round 2: Ch 1. (1 sc, ch 2, 1 sc) in the same space as the sl st. 1 sc in the next sc. * (1 sc, ch 2, 1 sc) in the next sc, 1 sc in the next sc. Repeat from * around. Join.
- Round 3: Ch 1. 1 sc in the same sp as the sl st. (2 sc, ch 2, 2 sc) in the next ch-2 sp. [1 sc in each of the next 3 sc, (2 sc, ch 2, 2 sc) in the next ch-2 sp] 4 times. 1 sc in each of the last 2 sc. Join.
- Round 4: Ch 1. 1 scbl in the same sp as the sl st. 1 scbl in each of the next 2 sc. *2 scbl in the next ch, ch 2, 2 scbl in the next ch, 1 scbl in each of the next 3 sc, skip next sc. 1 scbl in each of the next 3 sc. Repeat from * 3 times more, then from * to ** once. Join. Fasten off.
Assembly: Using Color C and the wrong side (WS) of the star, whipstitch two stars together through the back loops only, lightly stuffing them with fiberfill as you sew. You will make 10 total Star Pompoms.
Making the Heart Pompoms
Make 10 Heart Pompoms.
Note: Work in a continuous spiral. Use a Magic Ring for the start.
Part 1: The Lobes (Make 2)
- Setup: With Color C, make a Magic Ring.
- Round 1: Ch 1. 6 sc in the ring. Place marker on the first sc. Pull the tail tightly to close.
- Round 2: 2 scyuh in each sc around. (12 sc).
- Rounds 3 & 4: 1 scyuh in each sc around. Join with sl st to the first sc after Round 4. Fasten off, leaving a tail.
Join Lobes: Align the last stitch of each lobe and, using the tail, sew 2 stitches together to join the lobes in the center.
Part 2: The Bottom
- Round 1: Join Color C with a sl st to the stitch after the center join, leaving a tail. Ch 1. 1 scyuh in the same stitch as the sl st. 1 scyuh in each of the next 9 sc of the first lobe. Skip the joined stitches. 1 scyuh in each of the next 10 sc of the second lobe. Place marker on the first sc. (20 sc).
- Round 2: 1 scyuh in each stitch around. Use your yarn needle to close any remaining holes at the join.
- Round 3: (1 scyuh in each of the next 2 sc, invisible scyuh2tog) 5 times. (15 sc).
- Round 4: 1 scyuh in each stitch around.
- Round 5: (1 scyuh in the next sc, invisible scyuh2tog) 5 times. (10 sc).
- Round 6: (Invisible scyuh2tog) 5 times. Join with a sl st to the first st. Fasten off, leaving a tail.
Assembly: Lightly stuff the heart and weave the tail through the tops of the last 5 stitches, pulling tight to secure. You will make 10 total Heart Pompoms.
Assembling the Blanket
- Motifs: Using the remaining tails from your motifs and a yarn needle, sew the motifs together with the Right Side (RS) facing. Arrange them in an alternating pattern of stars and hearts as shown in your layout.
- The Edging: Join Color C with a sl st to the top right corner ch-3 sp of the blanket.
- Row 1: (RS) Ch 3. 1 dc in the same space as the sl st. *(3 dc in the next ch-1 sp) 4 times. 1 dc in the next ch-3 sp. Dc2tog over the same ch-3 sp and the next ch-3 sp. 1 dc in the last ch-3 sp worked. Repeat from * 7 times more, then from * to * once. 2 dc in the last corner ch-3 sp. Turn.
- Row 2: Ch 3. Skip the next dc. *3 dc in the space between the last skipped dc and the next dc. Skip the next 3 dc. Repeat from * until 5 dc remain. 3 dc in the space between the last skipped dc and the next dc. Skip the next dc. 1 dc in the last dc. Turn.
- Row 3: Ch 1. 1 sc in each dc to the end of the row. Fasten off.
- Repeat: Repeat this edging process for the bottom left corner of the blanket.
Finishing Touches
To complete your masterpiece, sew the Star Pompoms (by their points) and the Heart Pompoms (by their bottoms) evenly across the blanket edging. Place one at each corner and space the remaining pompoms to align approximately with the motif seams, alternating between hearts and stars. This adds incredible dimension and a professional, whimsical finish!
Expert Crochet Tips
- Managing Color Changes: When working with variegated yarn, if you find you have too much color left at the end of a round, slightly loosen your tension for the next few stitches to “stretch” the color. If you have too little, tighten your tension slightly.
- Mastering the “Yarn Under”: The Scyuh (yarn under single crochet) is used here to create a tighter, more structured stitch. It is essential for the 3D pompoms to hold their shape.
- Tension is Key: Because this blanket is made of many small pieces, try to keep your tension consistent so the motifs fit together snugly without gaping.
- Stuffing Tip: Don’t overstuff your pompoms! You want them to be firm but still have a soft, rounded appearance.