How to Crochet a Cute Chubby Teddy Bear with Accessories: Free Amigurumi Pattern
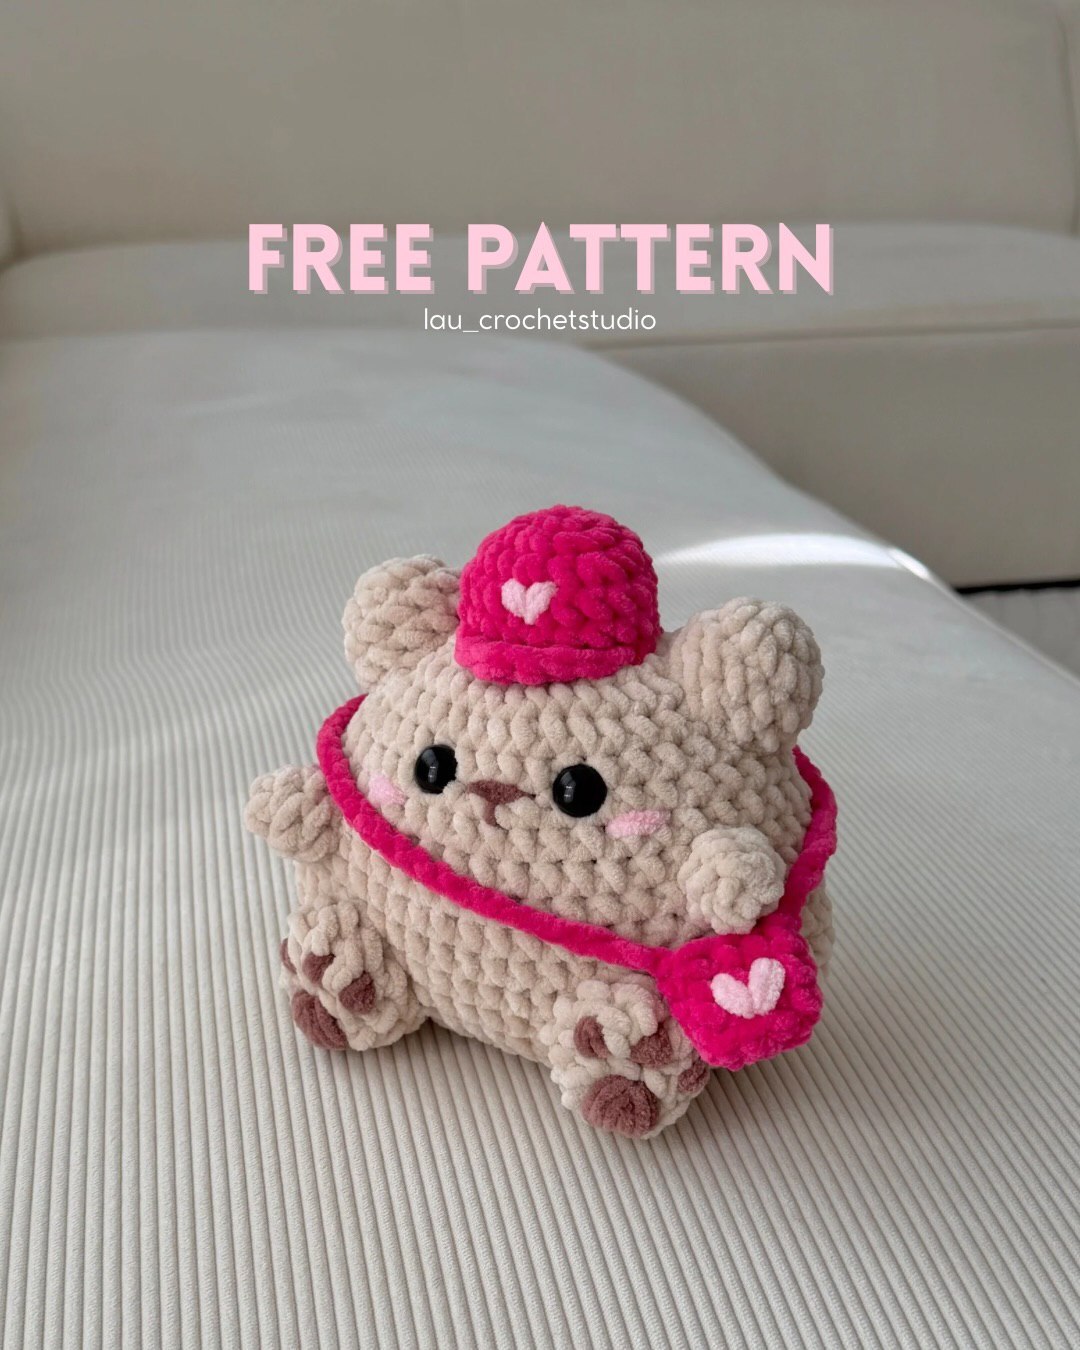
There is nothing quite as comforting as a handmade teddy bear. Whether you are looking for a sweet gift for a loved one or a cozy new addition to your own collection, this chubby teddy bear is the perfect project. Designed with a rounded, cozy shape, this little bear is all about sweetness and warmth.
What makes this pattern extra special are the adorable accessories. Your bear comes complete with a tiny pink cap and a matching crossbody bag, both decorated with little hearts. This project is beginner-friendly and works up quickly, especially if you use a chunky or velvet yarn to give it that professional, plush feel. Let’s dive into the details and start crafting some handmade love!
Materials & Abbreviations
To get started, gather the following supplies. For the look seen in the tutorial, a plush chenille or velvet yarn is recommended, but any medium-to-bulky weight yarn will work.
Yarn Requirements
- Beige Yarn: Used for the main body, head, ears, hands, and legs.
- Pink Yarn: Used for the cap and the crossbody bag.
- Light Pink Yarn: Used for the small heart details and the bear’s rosy cheeks.
- Brown Yarn: Used for embroidering the paw pads.
Tools & Notions
- Crochet Hooks: A 5mm hook for the main body and a 4mm hook for the smaller accessories.
- Safety Eyes: Plastic safety eyes (size depends on your yarn choice; 10mm-12mm is usually standard for this size).
- Stuffing: Polyester fiberfill or similar stuffing.
- Tapestry Needle: For sewing pieces together and embroidering details.
- Scissors: For trimming yarn.
Abbreviations (US Terms)
- MR: Magic Ring
- SC: Single Crochet
- INC: Increase (2 SC in the same stitch)
- DEC: Decrease (SC 2 stitches together)
- CH: Chain
- HDC: Half Double Crochet
- DC: Double Crochet
- TR: Treble Crochet
- BLO: Back Loop Only
- FLO: Front Loop Only
- SL ST: Slip Stitch
Step-by-Step Instructions
The Body and Head
The body is worked as one continuous piece starting from the bottom. We begin with an oval base to give the bear its signature chubby shape.
Using Beige Yarn:
- R1: CH 18. Skip the first chain from the hook. (18)
- R2: 16 SC, 3 SC in the last stitch, 15 SC across the other side of the chain, INC in the final stitch. (36)
- R3: INC, 15 SC, 3 INC, 15 SC, 2 INC. (42)
- R4: SC, INC, 15 SC, (SC, INC) x 3, 15 SC, (SC, INC) x 2. (48)
- R5-8: SC in each stitch around. (48)
- R9: (22 SC, DEC) x 2. (46)
- R10: SC in each stitch around. (46)
- R11: (21 SC, DEC) x 2. (44)
- R12: SC in each stitch around. (44)
- R13: (20 SC, DEC) x 2. (42)
- R14: (19 SC, DEC) x 2. (40)
- R15: (18 SC, DEC) x 2. (38)
- R16: (17 SC, DEC) x 2. (36)
Eye Placement: Between Rounds 12 and 13, insert your safety eyes. Space them approximately 4 stitches apart to give the bear its cute, wide-eyed look.
- R17: 18 DEC. (18)
- R18: SC in each stitch around. (18)
Stop here and stuff the body firmly with fiberfill.
- R19: (SC, DEC) x 6. (12)
- R20: 6 DEC. (6)
Cut the yarn, leaving a long tail. Use your tapestry needle to weave the tail through the remaining stitches and pull tight to close the hole.
The Ears (Make 2)
Using Beige Yarn:
- R1: 6 SC in MR. (6)
- R2: 6 INC. (12)
- R3-4: SC in each stitch around. (12)
Fasten off, leaving a tail for sewing. Stuff lightly.
The Hands (Make 2)
Using Beige Yarn:
- R1: 4 SC in MR. (4)
- R2: (SC, INC) x 2. (6)
- R3: SC in each stitch around. (6)
Fasten off, leaving a tail for sewing. Stuff lightly.
The Legs (Make 2)
Using Beige Yarn:
- R1: 6 SC in MR. (6)
- R2: (SC, INC) x 3. (9)
- R3: 3 SC, 3 DC in the same stitch, 5 SC. (11)
- R4: SC in each stitch around. (11)
Fasten off, leaving a tail for sewing. Stuff the legs.
Paw Details: Using Brown Yarn and your tapestry needle, embroider small paw pads onto the bottom of each foot.
Making the Accessories
Switch to your 4mm hook for these smaller pieces to ensure the stitches are tight and neat.
The Pink Cap
Using Pink Yarn:
- R1: 7 SC in MR. (7)
- R2: 7 INC. (14)
- R3: (SC, INC) x 7. (21)
- R4-5: SC in each stitch around. (21)
- R6 (The Brim): Work this round in the FLO (Front Loop Only): 9 SL ST, SC, HDC, DC, TR, DC, HDC, SC, 5 SL ST. (21)
Fasten off, leaving a tail for sewing. Stuff the top of the cap lightly. Using Light Pink Yarn, embroider a small heart on the center of the cap.
The Crossbody Bag
Using Pink Yarn:
- R1: CH 4. Skip the first chain.
- R2: 2 SC, 3 SC in the last stitch, 2 SC across the other side of the chain, INC. (9)
- R3: Work in BLO (Back Loop Only): 9 SC. (9)
- R4-5: SC in each stitch around. (9)
The Strap: Attach your yarn to the side of the bag and CH 52 (adjust the length to fit your bear’s size). SL ST back into the opposite side of the bag to secure the strap.
Using Light Pink Yarn, embroider a small heart on the front of the bag.
Finishing Touches
Now that all your pieces are complete, it is time to bring your teddy bear to life!
- Sewing the Limbs: Attach the ears to the top of the head. Sew the hands to the sides of the body and the legs to the bottom. Ensure they are symmetrical so your bear can sit comfortably.
- The Face: Use Brown Yarn to embroider a small inverted triangle for the nose. Use Light Pink Yarn to add two small horizontal stitches on either side of the eyes for rosy cheeks.
- Final Accessories: Sew the cap onto the head and drape the crossbody bag over the bear’s shoulder.
Tips for Success
- Tension Matters: When working with plush yarn, try to keep your tension consistent. If you see holes where the stuffing is peaking through, try using a slightly smaller hook.
- Hiding Ends: Use your tapestry needle to weave in all yarn tails deep into the stuffing before sewing the pieces closed.
- Customization: Feel free to change the colors! A blue cap or a mint green body can make this bear unique. You can also add a small ribbon around the neck for extra cuteness.
- Stuffing: Stuff the body firmly, but don’t overstuff the limbs, or they may become too stiff to position naturally.