Celestial Starry Cat Crochet Pattern: A Magical Amigurumi Tutorial
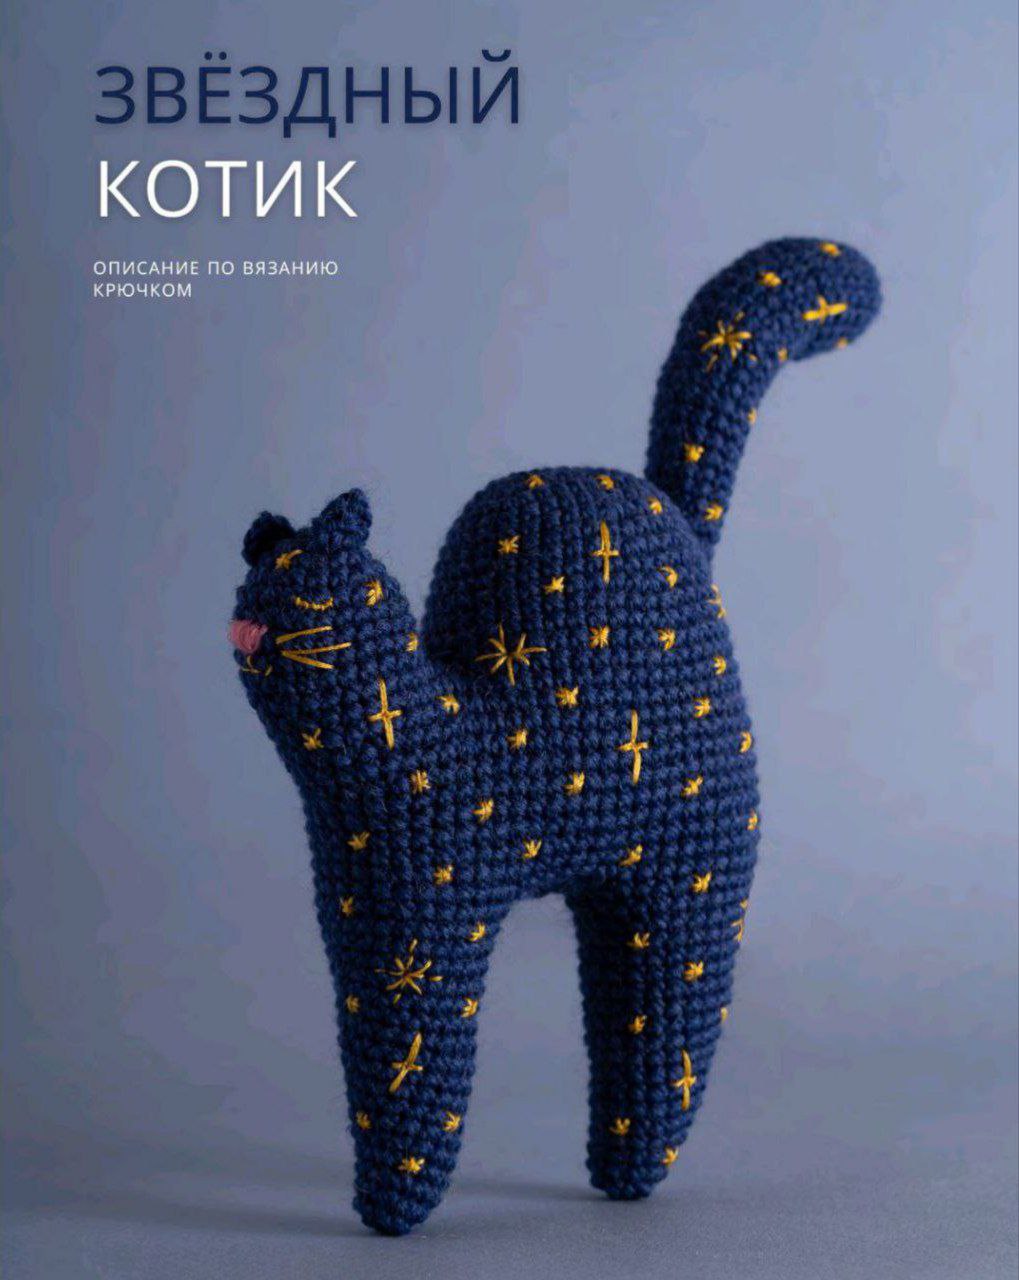
Bring a little bit of cosmic magic into your home with this adorable Starry Cat amigurumi! This whimsical little feline is the perfect project for anyone looking to create a unique, celestial-themed plushie. With its deep midnight-blue coat and shimmering golden stars, this cat is as enchanting to look at as it is to make.
Whether you are a seasoned crochet enthusiast or a beginner looking for a rewarding challenge, this detailed guide will walk you through every stitch. This project blends classic amigurumi techniques with a bit of embroidery to create a finished toy that looks like it stepped straight out of a fairytale. Once completed, your Starry Cat will stand approximately 6.3 inches tall (not including the tail) and about 4.7 inches wide.
Materials & Abbreviations
To get started on your celestial companion, gather the following supplies. We recommend using a tight tension to ensure the stuffing doesn’t peek through the stitches.
Supplies Needed
- Yarn:
- Midnight Blue yarn (suitable for a 2.5mm hook)
- Small amount of Pink yarn for the nose
- Yellow embroidery floss for the starry details
- Crochet Hook: 2.5mm (US 3/0)
- Stuffing: Polyfill or similar toy stuffing
- Tools: Tapestry needle, embroidery needle, and scissors
US Crochet Terms & Abbreviations
- MR: Magic Ring
- sc: Single crochet
- inc: Increase (two single crochets in one stitch)
- dec: Decrease (invisible decrease recommended)
- ch: Chain
- sl st: Slip stitch
- (*) : Total stitch count at the end of the round
Step-by-Step Instructions
The Head
The head is worked in continuous rounds. Do not join the rounds with a slip stitch unless specified.
- Round 1: 6 sc in MR (6)
- Round 2: 6 inc (12)
- Round 3: (inc, 2 sc) x 4 (16)
- Round 4: (3 sc, inc) x 4 (20)
- Round 5: sc, inc, (4 sc, inc) x 3, 3 sc (24)
- Rounds 6–8: sc in each stitch around (24)
Fasten off and leave a small tail to weave in later. Set the head aside; we will connect it to the body shortly.
The Body (Back & Torso)
Unlike the head, the body begins by working in rows to create the back of the cat.
Starting the Back
- Row 1: ch 10. Starting in the 2nd ch from hook: 8 sc, increase in the next 3 stitches (place 3 sc in one stitch), 7 sc, increase in the next 3 stitches (place 3 sc in one stitch) (22)
- Row 2: (inc, 8 sc, inc, sc) x 2 (26)
- Row 3: sc, inc, 8 sc, inc, 3 sc, inc, 8 sc, inc, 2 sc (30)
- Row 4: sc in each stitch across (30)
- Row 5: (6 sc, inc, 7 sc, inc) x 2 (34)
- Row 6: sc in each stitch across (34)
- Row 7: (7 sc, inc, 8 sc, inc) x 2 (38)
- Row 8: sc in each stitch across (38)
- Row 9: (8 sc, inc, 9 sc, inc) x 2 (42)
- Row 10: sc in each stitch across (42)
- Row 11: (9 sc, inc, 10 sc, inc) x 2 (46)
Connecting Head to Body
Now we will merge the head and the back into one continuous piece to create the overall shape.
- Round 12: Work 21 sc along the edge of the back, ch 1, work 24 sc around the edge of the head, 1 sc into the ch-1 space, then work 25 sc along the remaining edge of the back (72)
- Round 13: sc in each stitch around (72)
- Round 14: 23 sc, dec, (4 sc, dec) x 3, 29 sc (68)
- Round 15: sc in each stitch around (68)
- Round 16: 22 sc, (3 sc, dec) x 4, 26 sc (64)
- Round 17: sc in each stitch around (64)
- Round 18: 22 sc, (dec, 2 sc) x 4, 26 sc (60)
- Rounds 19–23: sc in each stitch around (60)
The Back Legs
We will now create the legs directly from the body.
- Round 24: 11 sc, ch 6. Now, join back to the body at the 16th stitch from the end of Round 23: 13 sc, dec, sc (32)
- Round 25: 11 sc, work along the top of the ch-6: 2 sc, dec, 2 sc. Finish the round: 12 sc, dec, sc (30)
- Round 26: (13 sc, dec) x 2, sl st (28)
- Round 27: (12 sc, dec) x 2 (26)
- Round 28: 24 sc, dec, sl st (25)
- Round 29: 23 sc, dec (24)
- Round 30: 22 sc, dec, sl st (23)
- Round 31: 21 sc, dec (22)
- Round 32: 20 sc, dec, sl st (21)
- Round 33: 19 sc, dec (20)
- Round 34: 18 sc, dec, sl st (19)
- Round 35: 17 sc, dec (18)
- Round 36: 16 sc, dec, sl st (17)
- Round 37: 15 sc, dec (16)
- Round 38: 14 sc, dec, sl st (15)
- Round 39: 13 sc, dec (14)
- Round 40: 12 sc, dec, sl st (13)
- Round 41: 11 sc, dec (12)
- Round 42: 10 sc, dec, sl st (11)
- Round 43: 9 sc, dec (10)
Fasten off and weave in ends. Repeat for the second back leg.
The Belly
Attach blue yarn to the right back leg.
- Round 1: 5 sc, ch 6. Then, starting from the 5th stitch of Round 23 (from the back leg): 5 sc, 6 sc along the inside of the ch-6 on the back leg, sl st (22)
- Round 2: (3 sc, dec from 3 stitches, 2 sc, dec from 3 stitches) x 2, sl st (14)
- Round 3: (sc, 2 dec from 3 stitches) x 2 (6)
Close the hole by stitching through the front loops of two adjacent sc. Fasten off.
The Front Legs
Attach yarn to Round 23, to the right of the back legs.
- Round 1: 11 sc, inc, 11 sc. Then, work along the inside of the belly chain: 2 sc, dec, 2 sc (29)
- Round 2: 25 sc, dec, 2 sc (28)
- Round 3: 25 sc, dec, sc (27)
- Round 4: 24 sc, dec, sc (26)
- Round 5: (11 sc, dec) x 2 (24)
- Round 6: 11 sc, dec, 11 sc (23)
- Round 7: 10 sc, dec, 11 sc (22)
- Round 8: 10 sc, dec, 10 sc (21)
- Round 9: 9 sc, dec, 10 sc (20)
- Round 10: 9 sc, dec, 9 sc (19)
- Round 11: 8 sc, dec, 9 sc (18)
- Round 12: 8 sc, dec, 8 sc (17)
- Round 13: 7 sc, dec, 8 sc (16)
- Round 14: 7 sc, dec, 7 sc (15)
- Round 15: 6 sc, dec, 7 sc (14)
- Round 16: 6 sc, dec, 6 sc (13)
- Round 17: 5 sc, dec, 6 sc (12)
- Round 18: 5 sc, dec, 5 sc (11)
- Round 19: 4 sc, dec, 5 sc (10)
Close the opening by stitching through the front loops of two adjacent stitches. Fasten off.
The Ears
The ears are worked in rows (turn your work at the end of each row).
- Row 1: ch 4
- Row 2: starting in 2nd ch from hook: 3 sc
- Row 3: skip the first stitch, 2 sc
- Row 4: skip the first stitch, 1 sc
Fasten off, leaving a long tail for sewing. Make two.
The Tail
- Round 1: 6 sc in MR (6)
- Round 2: 6 inc (12)
- Round 3: (sc, inc) x 6 (18)
- Rounds 4–8: sc in each stitch around (18)
- Round 9: (7 sc, dec) x 2 (16)
- Rounds 10–13: sc in each stitch around (16)
- Round 14: (6 sc, dec) x 2 (14)
- Rounds 15–19: sc in each stitch around (14)
- Round 20: (5 sc, dec) x 2 (12)
- Rounds 21–25: sc in each stitch around (12)
- Round 26: (4 sc, dec) x 2 (10)
- Round 27: (3 sc, dec) x 2 (8)
- Round 28: (2 sc, dec) x 2 (6)
Close the hole by stitching through the front loops of two adjacent stitches. Fasten off, leaving a long tail for sewing.
Finishing & Assembly
Now it is time to bring your Starry Cat to life! Stuff the head, body, legs, and tail firmly with polyfill as you assemble them.
Sewing the Parts
- Ears: Sew the front ear between Rounds 2 and 3 of the head. Sew the back ear between Rounds 3 and 4, shifting it slightly to the left.
- Tail: Sew the tail to the body between Rounds 5 and 10.
- The Face:
- Using pink yarn, embroider a small nose between Rounds 6 and 8 of the head.
- Embroider the eyes and mouth. For a bolder look, use three strands of yellow thread for the whiskers.
Adding the Stars
Using your yellow embroidery floss, scatter various stars across the cat’s body and tail. You can create different star styles: simple cross-stitches for tiny stars, longer four-pointed stars for brightness, and multi-pointed radiating stars for a dramatic celestial effect.
Tips for Success
- Invisible Decreases: When working the decreases (dec), use the invisible decrease method (insert hook into front loops only of the next two stitches) to keep the surface of your cat smooth and seamless.
- Stitch Markers: Because the body involves several complex shifts and connects to the head, use a stitch marker to keep track of the beginning of your rounds.
- Embroidery Tension: When sewing the stars, be careful not to pull the yellow thread too tight, as this can pucker the crochet fabric and distort the shape of the cat.
- Yarn Choice: If you want a more “fuzzy” look, try a soft acrylic or a velvet yarn, but remember that you may need to adjust your hook size to ensure the stuffing remains hidden.