Adorable Crochet Plush Donkey Pattern: Step-by-Step Amigurumi Tutorial
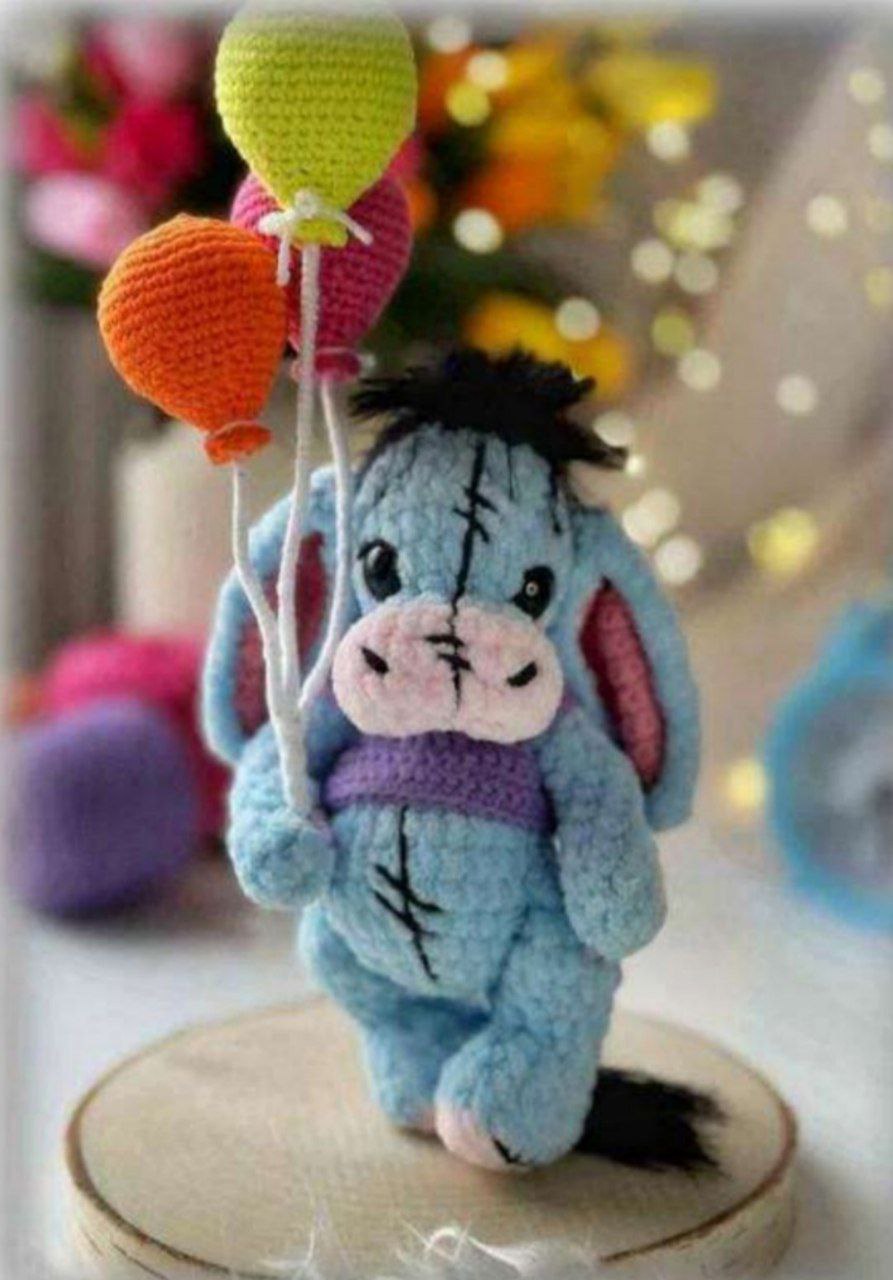
Looking for your next cozy crochet project? This adorable plush donkey is the perfect blend of cuddly and cute. Whether you are making a gift for a child or adding to your own amigurumi collection, this pattern creates a charming companion with a soft, velvety texture. This tutorial is designed to be beginner-friendly, guiding you through the process of creating a high-quality, professional-looking plushie from scratch.
The finished donkey stands approximately 6.7 inches tall, making it the ideal size for hugging or displaying on a shelf. By combining plush chenille yarn with smoother cotton blends for the details, we achieve a wonderful contrast in textures that makes the toy feel special.
Materials & Abbreviations
To get the best results, we recommend using chenille-style yarn for the body to give it that signature “squishy” feel. Here is everything you will need to gather before you begin.
Materials Needed
- Main Body Yarn: Approximately 50-60 yards of super bulky plush/chenille yarn (e.g., Himalaya Dolphin Baby) in light blue or grey.
- Detail Yarn: Small amounts of light-weight cotton or acrylic blend yarn (e.g., YarnArt Jeans) in pink (for ears and balloons) and green (for the sweater).
- Specialty Yarn: A small amount of black faux-fur or fluffy yarn for the mane and tail tip.
- Crochet Hooks: 3.25 mm hook for the main body and 2 mm hook for the smaller detail pieces.
- Eyes: 14 mm black safety eyes.
- Hardware: One 25 mm plastic head joint (disc and pin) for a moveable head.
- Filling: High-quality polyester fiberfill.
- Notions: Two small buttons, a small length of thin floral wire, a large yarn needle, stitch markers, and scissors.
US Crochet Abbreviations
- MR: Magic Ring
- ch: Chain
- sc: Single crochet
- inc: Increase (2 sc in one stitch)
- dec: Decrease (sc 2 together)
- sl st: Slip stitch
- BLO: Back loop only
- tr: Treble crochet
- st(s): Stitch(es)
Step-by-Step Instructions
The Legs (Make 2)
Use the 3.25 mm hook. Start with the accent color for the hoof.
- Round 1: Ch 6. Starting from the 2nd chain from the hook: inc, 3 sc, 4 sc in the last chain, 3 sc, 2 sc in the last chain. (14 sts)
- Round 2: Switch to main color. 14 sc in BLO.
- Round 3: 14 sc.
- Round 4: 4 sc, 3 dec, 4 sc. (11 sts)
- Round 5: 4 sc, 3-stitch decrease (sc 3 together), 4 sc. (9 sts)
- Round 6: 4 sc, inc, 4 sc. (10 sts)
- Round 7: 5 sc, inc, 4 sc. (11 sts)
- Round 8: 6 sc, inc, 4 sc. (12 sts)
- Round 9: (1 sc, inc) * 6. (18 sts)
- Round 10: 18 sc.
- Round 11: (1 sc, dec) * 6. (12 sts)
Fold the piece in half and sc 6 across to close. Fasten off, leaving a tail for sewing. Stuff the legs firmly, but only up to Round 5.
The Arms (Make 2)
Use the 3.25 mm hook. Start with the main color.
- Round 1: 8 sc in MR.
- Rounds 2-4: 5 sc in main color, 3 sc in accent color (pink). (8 sts)
- Round 5: 6 sc, inc, 1 sc. (9 sts)
- Round 6: 7 sc, inc, 1 sc. (10 sts)
- Round 7: 10 sc.
- Round 8: 8 sc, dec. (9 sts)
- Round 9: 3 sc, inc, 5 sc. (10 sts)
- Rounds 10-12: 10 sc.
Fold the arm in half and sc 5 across to close. Fasten off. Stuff lightly up to Round 4.
The Body
Use the 3.25 mm hook and main color. Stuff firmly as you go.
- Round 1: 6 sc in MR.
- Round 2: 6 inc. (12 sts)
- Round 3: (1 sc, inc) * 6. (18 sts)
- Round 4: (2 sc, inc) * 6. (24 sts)
- Round 5: (3 sc, inc) * 6. (30 sts)
- Round 6 (Joining Legs): 4 sc, 6 sc through the left leg, 10 sc, 6 sc through the right leg, 4 sc. (30 sts)
- Rounds 7-8: 30 sc.
- Round 9: 6 sc, (1 sc, dec) * 6, 6 sc. (24 sts)
- Round 10: 6 sc, 6 dec, 6 sc. (18 sts)
- Rounds 11-14: 18 sc.
- Round 15 (Joining Arms): 2 sc, 5 sc through the left arm, 4 sc, 5 sc through the right arm, 2 sc. (18 sts)
- Round 16: (1 sc, dec) * 6. (12 sts)
- Round 17: 12 sc.
Stuff the body completely. Insert the 25 mm plastic disc into the neck area. Final round: 6 dec. Close the hole tightly and fasten off.
The Head
Use the 3.25 mm hook. Start with the accent color for the muzzle.
- Round 1: Ch 6. Starting from 2nd ch: inc, 3 sc, 4 sc in last ch, 3 sc, 2 sc in last ch. (14 sts)
- Round 2: 2 inc, 3 sc, 4 inc, 3 sc, 2 inc. (22 sts)
- Rounds 3-4: 22 sc.
- Round 5: Switch to main color. 8 dec, 2 sc, 2 dec. (12 sts)
- Round 6: 12 sc.
- Round 7: 6 inc, 6 sc. (18 sts)
- Round 8: (1 sc, inc) * 6, 6 sc. (24 sts)
- Rounds 9-13: 24 sc.
- Round 14: (2 sc, dec) * 6. (18 sts)
- Round 15: (1 sc, dec) * 6. (12 sts)
- Round 16: 6 dec. (6 sts)
Place 14 mm safety eyes between Rounds 8 and 9, approximately 9-10 stitches apart. Stuff the head firmly and fasten off.
The Ears (Make 2)
Ears consist of two parts: an inner pink part and an outer plush part.
Inner Ear
Use the 2 mm hook and pink yarn. Work in rows, ch 1 at the end of each row and turn.
- Row 1: Ch 2, 1 inc in 2nd ch. (2 sts)
- Row 2: 2 inc. (4 sts)
- Row 3: inc, 2 sc, inc. (6 sts)
- Rows 4-5: 6 sc.
- Row 6: inc, 4 sc, inc. (8 sts)
- Row 7: 8 sc.
- Row 8: inc, 6 sc, inc. (10 sts)
- Rows 9-20: 10 sc. Fasten off.
Outer Ear
Use the 3.25 mm hook and main plush yarn. Work in rows, ch 1 and turn.
- Row 1: Ch 2, 1 inc in 2nd ch. (2 sts)
- Row 2: 2 inc. (4 sts)
- Row 3: 4 sc.
- Row 4: inc, 2 sc, inc. (6 sts)
- Rows 5-12: 6 sc. Do not fasten off.
Place the inner ear against the outer ear and sc around the entire perimeter using the 2 mm hook. Fold the base and sl st 4 times to narrow it. Leave a long tail for sewing.
The Tail and Mane
Tail
Use the 3.25 mm hook and main color. Ch 10, then sl st in each of the 9 stitches. Fasten off. Create a tassel using the black fluffy yarn and attach it to the end of the tail. Sew the tail to the back of the body between Rounds 6 and 7.
Mane
Using the black fluffy yarn, surface crochet or sew along the top of the head from the forehead, between the ears, and down to the back of the neck. Go back toward the forehead to add volume. Brush the mane with a pet brush and trim slightly for a neat look.
The Sweater
Use the 2 mm hook and green yarn. Work in rows, ch 1 and turn.
- Row 1: Ch 25, 24 sc.
- Row 2: (3 sc, inc) * 6. (30 sts)
- Row 3: 30 sc.
- Row 4: (4 sc, inc) * 6. (36 sts)
- Row 5: 36 sc.
- Row 6: (5 sc, inc) * 6. (42 sts)
- Row 7: 6 sc, ch 8, skip 10 sts, 10 sc, ch 8, skip 10 sts, 6 sc. (38 sts)
- Row 8: 6 sc, 8 sc in chain, 10 sc, 8 sc in chain, 6 sc. (38 sts)
- Row 9: (6 sc, inc) * 2, 10 sc, (inc, 6 sc) * 2. (42 sts)
- Row 10: 42 sc.
- Row 11: (6 sc, inc) * 6. (48 sts)
- Row 12: 48 sc.
Create buttonholes by chaining 4, skipping 2 rows, and continuing with 7 sc. Attach the small buttons opposite the holes.
Finishing
Now it is time to bring your donkey to life with facial details!
- Muzzle Shaping: Using a strong thread and needle, create an indentation under the muzzle. Mark 6 points and sew in a zig-zag pattern from point 1 to 6, pulling tight to create a cute snout.
- Eye Details: Use white plush yarn to embroider small highlights on the safety eyes. Use thin black thread for eyelids and eyebrows.
- Nostrils and Stitches: Embroider four small nostrils on the muzzle with black acrylic yarn. Add a few “stitch” marks on the forehead, muzzle, and tummy to give the donkey its characteristic look.
- Assembly: Sew the ears 2 rows above the eyes. Attach the head to the body using the plastic joint.
Tips for Success
- Tension is Key: When working with plush yarn, keep your tension consistent. If you crochet too loosely, the fiberfill may peek through the stitches.
- Hidden Seams: When joining the arms and legs to the body, make sure your stitches are tight so the limbs are securely anchored.
- Customization: Feel free to change the sweater color! A bright red or yellow sweater can give your donkey a whole new personality.
- Balloon Extras: To make the optional balloons, crochet a simple sphere (MR 6, inc to 36, dec back to 6). Attach them to thin wires wrapped in yarn and glue them to the donkey’s hand for a whimsical touch.