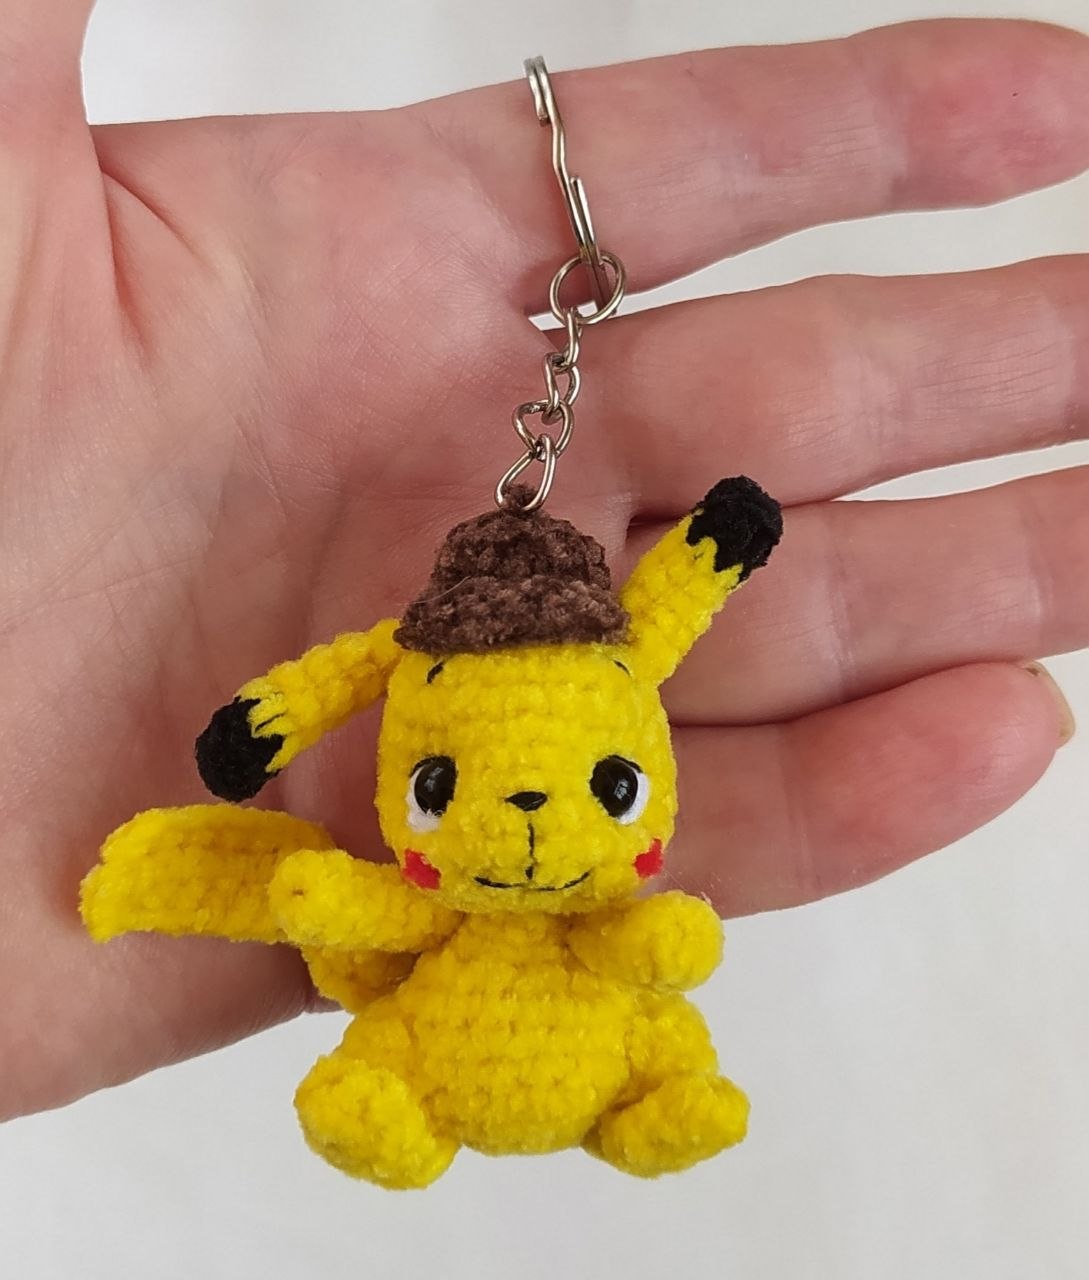
Pika-Perfect: How to Crochet Your Own Adorable Mini Pikachu
How to Crochet a Mini Pikachu: Step-by-Step Amigurumi Pattern
Create your own adorable mini Pikachu with this detailed crochet guide. This small-scale project is perfect for making keychains or desk buddies. Follow the steps below to bring this iconic Pokémon to life!
Materials Needed
- Yarn: Yellow and Brown micro-velour (1.5mm) or Acrylic yarn (approximately 100g/300m).
- Embroidery Thread:
- White (for eye highlights)
- Black (for the nose, eyelashes, and eyebrows)
- Red (for the cheeks)
- Crochet Hooks: 1.0mm (for micro-velour) or 1.25mm (for acrylic).
- Safety Eyes: 5mm sew-on eyes.
- Other Supplies:
- Fiberfill stuffing
- Strong thread for sculpting (dental floss or nylon thread)
- Long yarn needle for assembly
- Keychain ring
Crochet Abbreviations (US Terms)
- MR: Magic Ring
- ch: Chain
- sc: Single Crochet
- inc: Increase (2 sc in one stitch)
- dec: Decrease (sc 2 stitches together)
- dc: Double Crochet
- (…) * X: Repeat the sequence inside the parentheses X times
- (number): Total number of stitches at the end of the round
Note: The finished toy is approximately 6-7 cm (about 2.5 inches) tall depending on the yarn used.
Step-by-Step Pattern
Arms (Make 2)
- ch 2, work 6 sc into the 2nd chain from the hook.
- Rounds 2-7: 6 sc (6 rounds total).
Tip: Do not stuff the arms. Close the opening by sewing through the front loops only.
Lower Legs (Make 4 Parts Total)
Hips/Thighs (Make 2)
- ch 2, work 6 sc into the 2nd chain from the hook.
- 6 inc (12).
- Rounds 3-4: 12 sc (2 rounds).
Fasten off, leaving a tail for sewing. Stuff with small balls of fiberfill.
Feet (Make 2)
- ch 2, work 6 sc into the 2nd chain from the hook.
- Rounds 2-4: 6 sc (3 rounds).
Do not stuff. Fold the piece in half and sc 3 through both layers to close the end. Leave a tail for sewing.
Body
Worked from the bottom up:
- ch 2, work 6 sc into the 2nd chain from the hook.
- 6 inc (12).
- (1 sc, inc) * 6 (18).
- Rounds 4-7: 18 sc (4 rounds).
- 3 sc, 6 dec, 3 sc (12).
- (2 sc, dec) * 3 (9).
- Rounds 10-11: 9 sc (2 rounds).
Stuff the body firmly and leave a tail for sewing.
Tail
Worked in rows (turn at the end of each row):
- ch 8, sc in 2nd chain from hook and each remaining chain (7 sc).
- 7 sc, ch 1, turn.
- 7 sc, then ch 4 and work 4 sc into those chains (4 sc), ch 1, turn.
- 4 sc, ch 3 and work 3 sc into those chains (3 sc), ch 1, turn.
- 3 sc, change to black yarn, ch 2 and work 2 sc into those chains (2 sc), ch 1, turn.
- 2 sc.
Fasten off and leave a tail for sewing.
Head
- ch 2, work 6 sc into the 2nd chain from the hook.
- 6 inc (12).
- (1 sc, inc) * 6 (18).
- (2 sc, inc) * 6 (24).
- Rounds 5-11: 24 sc (7 rounds).
- 6 sc, 6 dec, 6 sc (18).
- 9 dec.
Stuff the head firmly. After finishing the face, close the opening using the front loops only.
Ears (Make 2)
Using Black Yarn:
- ch 2, work 6 sc into the 2nd chain from the hook.
- 6 sc.
Change to Yellow Yarn:
- Rounds 3-7: 6 sc (5 rounds).
Do not stuff. Fold one ear in half and sc 3 through both sides to flatten it. Leave tails for sewing.
The Hat (Optional Accessory)
Using Brown Yarn:
- ch 2, work 6 sc into the 2nd chain from the hook.
- 6 inc (12).
- Rounds 3-4: 12 sc (2 rounds).
- 4 sc, 4 dc increases (or 4 dc), 4 sc (16).
Fasten off and leave a tail. Add a small amount of stuffing before sewing it to the head.
Assembly and Finishing
Facial Details and Sculpting
- Eye Placement: Use pins to mark the eyes between rounds 7 and 8, roughly 6 stitches apart.
- Sculpting: Use a strong thread to create a “pull” from the open bottom of the head to the pin location. This creates a concave look for the eyes and defines the neck area.
- Eyes: Sew on the 5mm safety eyes.
- Embroidery:
- Use white thread for the small highlights in the eyes.
- Use black thread (doubled) for the nose, eyebrows, eyelashes, and mouth.
- Use red yarn or thread for the cheeks.
Final Assembly
- Head and Body: Align the head with the body and sew securely.
- Ears: Pin the ears in place and sew them to the top of the head.
- Arms: Sew the arms to the sides of the body.
- Legs: Sew the hips to the bottom of the body, then attach the feet to the hips.
- Tail: Sew the tail to the back of the body.
- Hat: Attach the brown hat to the top of the head.
Your mini Pikachu is now complete! You can now attach a keychain ring to the head to take your companion everywhere.