Meet Amelie’s Horse: A Magical Crochet Pattern for Your Dream Companion
Hello, dearest crochet friends! Today, I am absolutely overflowing with excitement to share a pattern that is truly something special—Amelie’s Horse this enchanting little pony has captured my heart completely, and I know she’ll capture yours too.
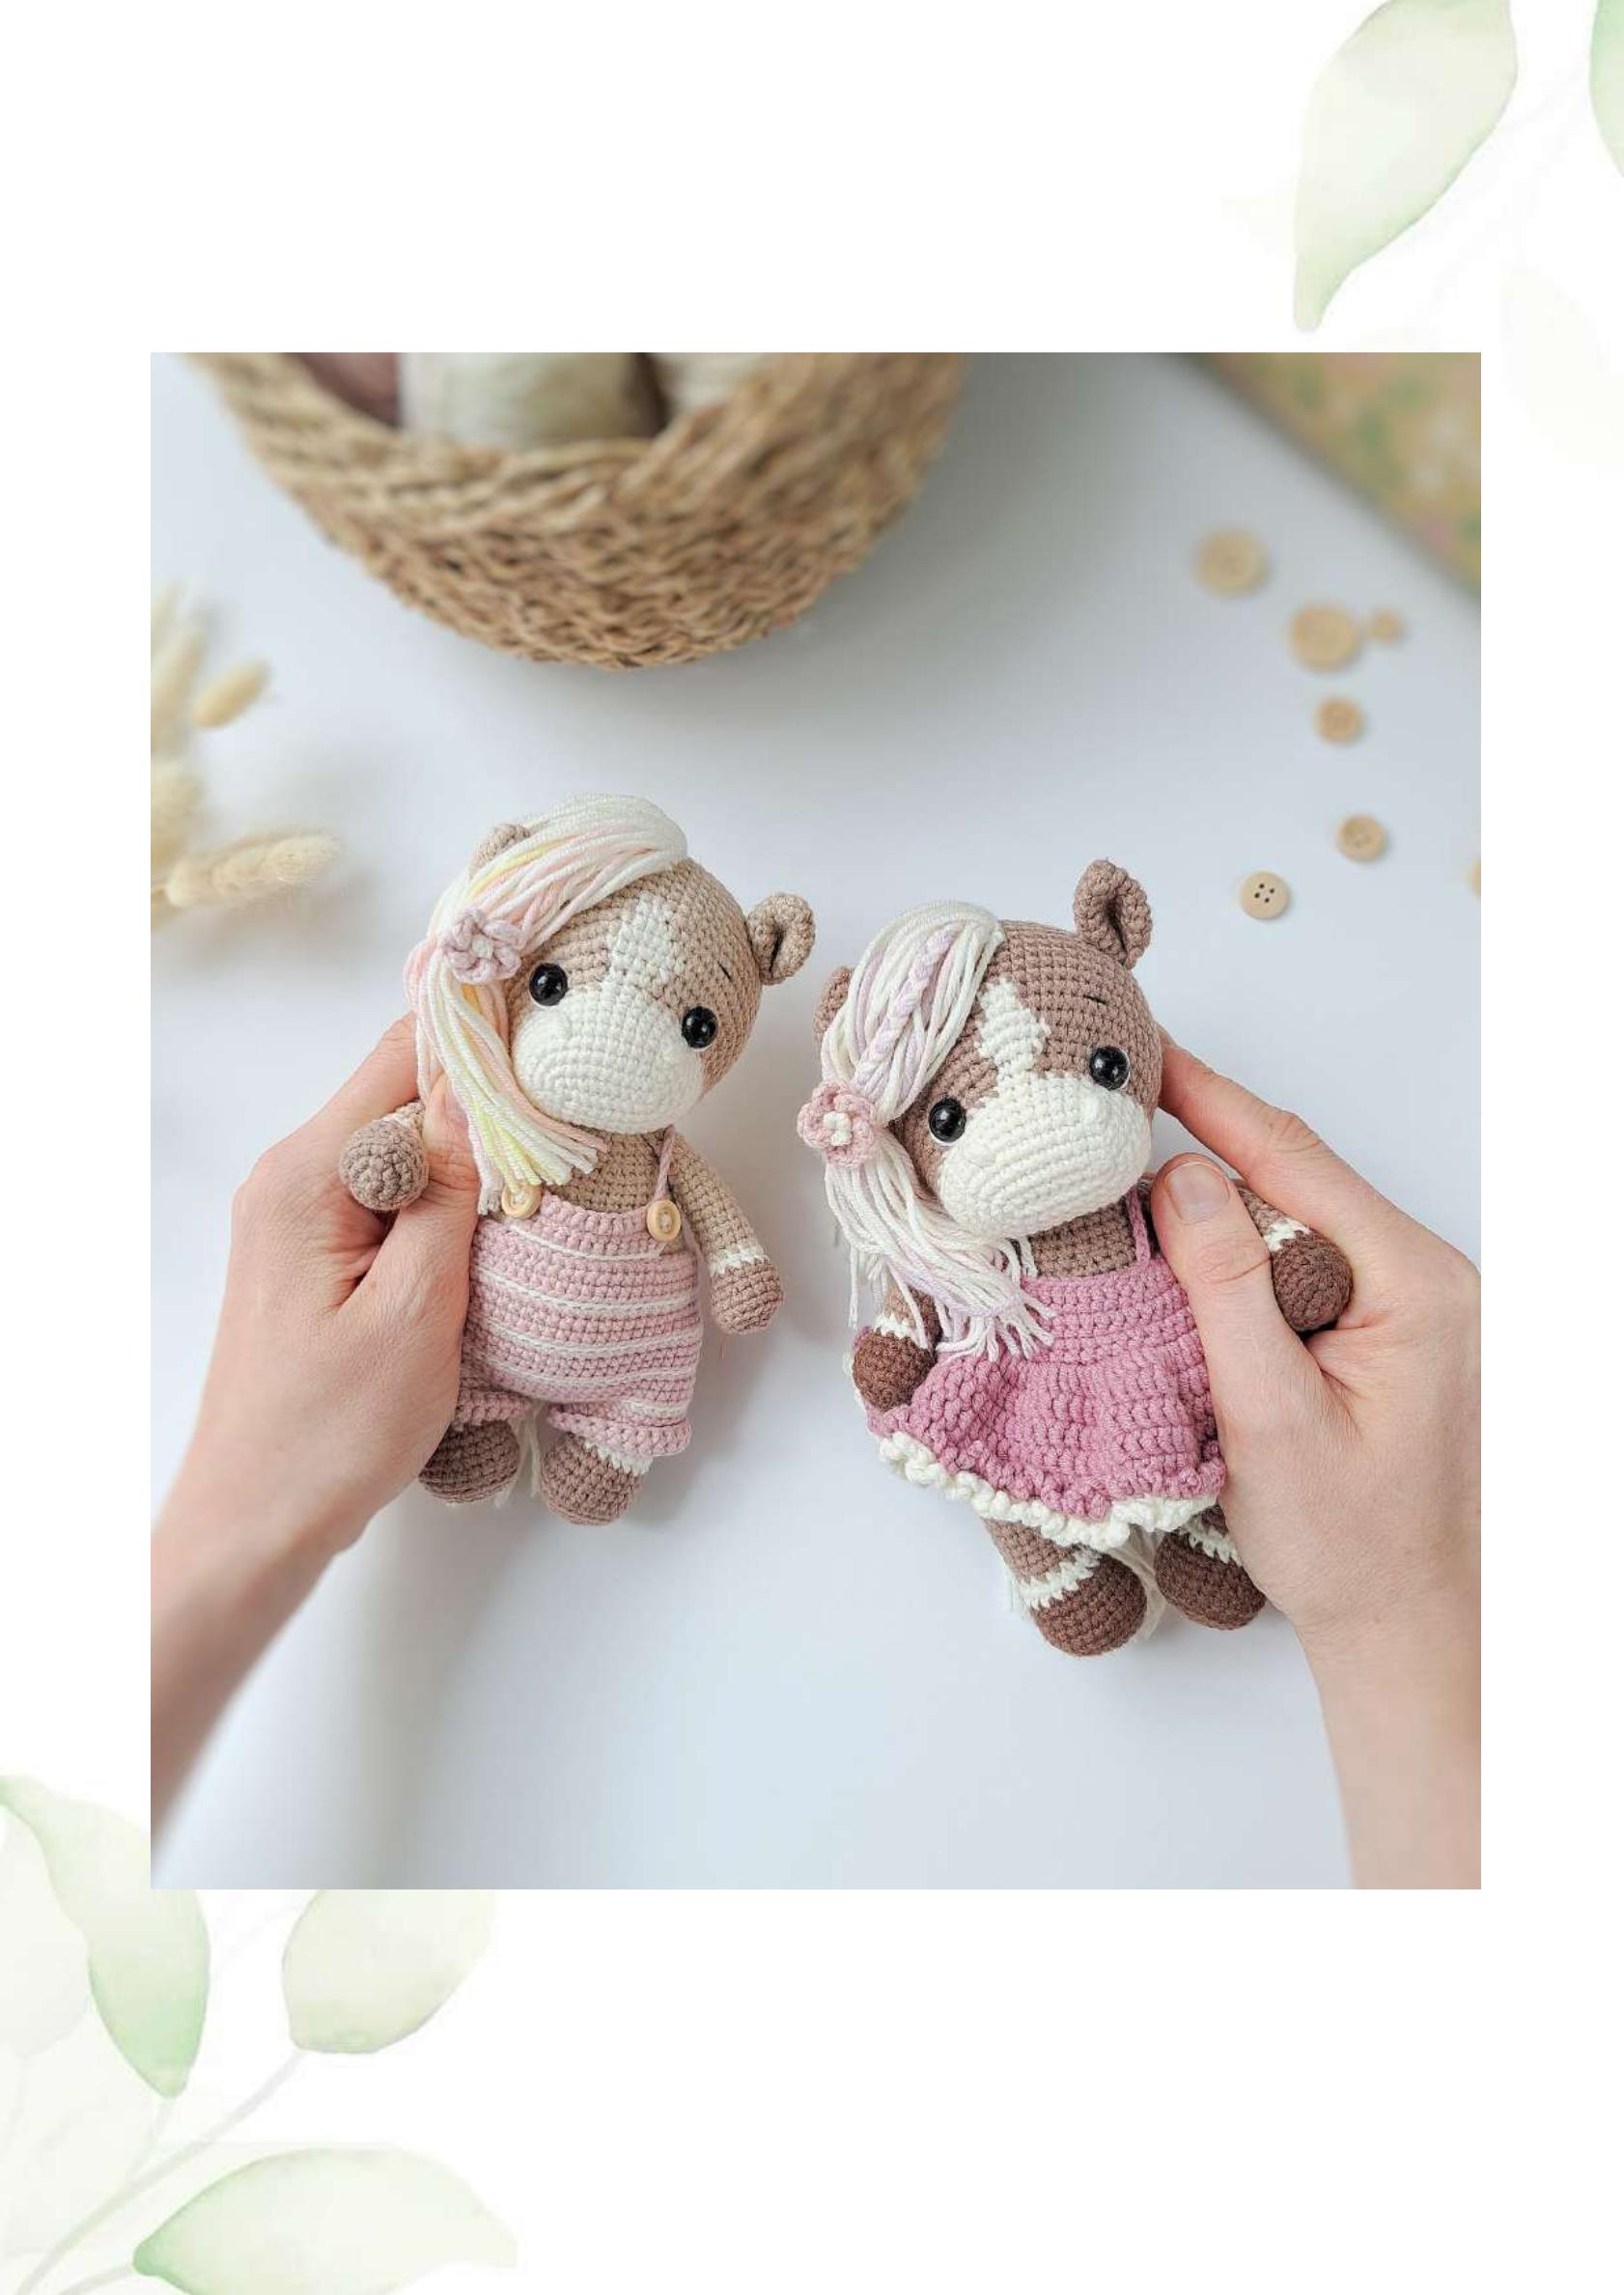
Isn’t she just the sweetest thing you’ve ever seen? With her gentle spotted face, perky ears, and that glorious flowing mane and tail, she looks like she’s stepped right out of a storybook. I can just imagine her galloping through enchanted forests, carrying dreams and wishes to children everywhere. There’s something so timeless and magical about handmade horses—they’ve been beloved companions for generations, and this pattern captures that classic charm perfectly.
What makes this pattern extra special is the attention to detail. From the carefully placed spot on her muzzle to the embroidered eyebrows that give her such a sweet expression, every element works together to create a toy with real personality. And the outfits! Oh, the outfits! She comes with TWO adorable ensembles—a cozy pair of overalls with tiny buttons, and a beautiful sundress with a delicate flower for her mane. You can dress her up for any occasion!
This pattern is rated medium difficulty and is perfect for crocheters who have some experience with amigurumi techniques. You’ll practice color changes, careful embroidery, and assembling multiple pieces. The result is an heirloom-quality toy that stands about 18 cm tall—the perfect size for little hands to love and big hearts to cherish.
So gather your yarn in those beautiful browns, creams, and pinks, and let’s embark on a magical crochet adventure together
Materials & Tools
Yarn: YarnArt Jeans (50g/160m) in the following colors:
- Color 71 Brown: For the body (slightly less than one skein)
- Color 03 Milky: For the face, spot, mane, tail, paws, and clothes (more than half a skein)
- Alize Cotton Gold (100g/330m) Color 493 Dark Brown: For the paws (a small amount)
- Color 83 Soft Pink: For overalls and flower (half a skein)
- Color 65 Pink-Violet: For the sundress (more than half a skein)
- Color 19 Light Purple: For the mane (a small amount)
- Color 18 Light Pink: For the mane (a small amount)
Hook: 2.0 mm (I use Tulip hooks)
Eyes:
- 10 mm safety eyes
- White and black threads for eye embroidery and eyebrows
Other Supplies:
- Holofiber or polyester fiberfill for stuffing
- Scissors, pins, tapestry needle, stitch marker (or contrasting thread)
- Two 10 mm buttons for the overalls
- One 10 mm button for the sundress
Finished Size: Approximately 18 cm tall using the specified materials.
Abbreviations (US Terms)
- KA (MR): amigurumi ring / magic ring
- ch: chain stitch
- inc: increase (2 sc in one stitch)
- dec: decrease (single crochet 2 together)
- sc: single crochet
- ss (sl st): slip stitch
- hdc: half double crochet
- dc: double crochet
- ZSP (BLO): behind the back walls of the loops / back loops only
- PSP (FLO): behind the front walls of the loops / front loops only
- (…) X n: repeat the instructions in parentheses n times
- (…): the number in brackets indicates the number of loops in a round
Let’s Begin! Amelie’s Horse Pattern
Head
We’ll start with the sweet face and work our way up.
Start with milky color:
- R1: Ch 10. Starting from the 2nd loop from the hook: 8 sc, 3 sc in the last loop (to turn the corner), on the other side of the chain: 7 sc, inc. (20)
- R2: inc, 7 sc, 3 inc, 7 sc, 2 inc. (26)
- R3: 1 sc, inc, 7 sc, (1 sc, inc) x 3, 7 sc, (1 sc, inc) x 2. (32)
- R4: 2 sc, inc, 7 sc, (2 sc, inc) x 3, 7 sc, (2 sc, inc) x 2. (38)
- R5 – R7: 38 sc. (3 rows)
- R8: 27 sc. When knitting the 27th loop, change color to brown. Secure and cut the milky thread. Brown: 11 sc. (38)
From the next row, we’ll start knitting a spot in milky color. The density of knitting may vary, so when changing thread, pay attention to the location of the spot. It should be centered above the muzzle. If necessary, shift it by knitting a larger or smaller number of brown sc.
Cut off the milky and brown threads each time you change color. At the end, tie them into knots. If you prefer to knit with jacquard, watch the tension of the threads and tighten them constantly.
- R9: Brown: 29 sc, Milky: 2 sc, Brown: 7 sc. (38)
- R10: Brown: (1 sc, inc) x 3, 1 sc; Milky: inc, 1 sc; Brown: inc, (1 sc, inc) x 3, 22 sc. (46)
- R11: Brown: (inc, 2 sc) x 3, 1 sc; Milky: 1 sc in the same loop (inc from one brown, one milky loop), 2 sc, inc; Brown: 2 sc, (inc, 2 sc) x 3, 22 sc. (54)
- R12: Brown: (3 sc, inc) x 3; Milky: 3 sc, inc, 3 sc; Brown: inc, (3 sc, inc) x 2, 26 sc. (61)
- R13: Brown: 17 sc; Milky: 5 sc; Brown: 39 sc. (61)
- R14 – R15: Brown: 18 sc; Milky: 3 sc; Brown: 40 sc. (61) — 2 rows
Fasten off the milky thread and cut it. Continue knitting with brown.
- R16 – R21: 61 sc. (6 rows)
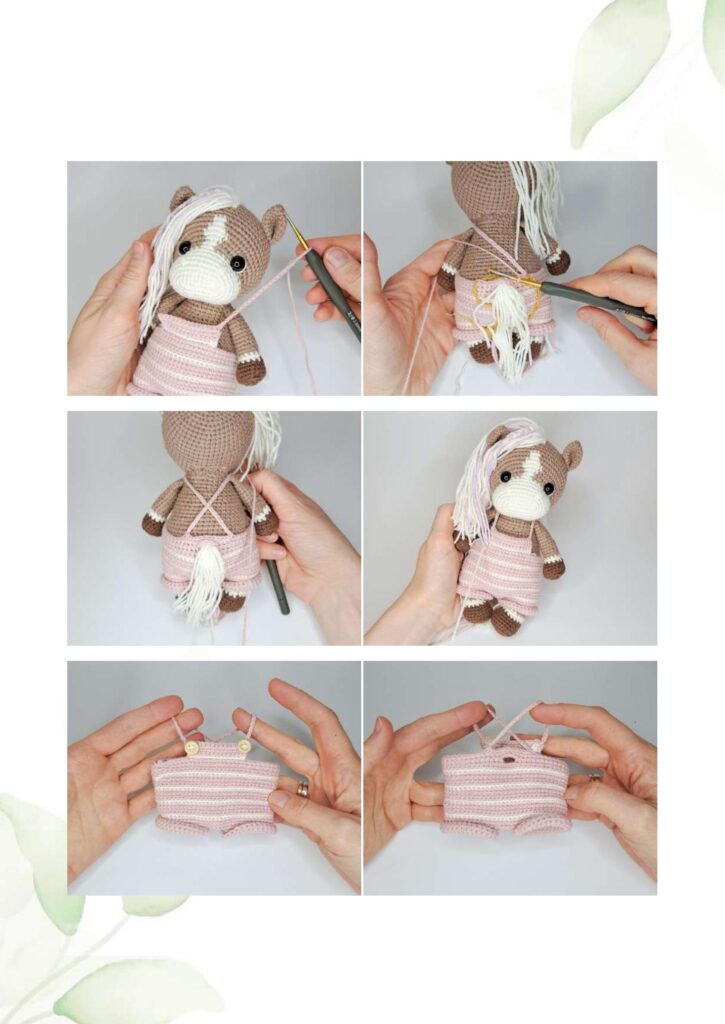
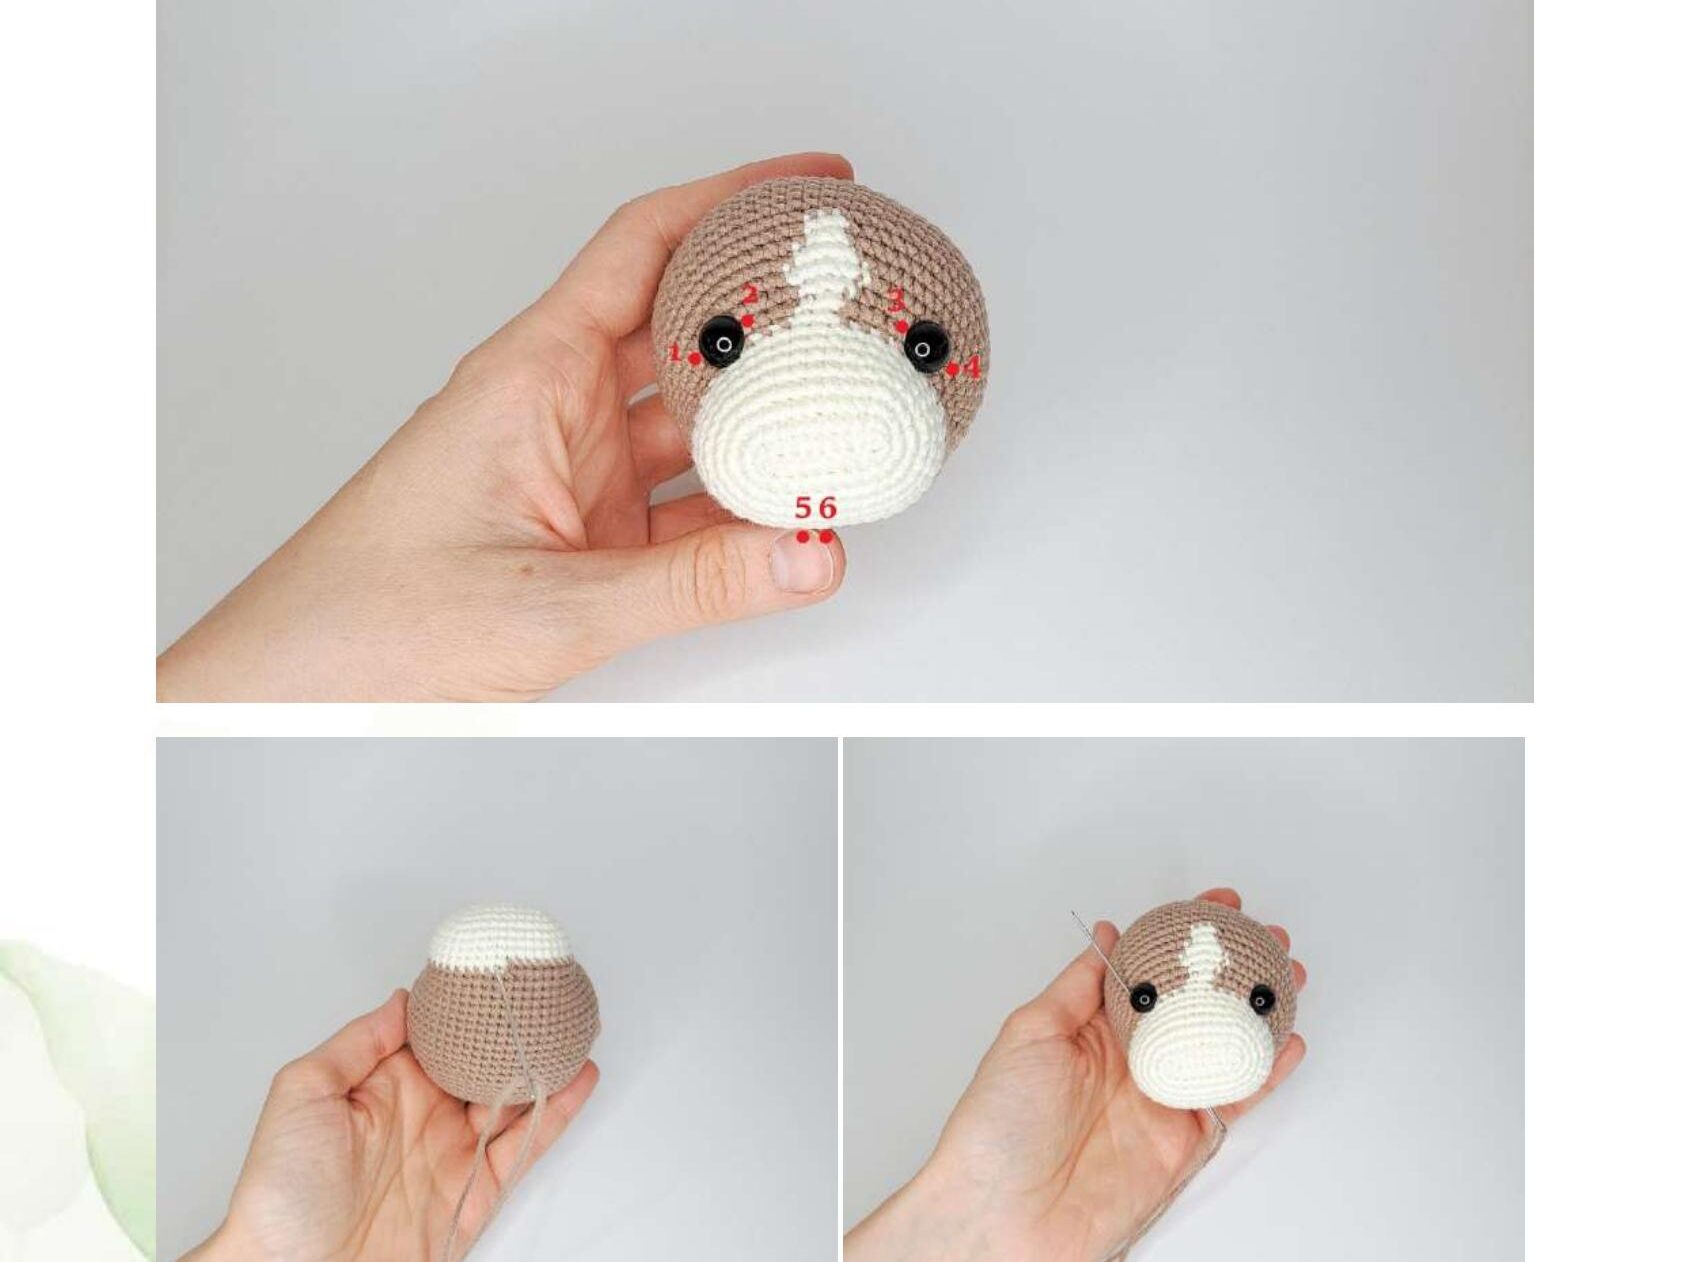
Insert safety eyes (10 mm) between rows 10 and 11, with 11 sc between them. When inserting, the spot should be centered between the eyes.
- R22: 5 sc, dec, (10 sc, dec) x 4, 6 sc. (56)
- R23: 56 sc.
- R24: 6 sc, dec, (12 sc, dec) x 3, 6 sc. (52)
- R25: 52 sc.
- R26: (11 sc, dec) x 4. (48)
- R27: 5 sc, dec, (10 sc, dec) x 3, 5 sc. (44)
- R28: (9 sc, dec) x 4. (40)
Stuff with holofiber as you knit. Stuff the light part of the muzzle less firmly.
- R29: 4 sc, dec, (8 sc, dec) x 3, 4 sc. (36)
- R30: 2 sc, dec, (4 sc, dec) x 5, 2 sc. (30)
- R31: (3 sc, dec) x 6. (24)
Stuff the head firmly.
- R32: 1 sc, dec, (2 sc, dec) x 5, 1 sc. (18)
- R33: (1 sc, dec) x 6. (12)
- R34: 6 dec. (6)
Tighten the hole (grab the front half loops with a needle and pull tight), hide the end of the thread inside the piece.
Ears (Make 2)
Do not stuff the ears.
With brown yarn:
- R1: 6 sc in a magic ring. (6)
- R2: (2 sc, inc) x 2. (8)
- R3: (1 sc, inc) x 4. (12)
- R4: (3 sc, inc) x 3. (15)
- R5: (4 sc, inc) x 3. (18)
- R6: 18 sc.
- R7: (4 sc, dec) x 3. (15)
- R8: (3 sc, dec) x 3. (12)
Fold the edges of the piece together and knit 6 sc through both layers to close. Fasten off, leaving a long tail for sewing the ears to the head.
Face Detailing: Bringing Her to Life
Eye Tightening:
Using a strong thread (like the yarn itself), tighten the eye sockets to give depth to the face:
- Insert needle at point 1 (near one eye), exit at point 2.
- Insert at point 3, exit at point 4.
- Insert at point 5, exit at point 6. (Points 5 and 6 are between rows 8 and 9, 1 sc apart.)
Pull the ends so the eyes sink in slightly, tie a knot, and hide the ends. Repeat once more with the thread passing under the eyes.
Whites of the Eyes: Using white thread, embroider small white highlights to make the eyes more expressive and lively.
Upper Eyelids: With brown thread, make one stitch above each eye to create the upper eyelid.
Nostrils: With milky thread, embroider nostrils between rows 4 and 6. Make several stitches until you achieve the desired thickness.
Attach Ears: Sew the ears to the sides of the head between rows 19 and 21. Make a few stitches upward to keep the ears close to the head.