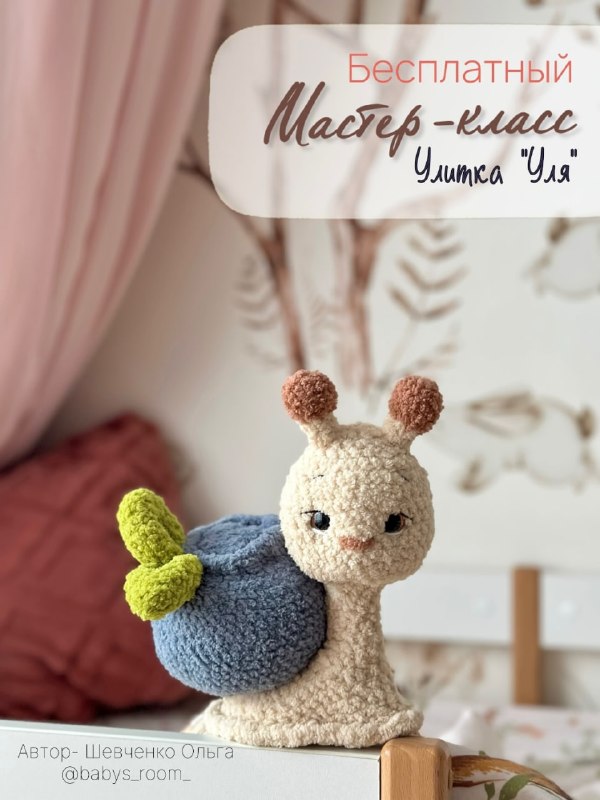
Slow & Sweet: Free Plush Snail Amigurumi Pattern
“`html
Cute Crochet Snail Amigurumi Free Pattern
Create your own adorable, plush snail with this detailed crochet guide. This project uses soft chenille-style yarn to give the snail a cuddly, velvety texture, making it perfect for a nursery decoration or a cozy gift.
Materials Needed
- Yarn: Super chunky chenille or velvet yarn in the following colors:
- Cream/Beige (for the body)
- Blue (for the shell)
- Brown (for the antenna tips)
- Green (for the leaves)
- Crochet Hook: 2.5mm to 3.0mm
- Eyes: 14mm safety eyes (sparkle style recommended)
- Stuffing: Fiberfill or polyester stuffing
- Tools: Yarn needle, black and white embroidery thread for facial details
Abbreviations (US Terms)
- MR: Magic Ring
- ch: Chain
- sc: Single Crochet
- inc: Increase (2 sc in one stitch)
- dec: Decrease (sc 2 stitches together)
- sl st: Slip Stitch
Step 1: The Shell
Using the blue yarn:
- 6 sc in MR (6)
- 6 inc (12)
- (1 sc, inc) x 6 (18)
- (2 sc, inc) x 6 (24)
- (3 sc, inc) x 6 (30)
- (4 sc, inc) x 6 (36)
- (5 sc, inc) x 6 (42)
- (6 sc, inc) x 6 (48)
- (7 sc, inc) x 6 (54)
- (8 sc, inc) x 6 (60)
- Rounds 11-20: 60 sc per round (10 rounds total). Begin stuffing the shell firmly.
- (8 sc, dec) x 6 (54)
- (7 sc, dec) x 6 (48)
- (6 sc, dec) x 6 (42)
- (5 sc, dec) x 6 (36)
- (4 sc, dec) x 6 (30)
- (3 sc, dec) x 6 (24)
- (2 sc, dec) x 6 (18)
- (1 sc, dec) x 6 (12)
- 6 dec (6)
Fasten off and weave in the ends. To add detail to the shell, insert your hook into round 6 and work a round of slip stitches around the circle. Gently tighten the thread at the end to create a slight indentation.
Step 2: The Leaves
Using the green yarn (make two):
- 6 sc in MR (6)
- 6 sc (6)
- (2 sc, inc) x 2 (8)
- (3 sc, inc) x 2 (10)
- (4 sc, inc) x 2 (12)
- (5 sc, inc) x 2 (14)
- Rounds 7-8: 14 sc per round (2 rounds total)
- (5 sc, dec) x 2 (12)
- 6 dec (6)
- 6 sc
Join the two leaves together by working 3 sc through both pieces. Leave a long tail for sewing the leaves onto the shell.
Step 3: The Snail’s Body
Using the cream/beige yarn:
The Head
- 6 sc in MR (6)
- 6 inc (12)
- (1 sc, inc) x 6 (18)
- (2 sc, inc) x 6 (24)
- (3 sc, inc) x 6 (30)
- (4 sc, inc) x 6 (36)
- 36 sc
- (5 sc, inc) x 6 (42)
- Rounds 9-13: 42 sc per round (5 rounds total)
- (6 sc, inc) x 6 (48)
- 48 sc
- 24 dec (24)
- 12 dec (12)
Eyes: Place safety eyes between rounds 10 and 11, leaving 8 sc between them. Stuff the head firmly.
The Neck
- Rounds 18-22: 12 sc per round (5 rounds total)
- (5 sc, inc) x 2 (14)
- (6 sc, inc) x 2 (16)
Stuff the neck area.
The Lower Body
Move the start of your round to the center of the back of the neck to begin the body:
- Ch 7, 1 inc in the 2nd ch from hook, 21 sc (30)
- 5 sc, (1 inc, 1 sc) x 2, 21 sc (32)
- 5 sc, (1 inc, 1 sc) x 3, 21 sc (35)
- 5 sc, (2 sc, 1 inc) x 3, 21 sc (38)
- (1 inc, 4 sc, 1 inc, 10 sc, 1 inc) x 2, 6 sc (42)
- 42 sc
- 1 inc, 6 sc, 1 inc, 10 sc, 1 inc, 6 sc, 1 inc, 10 sc, 6 sc (46)
- Rounds 28-30: 46 sc per round (3 rounds total)
Join the two parts of the body together and sew. Leave a small opening to add stuffing, then sew completely closed and hide the thread. Finish the base of the body by working a round of slip stitches around the bottom edge.
Step 4: The Antennas
Using cream yarn (make two):
- 6 sc in MR (6)
- 6 inc (12)
- (3 sc, inc) x 3 (15)
- 15 sc
- (3 sc, dec) x 3 (12) – Switch to brown yarn here.
- 6 dec (6)
- Rounds 7-9: 6 sc per round (3 rounds total)
Fasten off and leave a tail for sewing.
Step 5: Final Assembly
- Facial Details: Use the embroidery thread to create small white highlights in the eyes and embroider a small, cute nose and mouth.
- Antennas: Sew the antennas to the top of the head.
- The Shell: Sew the blue shell firmly onto the snail’s back.
- Leaves: Sew the green leaves onto the top of the shell.
- Shaping: If necessary, use a needle and thread to do “sculpting” (pulling the thread from the back to the front) to give the face more expression.
Your cute crochet snail is now complete!
“`