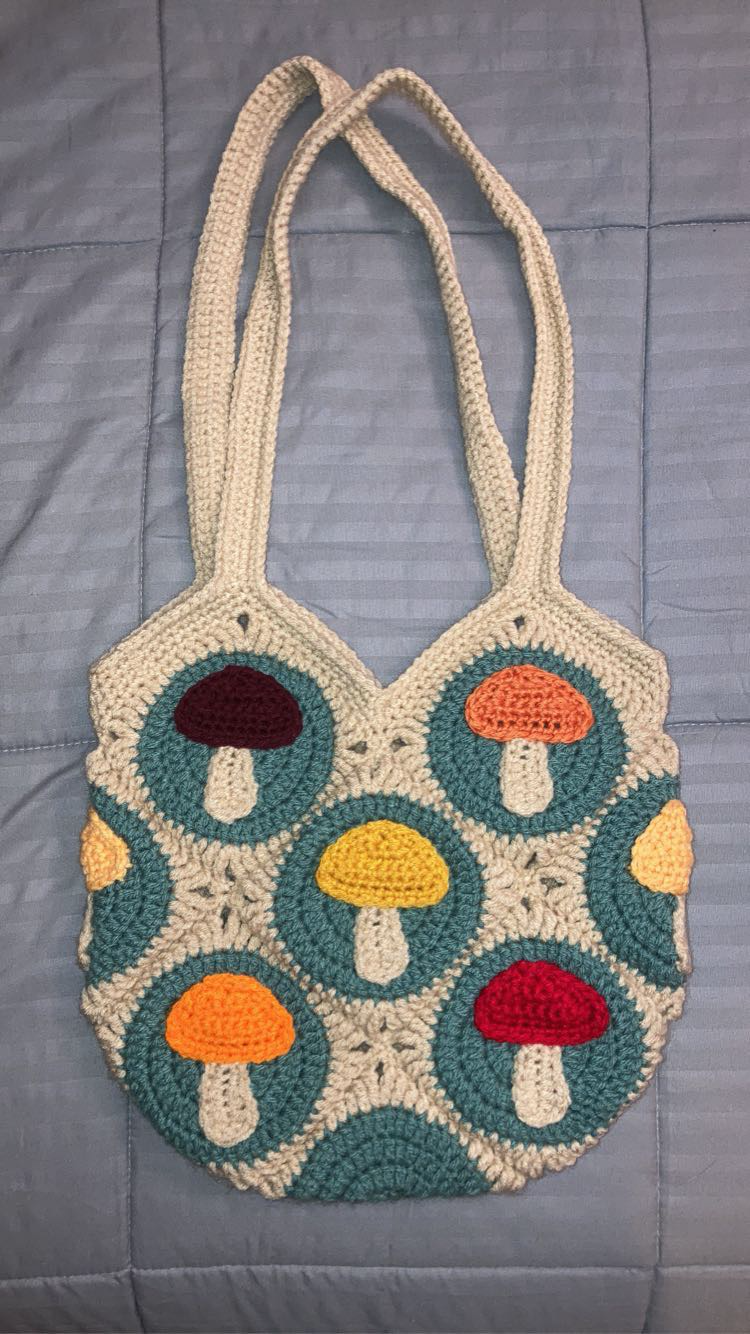
Mushroom Magic: Crochet Your Own Whimsical Cottagecore Tote Bag
DIY Crochet Mushroom Tote Bag: Step-by-Step Pattern
Add a touch of whimsical woodland charm to your wardrobe with this adorable Crochet Mushroom Tote Bag. This project is perfect for those who love cottagecore aesthetics and want a functional, handmade accessory for their daily errands or farmer’s market trips.
Materials You Will Need
To get started on this project, gather the following supplies:
- Crochet Hook: US G/6
- Yarn: Worsted weight acrylic yarn in the following colors:
- Tan (approx. 4 oz)
- Green (approx. 3.5 oz)
- Small amounts of: Red, Bright Orange, Light Orange, Gold, Burgundy, and Dark Orange
- Tools: Tapestry needle and scissors
The Pattern
1. Creating the Squares (Make 13)
Start with the green yarn.
- Round 1: Into a magic ring, chain 2, work 11 double crochet (dc), then slip stitch (sl st) to the first dc (do not slip stitch into the chain). Pull the ring closed. (12 stitches)
- Round 2: Chain 2, work a dc increase (dc inc) into the same stitch, then work dc inc around. Sl st to the first dc. (24 stitches)
- Round 3: Chain 2, dc into the same stitch, dc inc, *dc 1, dc inc* around. Sl st to the first dc. (36 stitches)
- Round 4: Chain 2, dc into the same stitch, dc 1, dc inc, *dc 2, dc inc* around. Sl st to the first dc. (48 stitches)
Note: The goal is to have a seamless circle of 48 stitches by the end of the fourth round.
Switch to tan yarn:
- Round 5: Chain 2, half double crochet (hdc), dc 3, treble crochet (tr) 1, (tr 1, ch 2, tr 1) all into the next stitch. *tr 1, dc 3, hdc 3, dc 3, tr 1, (tr 1, ch 2, tr 1) all into the next stitch* repeat 3 times. End with tr 1, dc 3, hdc 1, then slip stitch into the first chain 2. Fasten off.
Leave a tail long enough for sewing the squares together, or a short tail if you prefer to slip stitch them together from the inside.
2. Mushroom Tops (Make 12)
Use your assorted mushroom colors (e.g., 2 of each in 6 colors).
- Chain 11.
- Row 1: Single crochet (sc) in the 2nd chain from the hook, then sc in each stitch across. (10 stitches)
- Row 2: Decrease (dec) 1, sc 6, dec 1. (8 stitches)
- Row 3: Dec 1, sc 4, dec 1. (6 stitches)
- Row 4: Dec 1, sc 2, dec 1. (4 stitches)
- Row 5: Dec 2. (2 stitches)
Work a round of sc around the entire border to give the top a rounded look. Fasten off, leaving a long tail for sewing.
3. Mushroom Bottoms (Make 12)
Use tan yarn.
- Chain 7.
- Row 1: Sc in the 2nd chain from the hook, sc 1, hdc 2, dc 1, then work 3 dc in the last chain. Now, continue to crochet along the underside of the starting chain: dc 1 into the next stitch, hdc 2, sc 2.
Fasten off, leaving a long tail for sewing.
Assembly Instructions
Attaching the Mushrooms
Sew the mushroom tops and bottoms onto 12 of your 13 squares. One square should be left completely blank; this will serve as the very bottom of your bag.
Bag Layout and Joining
Arrange your squares in a cross-like layout to form the body of the bag. Ensure the mushroom designs are placed so the bag looks consistent on both sides.
- Joining: You can join the squares using a slip stitch along the inside for a cleaner look, or use a whip stitch or mattress stitch on the outside.
- Folding: Fold the sides and bottom as per your layout and secure the seams firmly.
Adding the Handles
To create the straps, chain 105 for each handle. Attach the handles securely to the top edges of the bag.
Finishing Touches
Once the handles are attached and all squares are secure, use your tapestry needle to weave in all remaining yarn tails. Your whimsical Mushroom Tote Bag is now ready for use