Llama Love: Create Your Own Adorable Crochet Companion
Adorable Crochet Llama Pattern: Step-by-Step Guide
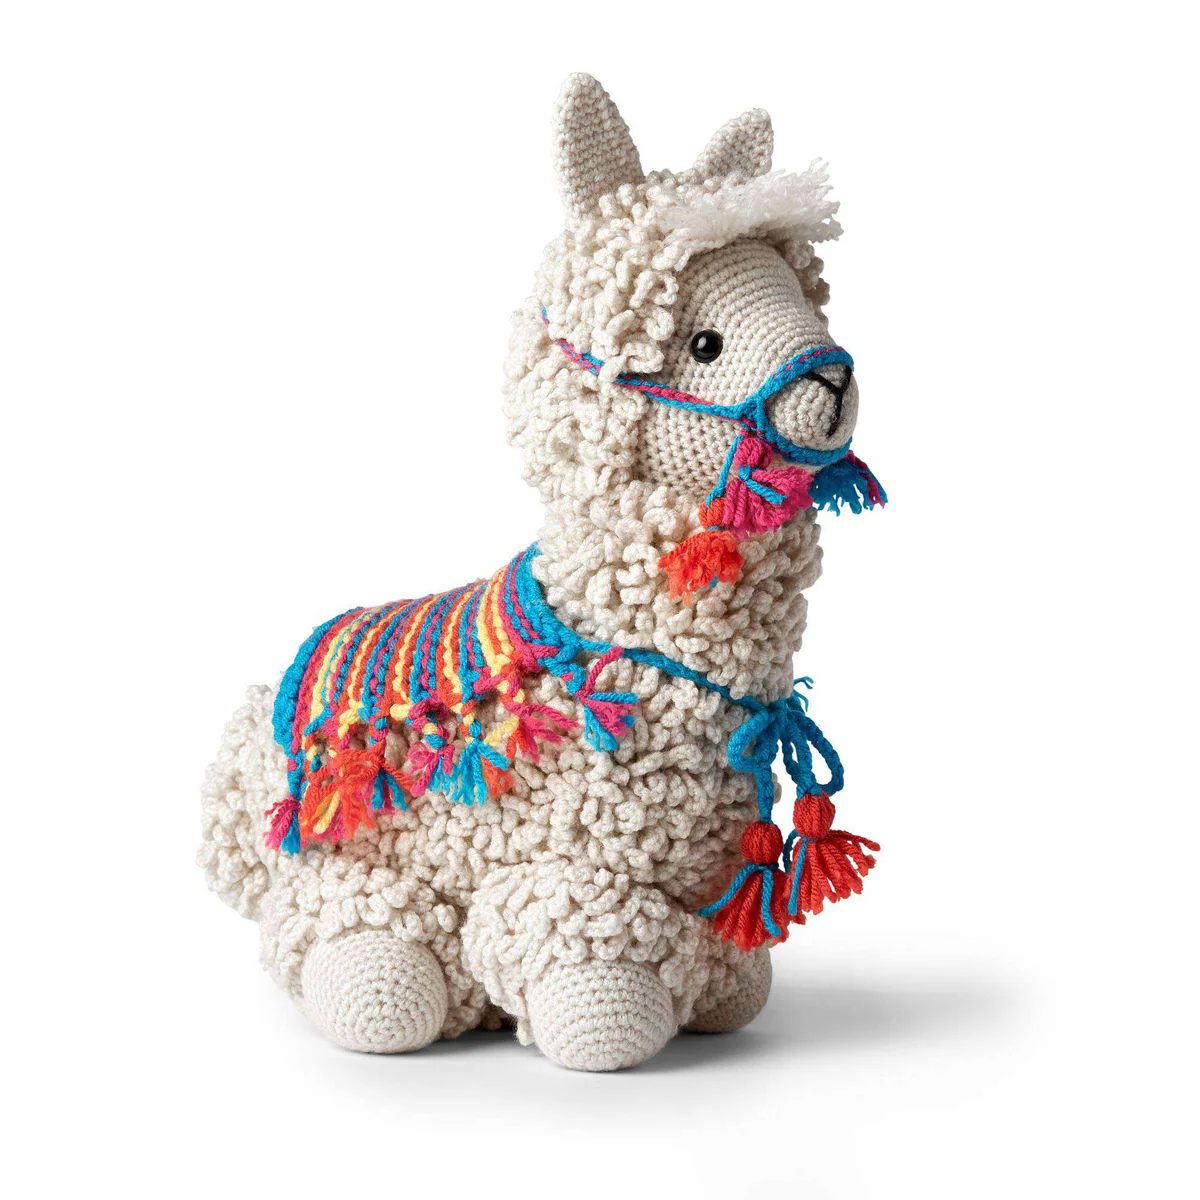
Create your own cozy and cute crochet llama with this detailed guide. This intermediate-level project results in a charming llama approximately 14.5 inches tall and 11 inches long. Perfect for home decor or as a handmade gift!
Materials Needed
- Yarn: Medium weight yarn (such as Red Heart With Love) in the following colors:
- Contrast A (Eggshell): 3 balls
- Contrast B (Blue Hawaii): 1 ball
- Contrast C (Bubblegum): 1 ball
- Contrast D (Tigerlily): 1 ball
- Contrast E (Daffodil): 1 ball
- Contrast F (Black): Small amount for facial features
- Crochet Hooks: U.S. F/5 (3.75 mm) and U.S. L/11 (8 mm)
- Accessories:
- Stitch marker
- Two 15 mm safety eyes
- Stuffing
Abbreviations Reference
- Approx: Approximately
- Beg: Beginning
- Ch: Chain(s)
- Cont: Continue(ity)
- PM: Place marker
- Rnd(s): Round(s)
- Sc: Single crochet
- Sc2tog: Single crochet two together (decrease)
- Sl st: Slip stitch
- St(s): Stitch(es)
- Yoh: Yarn over hook
Pattern Instructions
Head and Neck
Use the smaller hook and Color A.
- 1st rnd: Ch 2. Work 6 sc in 2nd ch from hook. Join with sl st. PM for beginning of round.
- 2nd rnd: Ch 1. 2 sc in each sc around. Join. (12 sc)
- 3rd rnd: Ch 1. (1 sc in next sc, 2 sc in next sc) 6 times. Join. (18 sc)
- 4th rnd: Ch 1. (1 sc in each of next 2 sc, 2 sc in next sc) 6 times. Join. (24 sc)
- 5th rnd: Ch 1. (1 sc in each of next 3 sc, 2 sc in next sc) 6 times. Join. (30 sc)
- 6th rnd: Ch 1. 1 sc in each sc around. Join.
- 7th rnd: Ch 1. (1 sc in each of next 4 sc, 2 sc in next sc) 6 times. Join. (36 sc)
- 8th to 10th rnds: Ch 1. 1 sc in each sc around. Join.
- 11th rnd: Ch 1. (1 sc in each of next 5 sc, 2 sc in next sc) 6 times. Join. (42 sc)
- 12th and 13th rnds: Ch 1. 1 sc in each st around. Join.
- 14th rnd: Ch 1. (1 sc in each of next 6 sc, 2 sc in next sc) 6 times. Join. (48 sc)
- 15th rnd: Ch 1. (1 sc in each of next 7 sc, 2 sc in next sc) 6 times. Join. (54 sc)
- 16th rnd: Ch 1. 1 sc in each st around. Join.
- 17th rnd: Ch 1. (1 sc in each of next 8 sc, 2 sc in next sc) 6 times. Join. (60 sc)
- 18th and 19th rnds: Ch 1. 1 sc in each sc around. Join.
Neck Opening:
- 1st rnd: Ch 1. 1 sc in same space as sl st. Ch 15. Skip next 15 sc. 1 sc in each sc to end of rnd. Join.
- 2nd rnd: Ch 1. 1 sc in same space as sl st. 1 sc in each of next 15 ch. 1 sc in each sc to end of rnd. Join. (60 sc)
Fur Texture (Repeated Section):
To create the fur, follow this sequence:
- Fur Rnd 1: Ch 1. Working in front loops only, 1 sc in same space as sl st. *Ch 10, 1 sc in next sc. Repeat from * around. Join.
- Fur Rnd 2: Ch 1. Working in back loops only 2 rounds below, 1 sc in each st around, pushing the ch-10 loops to the front. Join.
Follow the specific fur and decrease sequences detailed in the pattern to shape the head and neck, ending with a secure fasten off.
Facial Features: Using Color F, embroider a “Y” shaped nose and mouth onto the muzzle. Attach 15mm safety eyes between the 15th and 16th rounds, approximately 13 stitches apart.
Body
Use the smaller hook and Color A.
- 1st rnd: Ch 2. 6 sc in 2nd ch from hook. Join. PM for beginning of round.
- 2nd rnd: Ch 1. Working in front loops only, 1 sc in same space as sl st. *Ch 10, 1 sc in next sc. Repeat from * around. Join.
- 3rd rnd: Ch 1. Working in back loops only 2 rounds below, 2 sc in each st around, pushing ch-10 loops to front. Join. (12 sc)
- 4th rnd: Ch 1. Working in both loops, (1 sc in next sc, 2 sc in next sc) 6 times. Join. (18 sc)
- 5th rnd: Repeat 2nd rnd.
- 6th rnd: Ch 1. Working in back loops only 2 rounds below, (1 sc in each of next 2 sc, 2 sc in next sc) 6 times, pushing ch-10 loops to front. Join. (24 sc)
- 7th rnd: Ch 1. Working in both loops, (1 sc in each of next 3 sc, 2 sc in next sc) 6 times. Join. (30 sc)
- 8th rnd: Repeat 2nd rnd.
- 9th rnd: Ch 1. Working in back loops only 2 rounds below, (1 sc in each of next 2 sc, 2 sc in next sc) 10 times, pushing ch-10 loops to front. Join. (40 sc)
- 10th rnd: Ch 1. Working in both loops, (1 sc in each of next 3 sc, 2 sc in next sc) 6 times. Join. (50 sc)
- 11th rnd: Repeat 2nd rnd.
- 12th rnd: Ch 1. Working in back loops only 2 rounds below, (1 sc in each of next 4 sc, 2 sc in next sc) 10 times, pushing ch-10 loops to front. Join. (60 sc)
- 13th rnd: Ch 1. 1 sc in each st around. Join.
- 14th rnd: Repeat 2nd rnd.
Form Neck Opening (15th-19th rnds): Create the opening for the neck by chaining and skipping stitches as specified in the pattern, then completing the rounds with sc and fur stitches to maintain the texture.
Legs (Make 4)
Use the smaller hook and Color A.
- 1st rnd: Ch 2. 6 sc in 2nd ch from hook. Join. (6 sc)
- 2nd rnd: Ch 1. 2 sc in each st around. Join. (12 sc)
- 3rd rnd: Ch 1. (1 sc in next sc, 2 sc in next sc) 6 times. Join. (18 sc)
- 4th rnd: Ch 1. (1 sc in each of next 2 sc, 2 sc in next sc) 6 times. Join. (24 sc)
- 5th rnd: Ch 1. (1 sc in each of next 3 sc, 2 sc in next sc) 6 times. Join. (30 sc)
- 6th to 13th rnds: Ch 1. 1 sc in each sc around. Join.
Finish the legs by adding the fur stitch (Ch 10 sequence), decreasing to close the top, and fastening off.
Tail
Use the smaller hook and Color A. Ch 7. Work 1 sc in 2nd ch from hook and each ch to last. 2 sc in last ch. Rotate and work along the opposite side of the foundation chain. Continue with fur stitch and decrease rounds until the tail is closed.
Ears (Make 2)
Use the smaller hook and Color A. Ch 18. Join with sl st to first ch to form a ring. Work 1 sc in each ch around. Follow decrease rounds (sc2tog) to shape the ear into a point. Fasten off leaving a long end for sewing.
Bangs
With the smaller hook and Color A, ch 10. Fasten off, leaving long ends on both sides. Cut 20 strands of Color A (3 inches long). Knot these into the chain as a fringe and separate the plies for a fluffy look.
Halter
- Noseband: Use smaller hook and Color B. Ch 30. Join with sl st to form a ring.
- Head Strap: Ch 49. Join the end of the head strap to the opposite side of the noseband.
- Tassels: Wrap yarn (B, C, and D) around two fingers 10 times. Tie securely, cut the ends, and wrap the top of the tassel to secure. Attach these to the halter.
Blanket
Use the larger hook and 2 strands of Color B held together. Ch 26. Work rows of slip stitches in the front loops only, changing colors in the sequence: [D, E, B, C] 4 times, then E, D, C. Finish with two rows of Color B.
Fringe: Braid the remaining ends of the yarn into groups of 6 strands for 2 inches. Secure with yarn and trim.
Ties: Ch 40 in the corners of the blanket using Color B and add tassels using Color D.
Finishing and Assembly
- Neck and Head: Insert the neck into the body’s neck opening. Sew securely and stuff the head and neck firmly.
- Legs: Sew front legs directly under the shoulders (approx. 20th round of body). Sew back legs at the hip area. Ensure they are side-by-side with edges touching.
- Tail: Sew the closed tail to the upper rear of the body.
- Ears: Sew ears to the top of the head, approximately 2 inches apart.
- Bangs: Sew the fringe strip along the top of the head.
- Final Touches: Tie the blanket around the neck and place the halter on the head