Stitch Your Own Festive Friend: Cute Sitting Reindeer Crochet Pattern
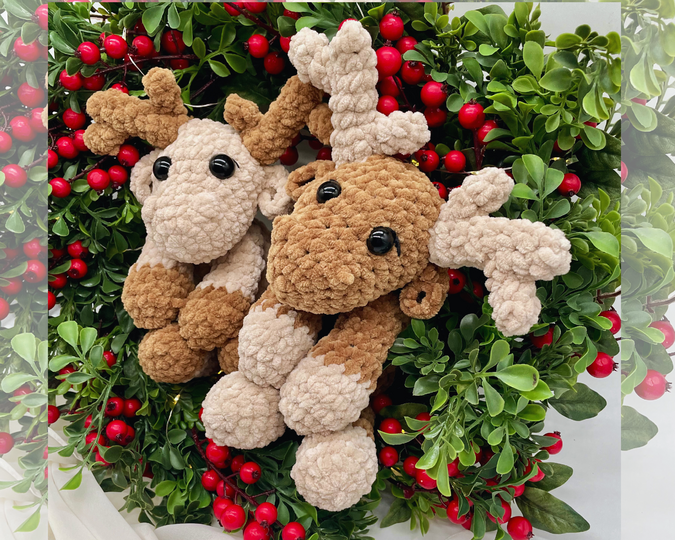
Create your own cozy, plush holiday companion with this detailed crochet pattern. This sitting reindeer is perfect for holiday decor, gifts, or a cute addition to a stuffed animal collection. Using chunky yarn and a few simple stitches, you can bring this adorable character to life.
Materials Needed
- Yarn: Two colors of chunky yarn (approximately 100g/120m per skein). You will need a Main Color (brown) and a Second Color (beige/cream).
- Crochet Hook: 4.5 mm
- Eyes: 13mm safety eyes
- Detailing: Thin black thread (for eyelashes)
- Stuffing: Polyfill
- Tools: Tapestry needle, scissors, and a stitch marker (optional)
Crochet Terms and Abbreviations
This pattern is written using US crochet terms:
- ch: chain
- st: stitch
- sc: single crochet
- inc: increase (work 2 sc into the same stitch)
- dec: decrease (sc 2 stitches together)
- bbl: bobble stitch
- MR: Magic Ring
- slst: slip stitch
- rep: repeat
Pro Tip: Use a stitch marker or a small piece of contrasting yarn to mark the beginning of every round to keep your count accurate.
The Pattern
Head
Use the Main Color.
- R1: 6 sc in MR (6)
- R2: inc x6 (12)
- R3: (sc, inc) x6 (18)
- R4: 6 sc, bbl, 4 sc, bbl, 6 sc (18)
- R5: (5 sc, inc) x3 (21)
- R6: 21 sc around (21)
- R7: 7 sc, 7 inc, 7 sc (28)
- R8-R12: 28 sc around (28)
- R13: (2 sc, dec) x7 (21)
Adding the Eyes: Stuff the head completely first to find the best placement. Place the safety eyes between rows 7 and 8 (where the snout ends and the head begins to curve), leaving a distance of 5 sc between them. Once positioned, you can remove a small amount of stuffing to secure the eye backs.
- R14: (sc, dec) x7 (14)
- Stuff: Fill with polyfill.
- R15: 7 dec (7)
Fasten off, leaving a long tail. Thread the yarn through the front loops and pull tight to close the hole. Sew the end securely.
Body
Continue with the Main Color.
- R1: 6 sc in MR (6)
- R2: inc x6 (12)
- R3: (sc, inc) x6 (18)
- R4: (2 sc, inc) x6 (24)
- R5: (3 sc, inc) x6 (30)
- R6: (4 sc, inc) x6 (36)
- R7-R8: 36 sc around (36)
- R9: (4 sc, dec) x6 (30)
- R10-R11: 30 sc around (30)
- R12: (3 sc, dec) x6 (24)
- R13-R14: 24 sc around (24)
- R15: (2 sc, dec) x6 (18)
Stuff the body with polyfill.
- R16: (sc, dec) x6 (12)
- R17: dec x6 (6)
Fasten off and leave a long tail. Thread the yarn through the front loops and pull to close. Do not sew the end shut yet; you will use this tail to attach the head later.
Arms (Make 2)
Start with the Second Color.
- R1: 5 sc in MR (5)
- R2: inc x5 (10)
- R3: (sc, inc) x5 (15)
- R4: 15 sc around (15)
- R5: (3 sc, dec) x3 (12)
Change to the Main Color.
- R6: 12 sc around (12)
- R7: (4 sc, dec) x2 (10)
- R8-R12: 10 sc around (10)
Stuff 3/4 of the arm. Fold the opening, chain 1, and sew the edge together with 5 sc. Leave a few inches of yarn for assembly.
Legs (Make 2)
Start with the Second Color.
- R1: 5 sc in MR (5)
- R2: inc x5 (10)
- R3: (sc, inc) x5 (15)
- R4: 15 sc around (15)
- R5: (3 sc, dec) x3 (12)
Change to the Main Color.
- R6-R13: 12 sc around (12)
Stuff 3/4 of the leg. Fold the opening, chain 1, and sew together with 6 sc. Leave a few inches of yarn for assembly.
Ears (Make 2)
Use the Main Color.
- R1: 6 sc in MR (6)
- R2: (2 sc, inc) inc x2 (8)
- R3: (3 sc, inc) inc x2 (10)
First Ear: Fold and crochet both sides together using 2 sc. Make 1 slst into the left side only. Leave yarn for sewing.
Second Ear: Fold and crochet both sides together using 2 sc. Make 1 slst into the right side only. Leave yarn for sewing.
Tail
Use the Main Color.
- R1: 4 sc in MR (4)
- R2-R3: 4 sc around (4)
Finish with a slip stitch and leave a few inches of yarn for sewing.
Antlers
Use the Second Color for both parts.
Part A (Make 2):
- R1: 4 sc in MR (4)
- R2: (sc, inc) x2 (6)
- R3-R6: 6 sc around (6)
- R7: (2 sc, inc) x2 (8)
- R8: 8 sc around (8)
Slst and cut yarn, leaving a tail for sewing.
Part B (Make 4):
- R1: 4 sc in MR (4)
- R2-R3: 4 sc around (4)
Slst and cut yarn. These parts do not need stuffing.
Assembly Guide
Assembling the Antlers
Sew two “Part B” pieces onto one “Part A” piece. Place the first Part B between rounds 3 and 4, and the second Part B between rounds 7 and 8 on the opposite side. Stuff Part A before completing the assembly.
Putting the Reindeer Together
- Antlers: Sew the completed antlers to the top of the head, approximately 7 sc apart.
- Ears: Sew the ears directly below the antlers.
- Head: Sew the head onto the top of the body.
- Limbs: Sew the arms and legs to the body.
- Tail: Sew the tail to the lower part of the back.
- Face: Use thin black thread to sew small eyelashes next to the safety eyes for added character.
How to Achieve the Sitting Pose
To make your reindeer sit upright naturally, follow these steps:
- Offset the Arms: Sew the hands in an offset (slightly staggered) position rather than perfectly symmetrical.
- Balance: Sit the reindeer down on a flat surface and balance the body until it feels stable.
- Position the Legs: While the reindeer is sitting and balanced, attach the legs to the sides, placing them just below the lower arm