Shell-tastic Style: Crochet Your Own Adorable Sea Turtle Tote
How to Crochet a Sea Turtle Tote Bag: A Step-by-Step Guide
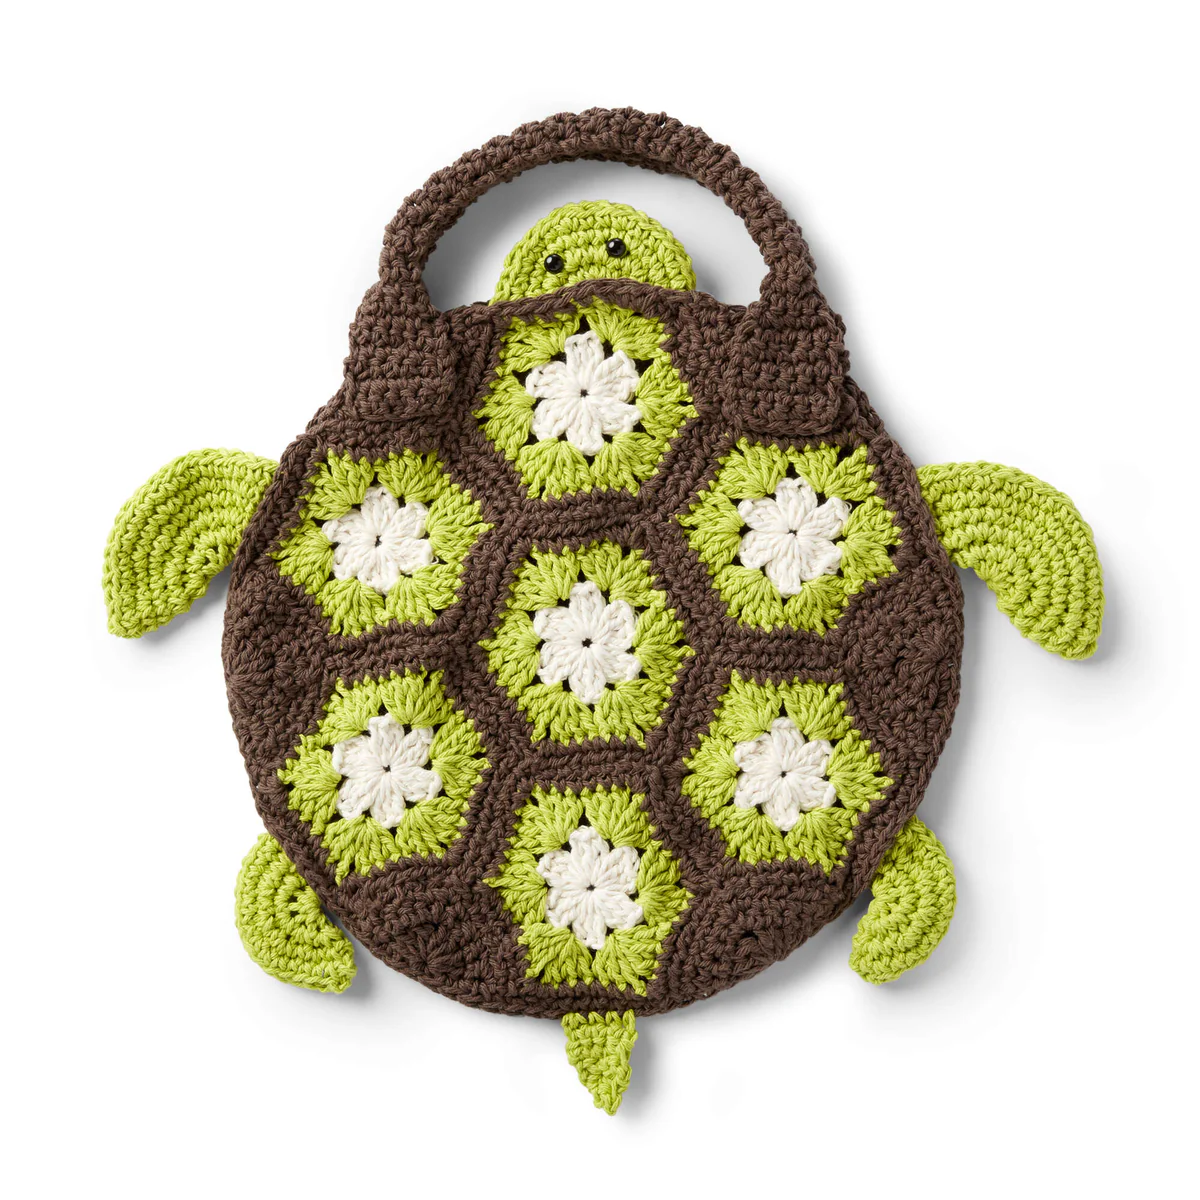
Create a whimsical and functional accessory with this Crochet Sea Turtle Tote Bag. This project combines geometric shapes like hexagons and triangles to create a beautiful turtle shell design. Perfect for a day at the beach or a trip to the farmer’s market, this bag is a fun project for any crochet enthusiast.
Materials Needed
- Yarn: Medium Weight (4) Yarn (Suggested: Lily Sugar’n Cream)
- Contrast A (Warm Brown): 2 balls
- Contrast B (Hot Green): 1 ball
- Contrast C (Soft Ecru): 1 ball
- Crochet Hook: Size U.S. H/8 (5 mm) or size needed to obtain gauge
- Notions:
- Pair of 9mm safety eyes
- 2 stitch markers
- Yarn needle for assembly
Project Details
- Finished Measurement: Approximately 18″ in diameter (excluding straps, limbs, and tail).
- Gauge: 13 sc and 14 rows = 4″ [10 cm].
- Skill Level: Easy
Abbreviations Used
- Alt: Alternate
- Beg: Beginning
- Ch: Chain(s)
- Dc: Double crochet
- Rep: Repeat
- Rnd(s): Round(s)
- Sc: Single crochet
- Sc2tog: Draw up a loop in each of next 2 stitches. Yoh and draw through all 3 loops on hook
- Sl st: Slip stitch
- Sp(s): Space(s)
- St(s): Stitch(es)
- Tog: Together
- WS: Wrong side
Pattern Instructions
Note: Join each round with a slip stitch to the first dc or sc. The Ch 2 at the beginning of the round does not count as a stitch.
The Hexagons (Make 7)
1st Rnd: Using Color C, begin with a magic loop. Ch 2. (3 dc, Ch 2) 6 times in ring. Join. Fasten off.
2nd Rnd: Join Color B with a sl st to any ch-2 sp. Ch 2. (3 dc, Ch 2, 3 dc) in same sp as sl st. *(3 dc, Ch 2, 3 dc) in next ch-2 sp. Repeat from * around. Join. Fasten off.
3rd Rnd: Join Color A with a sl st to any ch-2 sp. Ch 1. (1 sc, Ch 1, 1 sc) in same sp as sl st. *1 sc in each of next 6 sts. (1 sc, Ch 1, 1 sc) in next ch-2 sp. Repeat from * to last ch-2 sp. 1 sc in each of last 6 sts. Join. Fasten off.
The Triangles (Make 6)
Using Color A, begin with a magic loop.
1st Row: Ch 2. (4 dc, Ch 2, 4 dc) in ring. Turn.
2nd Row: Ch 1. 1 sc in each of next 4 sts. (1 sc, Ch 1, 1 sc) in ch-2 sp. 1 sc in each of last 4 sts. Turn.
3rd Row: Ch 1. 2 sc in first st. 1 sc in each of next 4 sts. (1 sc, Ch 1, 1 sc) in ch-1 sp. 1 sc in each of next 4 sts. 2 sc in last st. Fasten off.
The Back Piece
Using Color A, begin with a magic loop.
- 1st Rnd: Ch 1. 10 sc in ring. Join.
- 2nd Rnd: Ch 1. 2 sc in each sc around. Join. (20 sc)
- 3rd Rnd: Ch 1. *2 sc in next sc, 1 sc in next sc. Repeat from * around. Join. (30 sc)
- 4th Rnd: Ch 1. 1 sc in each sc around. Join.
- 5th Rnd: Ch 1. *2 sc in first sc, 1 sc in each of next 2 sc. Repeat from * around. Join. (40 sc)
- 6th Rnd: Repeat 4th rnd.
- 7th Rnd: Ch 1. *2 sc in first sc, 1 sc in each of next 3 sc. Repeat from * around. Join. (50 sc)
- 8th Rnd: Ch 1. *2 sc in first sc, 1 sc in each of next 4 sc. Repeat from * around. Join. (60 sc)
- 9th Rnd: Repeat 4th rnd.
- 10th Rnd: Ch 1. *2 sc in first sc, 1 sc in each of next 5 sc. Repeat from * around. Join. (70 sc)
- 12th Rnd: Ch 1. *2 sc in first sc, 1 sc in each of next 6 sc. Repeat from * around. Join. (80 sc)
- 14th Rnd: Ch 1. *2 sc in first sc, 1 sc in each of next 7 sc. Repeat from * around. Join. (90 sc)
- 16th Rnd: Ch 1. *2 sc in first sc, 1 sc in each of next 8 sc. Repeat from * around. Join. (100 sc)
- 18th Rnd: Ch 1. *2 sc in first sc, 1 sc in each of next 9 sc. Repeat from * around. Join. (110 sc)
- 20th Rnd: Ch 1. *2 sc in first sc, 1 sc in each of next 10 sc. Repeat from * around. Join. (120 sc)
Fasten off.
The Handles (Make 2)
Using Color A, ch 7.
- 1st Row: 1 sc in 2nd ch from hook. 1 sc in each ch to end of ch. Turn. (6 sc)
- 2nd to 6th Rows: Ch 1. 1 sc in each sc to end of row. Turn.
- 7th Row: Ch 1. Sc2tog. 1 sc in each sc to last 2 sc. Sc2tog. Turn. (4 sc)
- 8th to 42nd Rows: Ch 1. 1 sc in each sc across. Turn.
- 43rd Row: Ch 1. 2 sc in first st. 1 sc in each of next 2 sts. 2 sc in last sc. Turn. (6 sc)
- 44th to 49th Rows: Ch 1. 1 sc in each sc across. Turn.
Fasten off, leaving a long tail. Fold handles in half lengthwise and seam between the 8th and 42nd rows. Sew the wide ends of the handles to the Tote Bag.
Arms and Legs (Make 4 total)
Using Color B, begin with a magic loop.
- 1st Rnd: Ch 1. 10 sc in ring. Join.
- 2nd Rnd: Ch 1. 2 sc in each sc around. Join. (20 sc)
- 3rd Rnd: Ch 1. *2 sc in next sc, 1 sc in next sc. Repeat from * around. Join. (30 sc)
- 4th Rnd: Ch 1. 1 sc in each sc around. Join.
- 5th Rnd: Ch 1. *2 sc in first sc, 1 sc in each of next 2 sc. Repeat from * around. Join. (40 sc)
- 6th Rnd: Repeat 4th rnd. Fasten off.
Fold in half and stitch edges together.
The Tail
Join Color B with a sl st two stitches to the right of center at the bottom of the Tote Bag.
- 1st to 3rd Rows: Ch 1. 1 sc in each of next 4 sts. Turn.
- 4th Row: Ch 1. (Sc2tog) twice. Turn. (2 sts)
- 5th Row: Ch 1. 1 sc in each of next 2 sts. Turn.
- 6th Row: Ch 1. Sc2tog. Fasten off.
The Head
Using Color B, begin with a magic loop.
- 1st Rnd: Ch 1. 10 sc in ring. Join.
- 2nd Rnd: Ch 1. 2 sc in each sc around. Join. (20 sc)
- 3rd Rnd: Ch 1. *2 sc in next sc, 1 sc in next sc. Repeat from * around. Join. (30 sc)
- 4th Rnd: Ch 1. *2 sc in first sc, 1 sc in each of next 2 sc. Repeat from * around. Join. (40 sc)
Fasten off, leaving a long tail. Attach safety eyes two rows from the edge, 4 stitches apart. Fold the head in half and sew edges together. Sew the head to the top hexagon of the Front of the Tote Bag.
Assembly Instructions
- Front Panel: Stitch the 7 Hexagons and 6 Triangles together using a mattress stitch to create the turtle shell front. Use a diagram for placement, ensuring you place stitch markers at the top corners where the handles will attach.
- Joining Front to Back: Align the Front of the Tote Bag over the Back piece with wrong sides facing each other. Working through both thicknesses, work 1 row of single crochet evenly around the bag between the stitch markers, leaving the top section open for the bag opening.
- Final Details:
- Sew the Arms and Legs to the sides and bottom of the bag.
- Sew the handles to the top edges.
- Attach the head and tail as described in their respective sections.