Stitch Your Own Whimsical Moose: A Complete Step-by-Step Amigurumi Guide
“`html
Crochet Moose Amigurumi Pattern: Step-by-Step Guide
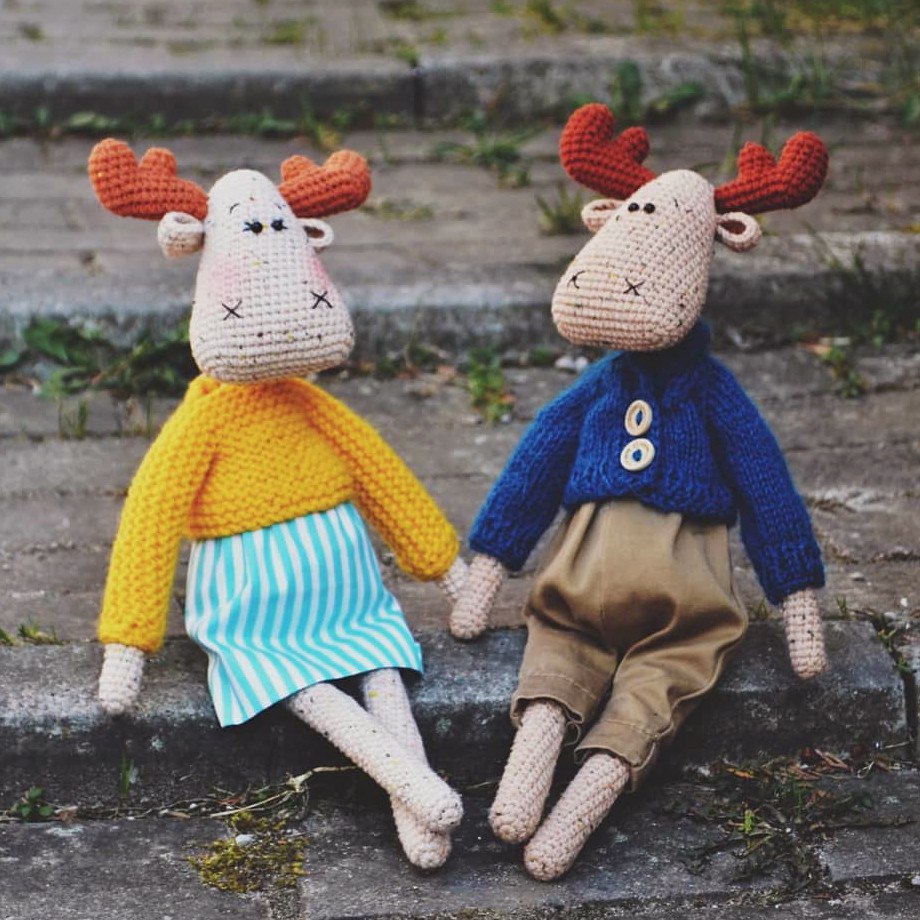
Create a charming pair of moose companions with this detailed amigurumi pattern. This project is perfect for those who love whimsical, long-limbed characters. Follow our step-by-step guide to bring these moose to life!
Materials Needed
- Main Color Yarn: Alize Cotton Gold Tweed (or similar cotton blend tweed)
- Accent Color Yarn: YarnArt Jeans or Alize Cotton Gold Tweed (Color 43 for antlers)
- Crochet Hook: 2.0 mm
- Stuffing: Polyfill or Hollofiber
- Wire: Floral wire (1-2 mm thickness, approx. 40 cm for neck support)
- Safety Eyes: 5 mm diameter
- Embroidery Thread: Black floss or iris yarn for facial details
- Finishing Touches: Dry pastels or blush for the cheeks
- Tools: Yarn needle, scissors, and fabric adhesive tape
Abbreviations (US Terms)
- MR: Magic Ring
- ch: Chain
- sl st: Slip stitch
- sc: Single crochet
- inc: Increase (2 sc in one stitch)
- dec: Decrease (2 sc together)
- FLO: Front loop only
- BLO: Back loop only
- (…) x N: Repeat the sequence inside parentheses N times
- [Number]: Total stitch count at the end of the round
Step-by-Step Pattern
Arms (Make 2)
Use the main color yarn.
- Round 1: 5 sc in MR [5]
- Round 2: 5 inc [10]
- Rounds 3-37: 10 sc [10]
Fasten off and leave a tail for sewing. Stuff only the bottom part of the arms.
Ears (Make 2)
Use the main color yarn.
- Round 1: 6 sc in MR [6]
- Round 2: 6 inc [12]
- Round 3: (1 sc, inc) x 6 [18]
- Rounds 4-5: 18 sc [18]
Fasten off and leave a tail for attachment.
Antlers (Make 2)
Use the accent color yarn.
- Start: Ch 11. Work into the 2nd chain from the hook.
- Round 1: inc, 8 sc, 4 sc in the last chain, then work 9 sc along the opposite side of the chain [23]
- Round 2: 2 sl st in BLO, 8 sc, 4 inc, 8 sc, 1 sl st in BLO [27]
- Round 3: 2 sl st in BLO, 24 sc, 1 sl st in BLO [27]
- Round 4: 2 sl st in BLO, 8 sc, inc, 6 sc, inc, 8 sc, 1 sl st in BLO [29]
- Round 5: 2 sl st in BLO, 7 sc. Place a marker here to indicate the start of the row, then work 12 sc. Leave the remaining stitches unworked.
- Rounds 6-8: 12 sc [12]
- Round 9: 6 dec [6]
Fasten off, weave in the end, and stuff the resulting “bump.”
Second Bump of Antler: Re-attach yarn to the 3rd stitch to the right of the marker. Work into the next stitch.
- Round 1: 2 sc, 1 sc over 2 stitches of the previous row at the base of the first bump, 4 sc, 1 sc in the stitch to the right of the join, 1 sc in the join [9]
- Rounds 2-3: 9 sc [9]
- Round 4: (1 sc, dec) x 3 [6]
Fasten off. Weave a long tail through the inside of the piece back to the base of the second bump. Stuff the entire antler firmly.
Legs (Make 2)
Use the main color yarn.
- Round 1: 6 sc in MR [6]
- Round 2: 6 inc [12]
- Rounds 3-42: 12 sc [12]
Fasten off the first leg. Do not cut the thread for the second leg. Stuff legs up to Round 40.
The Body
Continue from the second leg.
- Start: Ch 5.
- Round 1: Work around the first leg (FLO): inc, 3 sc, 2 inc; work into the remaining loops of the first leg: 2 inc, 3 sc, inc; work along one side of the chain: 5 sc; work around the second leg (FLO): inc, 3 sc, 2 inc; work into the remaining loops of the second leg: 2 inc, 3 sc, inc; work along the other side of the chain: 5 sc [46]
- Rounds 2-3: 46 sc [46]
- Round 4: 5 sc, (1 sc, inc) x 4, 15 sc, (1 sc, inc) x 4, 10 sc [54]
- Rounds 5-9: 54 sc [54]
- Round 10: 7 sc, (dec, 2 sc) x 2, dec, 17 sc, (dec, 2 sc) x 2, 10 sc [48]
- Rounds 11-13: 48 sc [48]
- Round 14: (6 sc, dec) x 6 [42]
- Rounds 15-17: 42 sc [42]
- Round 18: (5 sc, dec) x 6 [36]
- Rounds 19-21: 36 sc [36]
- Round 22: (4 sc, dec) x 6 [30]
- Rounds 23-25: 30 sc [30]
- Round 26: (3 sc, dec) x 6 [24]
- Rounds 27-28: 24 sc [24]
- Round 29 (Attaching Arms): 6 sc, 4 sc through both the body and one arm, 8 sc, 4 sc through both the body and the other arm, 2 sc [24]
- Round 30: 6 sc, 6 sc through the arm, 8 sc, 6 sc through the arm, 2 sc [28]
- Round 31: 28 sc [28]
- Round 32: 6 sc, 3 dec, 8 sc, 3 dec, 2 sc [22]
- Round 33: 5 sc, dec, 1 sc, dec, 6 sc, (dec, 1 sc) x 2 [18]
- Round 34: (1 sc, dec) x 6 [12]
- Rounds 35-49: 12 sc [12]
Fasten off. Do not stuff the neck area.
The Head
Use the main color yarn.
- Start: Ch 16. Work into the 2nd chain from the hook.
- Round 1: inc, 13 sc, 4 sc in the last chain, 13 sc along the other side, inc [34]
- Round 2: 2 inc, 13 sc, 4 inc, 13 sc, 2 inc [42]
- Rounds 3-10: 42 sc [42]
- Round 11: (dec, 19 sc) x 2 [40]
- Rounds 12-13: 40 sc [40]
- Round 14: (dec, 18 sc) x 2 [38]
- Rounds 15-16: 38 sc [38]
- Round 17: (dec, 17 sc) x 2 [36]
Connecting Head to Body
Fold the neck in half to create a flat surface for joining.
- Round 18: 7 sc around head, 4 sc through both the head and neck, 25 sc around head [36]
- Round 19: 5 sc around head, 2 sc through both the head and neck, 4 sc through the 4 stitches created in the previous row, 2 sc through both the head and neck, 23 sc [36]
- Round 20: 5 sc around head, 1 sc in the first neck stitch of the previous row, 4 sc around the neck, 1 sc in the last neck stitch of the previous row, 23 sc [34]
Neck Support: To ensure the head stays upright, create a wire frame. Bend a piece of floral wire into a loop at the top, wrap the center with yarn for stability, and insert it through the neck into the head. The loop should not touch the face area. Lightly stuff the neck and head around the wire.
Finishing the Head
- Round 21: dec, 3 sc, dec, 2 sc, dec, 3 sc, dec, 18 sc [30]
- Round 22: 30 sc [30]
- Round 23 (Attaching Ears): Fold an ear in half and crochet through both layers. 3 sc with ear, dec, 3 sc, dec, 3 sc with ear, dec, (3 sc, dec) x 3 [24]
- Round 24: 24 sc [24]
- Round 25: 23 sc (leave 1 stitch unworked). Mark the start of the row.
- Round 26 (Attaching Antlers): Crochet through the unworked loops of all previous rows. 3 sc with antler, dec, 8 sc, 3 sc with antler, 10 sc [24]
- Round 27: 24 sc [24]
- Round 28: (2 sc, dec) x 6 [18]
- Round 29: (1 sc, dec) x 6 [12]
- Round 30: 6 dec [6]
Fasten off and weave in the end.
Facial Features
- Eyes: Sew the safety eyes between rounds 17 and 18, with 2 sc between them.
- Details: Use black embroidery floss to stitch eyelashes, eyebrows, and nostrils.
- Cheeks: Apply a small amount of blush or dry pastel to the cheeks for a cute look.
Clothing Ideas
Since these moose are characters, you can get creative with their outfits!
For the Male Moose (Albert):
- Sweater: Knit a top-down raglan sweater using garter stitch. Measure the neck, back, and arms to calculate the number of stitches needed.
- Pants: Use a simple fabric pattern. Measure the waist, hip circumference, and leg length. Cut two mirrored pieces, sew the inner legs, then sew the outer seams and add an elastic waistband.
For the Female Moose (Gertrude):
- Top: Knit a simple rectangle using garter stitch to the desired size and sew the sides.
- Skirt: Use a rectangular piece of fabric. Sew the short ends together, hem the top and bottom, and insert an elastic band at the waist.
“`