Easy Crochet Striped Bubble Tote Pattern: A Step-by-Step Tutorial
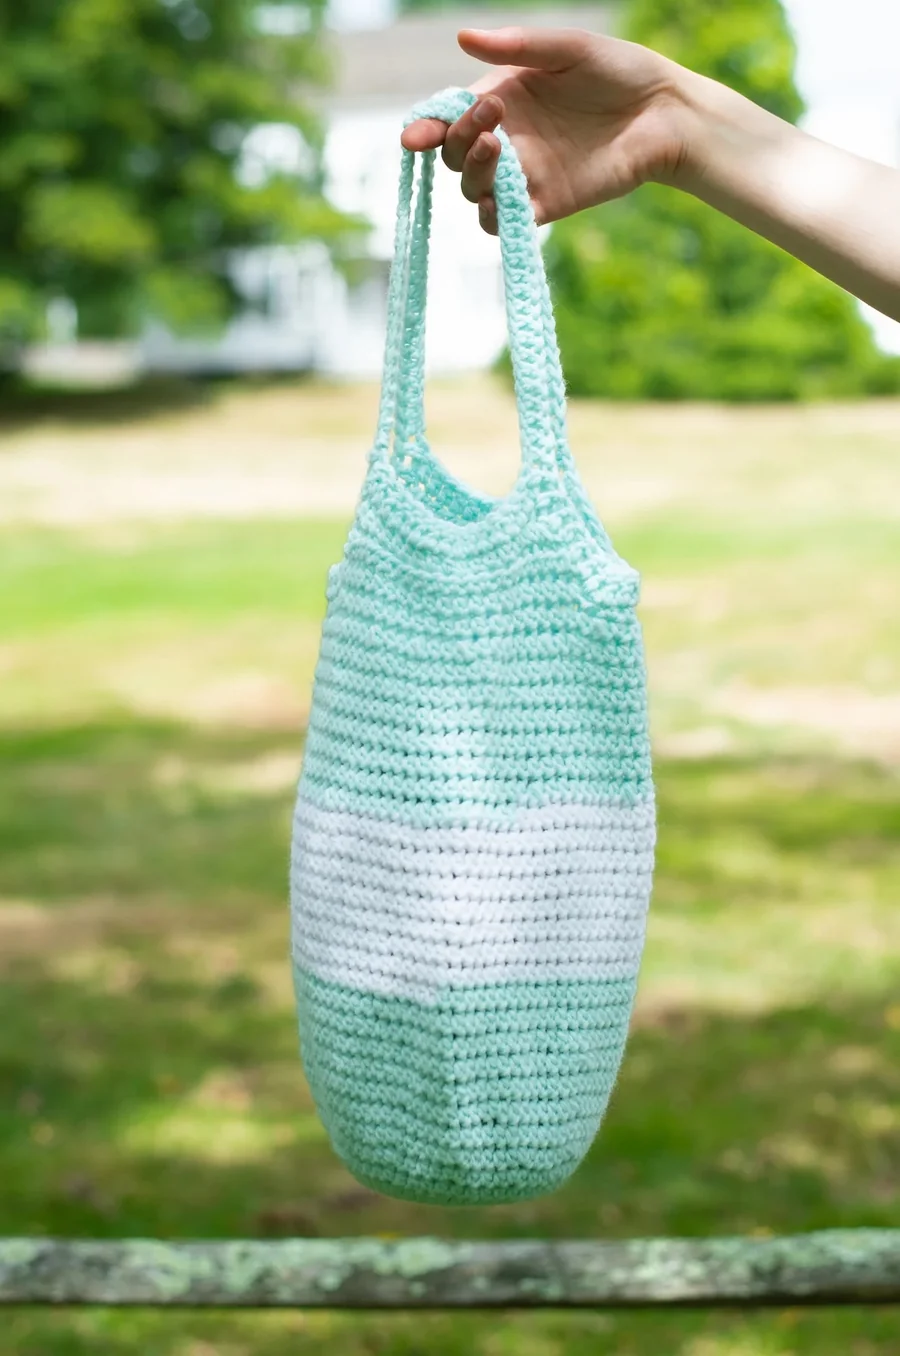
If you are looking for a fun, functional, and stylish project to add to your crochet collection, this Striped Bubble Tote is the perfect choice. With its unique rounded shape and classic stripes, this bag is ideal for farmers’ markets, beach trips, or simply running errands around town. The best part? It is designed with beginners in mind!
This tote uses a bulky yarn to ensure the bag holds its shape and works up quickly, meaning you can go from a ball of yarn to a completed accessory in just a few evenings. We will be using half double crochet stitches to create a dense but flexible fabric that is durable enough to carry your essentials. Let’s dive into the details and get hooking!
Materials & Abbreviations
Before you start, gather all your supplies. Using a bulky weight yarn is key to achieving that “bubble” look and ensuring the bag isn’t too see-through.
Supplies Needed
- Yarn: Two colors of bulky weight yarn (approximately 1 ball of each). For this project, we suggest a soft Pastel Green (Color A) and a crisp White (Color B).
- Crochet Hook: Size J-10 (6 mm).
- Stitch Markers: Essential for keeping track of your rounds since we are working in a continuous spiral.
- Large-Eyed Blunt Needle: For weaving in your ends.
- Scissors
Abbreviations (US Terms)
- beg: beginning
- ch: chain
- dc: double crochet
- hdc: half double crochet
- rep(s): repeat(s)
- sk: skip
- sl st: slip stitch
- st(s): stitch(es)
- hdc2tog: Half double crochet 2 together. (Yarn over, insert hook in next stitch, yarn over and pull up a loop) 2 times, yarn over and draw through all loops on hook. This results in 1 stitch decreased.
Gauge
13 hdc + 10 rows = 4 inches. If your square is smaller than 4 inches, try a larger hook. If it is larger, try a smaller hook. Matching the gauge ensures your tote will be approximately 24 inches in circumference at its widest point and 16 inches tall (not including handles).
Step-by-Step Instructions
The bag is worked in two main parts: the “Tank” (the main body of the bag) and the “Handles.”
Part 1: The Bag Body (The Tank)
The body of the bag is worked in continuous rounds. This means you will not join each round with a slip stitch; instead, you will spiral upward. Use your stitch marker to mark the first stitch of every round so you know exactly where to start the next one.
Note on Color Changes: To keep your stripes clean, change colors during the final step of the stitch. Work the last stitch of the old color until the final yarn over, then yarn over with the new color and draw through all loops to complete the stitch.
- Round 1: Using Color A, chain 6; join with a slip stitch in the first chain to form a ring. Work 18 hdc into the ring. Place your marker in the first stitch.
- Round 2: *Hdc in next st, 2 hdc in next st; repeat from * around. (27 sts)
- Rounds 3 and 4: *Hdc in next 2 sts, 2 hdc in next st; repeat from * around. (48 sts at the end of Round 4)
- Round 5: Hdc in each stitch around.
- Round 6: *Hdc in next 3 sts, 2 hdc in next st; repeat from * around. (60 sts)
- Round 7: *Hdc in next 4 sts, 2 hdc in next st; repeat from * around. (72 sts)
- Round 8: Repeat Round 5 (hdc in each stitch around).
- Round 9: *Hdc in next 7 sts, 2 hdc in next st; repeat from * around. (81 sts)
- Rounds 10-14: Repeat Round 5. Change to Color B in the last stitch of Round 14.
- Rounds 15-22: Repeat Round 5. Change back to Color A in the last stitch of Round 27 (Note: follow the pattern’s count to maintain the stripe width).
- Round 23: *Hdc in next 7 sts, hdc2tog; repeat from * around. (72 sts)
- Rounds 24-29: Repeat Round 5.
- Round 30: *Hdc in next 2 sts, hdc2tog; repeat from * around. (54 sts)
- Round 31: Repeat Round 5; join with a slip stitch in the first stitch. Do not fasten off, as we need to move straight into the handles.
Part 2: Shaping the Handles
Unlike the body, the handles are worked back and forth in rows.
Creating the First Handle
- Row 1: Chain 2, hdc in the next 21 stitches.
- Row 2: Chain 2, turn. Hdc2tog, hdc in each stitch until the last 2 stitches, hdc2tog. (19 sts)
- Row 3: Repeat Row 2.
- Row 4: Chain 3, turn. Double crochet (dc) in each hdc across. Chain 45 to create the handle strap. Join the end of the chain with a slip stitch to the top of the beginning chain 3. Fasten off.
Creating the Second Handle
Skip 6 hdc along the upper edge of the tote. Join your yarn with a slip stitch in the next hdc. Repeat Rows 1 through 4 as written for the first handle. Do not fasten off this time.
The Final Decorative Edge
To give the bag a polished look and reinforce the handles, we will work one final round around the entire top opening.
Chain 3 and turn. Working across each handle chain and around the top edge of the tote, follow this sequence: *dc in each chain of the handle, work 7 dc evenly spaced down the base of the handle, dc in each hdc along the upper edge of the tote until you reach the base of the opposite handle, then work 7 dc evenly spaced up the base of that handle to the handle chain; repeat from * around. Join with a slip stitch in the first dc of the handle. Fasten off.
Finishing
Now for the easiest part! Use your large-eyed blunt needle to weave all remaining yarn tails into the inside of the bag. Make sure to weave them in securely so they don’t pop out when the bag is filled with items. Give your tote a little shake and a pat to settle the stitches, and your Striped Bubble Tote is ready for use!
Tips for Success
Choosing the Right Yarn
While this pattern works great with bulky acrylics, you can experiment with cotton blends if you want a more structured, “market bag” feel. Just remember to check your gauge; cotton is often heavier and less stretchy than acrylic, which might affect the final size of your bubble shape.
Perfecting Your Color Changes
If you find that your color changes are creating a “jog” or a visible line in the spiral, ensure you are switching colors on the last yarn over of the stitch before the color change. This creates a seamless transition that looks professional.
Maintaining the Shape
Because this bag is worked in continuous rounds, it can sometimes lean if your tension is inconsistent. If you notice the bag spiraling or leaning to one side, try to relax your grip on the hook. Working with a slightly larger hook than usual often helps the “bubble” effect feel more airy and rounded.
Adding a Liner
If you plan on carrying very small items (like coins or lip balm), consider sewing a simple fabric liner into the bag. Since the hdc stitch creates a sturdy fabric, a liner isn’t strictly necessary, but it adds an extra layer of luxury and security to your handmade accessory.