Crochet Your New Best Friend Super-Soft Plush Hippo
Adorable Crochet Plush Hippo Pattern: Step-by-Step Tutorial
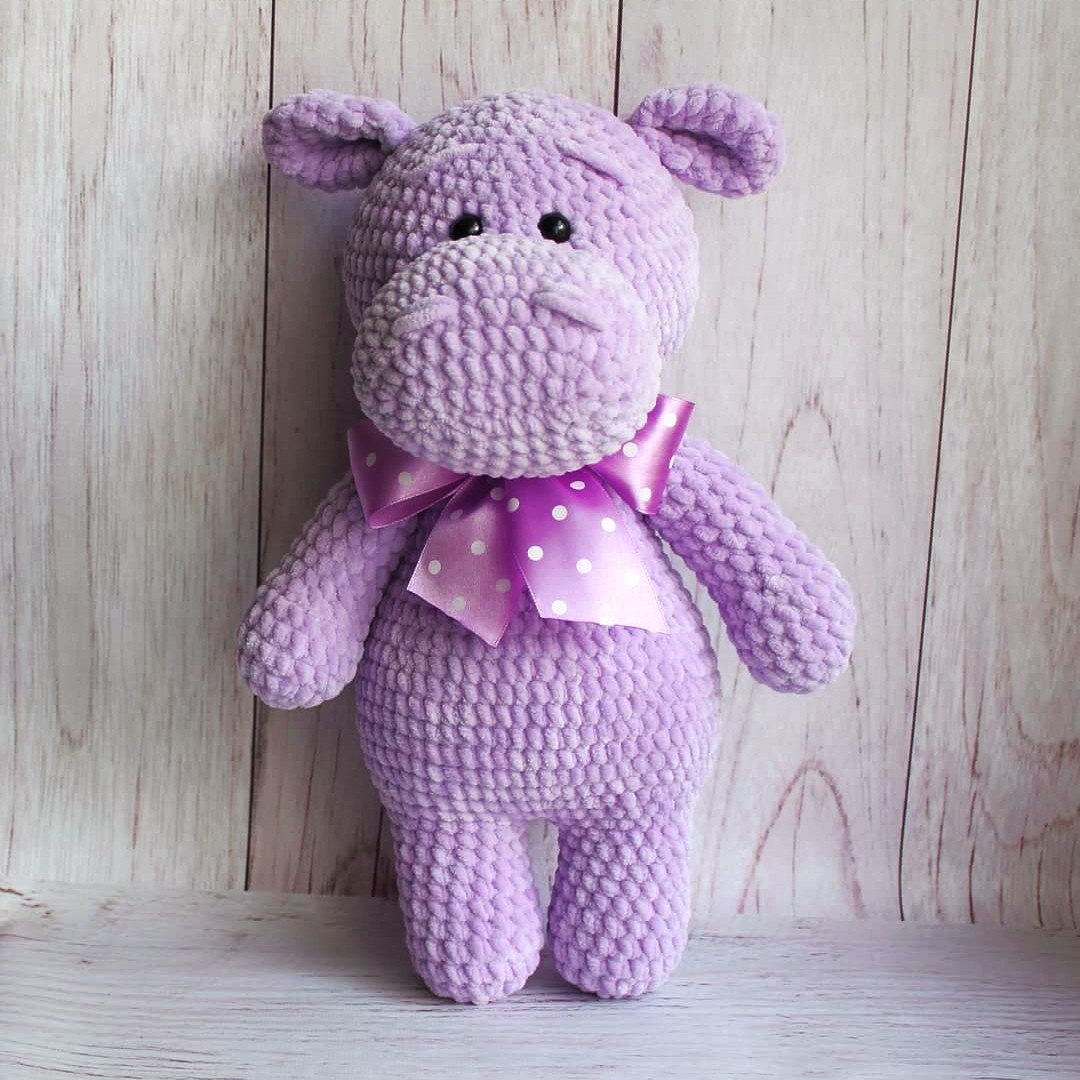
Create your own huggable, super-soft companion with this detailed crochet pattern for a plush hippo. This project is perfect for beginners and intermediate crocheters who want to make a cuddly toy using chenille or velvet yarn. The finished hippo stands approximately 12.5 inches (32 cm) tall.
Materials Needed
- Yarn: Approximately 2 skeins of plush/chenille yarn (such as Himalaya Dolphin Baby or YarnArt Dolce)
- Hook: 3.5mm or 4mm crochet hook
- Eyes: 12mm safety eyes
- Stuffing: Fiberfill or synthetic stuffing
- Tools: Yarn needle for sewing and sculpting, sewing thread for shaping
Crochet Abbreviations (US Terms)
- MR: Magic Ring
- ch: Chain
- sc: Single crochet
- inc: Increase (2 sc in one stitch)
- dec: Decrease (sc 2 together)
- sl st: Slip stitch
Step-by-Step Pattern
The Head
- MR, 6 sc (6)
- inc x 6 (12)
- (1 sc, inc) x 6 (18)
- (2 sc, inc) x 6 (24)
- (3 sc, inc) x 6 (30)
- (4 sc, inc) x 6 (36)
- (5 sc, inc) x 6 (42)
- (6 sc, inc) x 6 (48)
- (7 sc, inc) x 6 (54)
- (8 sc, inc) x 6 (60)
- Rounds 11-15: sc in each stitch for 5 rounds (60)
- (8 sc, dec) x 6 (54)
- (7 sc, dec) x 6 (48)
- (6 sc, dec) x 6 (42)
- (5 sc, dec) x 6 (36)
- (4 sc, dec) x 6 (30)
- (3 sc, dec) x 6 (24)
- (2 sc, dec) x 6 (18)
- (1 sc, dec) x 6 (12)
- dec x 6 (6). Fasten off.
The Muzzle
- ch 9
- Starting from the 2nd chain from hook: 7 sc, 3 sc in the last chain. Turn to work along the opposite side of the chain: 6 sc, inc (18)
- inc, 6 sc, 3 inc, 6 sc, 2 inc (24)
- sc, inc, 7 sc, inc, 3 sc, inc, 7 sc, inc, 2 sc (28)
- inc, 9 sc, (inc, sc) x 3, 8 sc, (inc, sc) x 2 (34)
- (5 sc, inc, 5 sc, inc, 4 sc, inc) x 2 (40)
- (6 sc, inc, 6 sc, inc, 5 sc, inc) x 2 (46)
- Rounds 8-10: sc in each stitch for 3 rounds (46)
- (10 sc, dec, 9 sc, dec) x 2 (42)
- (6 sc, dec) x 6 (36). Fasten off.
The Ears (Make 2)
- MR, 6 sc (6)
- inc x 6 (12)
- (1 sc, inc) x 6 (18)
- Rounds 4-6: sc in each stitch for 3 rounds (18)
- (4 sc, dec) x 3 (15)
- Fold the piece in half and sew 7 stitches together.
- Fold again and sew 3 stitches together to shape. Fasten off.
The Arms (Make 2)
- MR, 6 sc (6)
- inc x 6 (12)
- (1 sc, inc) x 6 (18)
- Rounds 4-6: sc in each stitch for 3 rounds (18)
- 3 dec, 12 sc (15)
- Rounds 8-15: sc in each stitch for 8 rounds (15)
- (3 sc, dec) x 3 (12)
- Fold in half and sew 6 stitches together. Fasten off.
The Legs (Make 2)
- MR, 6 sc (6)
- inc x 6 (12)
- (sc, inc) x 6 (18)
- Rounds 4-10: sc in each stitch for 7 rounds (18)
- For the first leg: Fasten off with a slip stitch.
- For the second leg: Do not fasten off; you will continue to create the body.
The Body
- From the second leg, ch 3 and join to the first leg with a slip stitch.
- Round 1: 18 sc around the 1st leg, 3 sc in the chain, 18 sc around the 2nd leg, 3 sc on the other side of the chain (42)
- 8 sc, 2 inc, 19 sc, 2 inc, 11 sc (46)
- (10 sc, inc, 11 sc, inc) x 2 (50)
- (12 sc, inc) x 2, (11 sc, inc) x 2 (54)
- (8 sc, inc) x 6 (60)
- Rounds 6-10: sc in each stitch for 5 rounds (60)
- (8 sc, dec) x 6 (54)
- sc in each stitch for 1 round (54)
- (7 sc, dec) x 6 (48)
- sc in each stitch for 1 round (48)
- (6 sc, dec) x 6 (42)
- sc in each stitch for 1 round (42)
- (5 sc, dec) x 6 (36)
- sc in each stitch for 1 round (36)
- (4 sc, dec) x 6 (30)
- sc in each stitch for 1 round (30)
- (3 sc, dec) x 6 (24)
- Attach Arms: 6 sc, 6 sc joined with the 1st arm, 6 sc, 6 sc joined with the 2nd arm.
- (2 sc, dec) x 6 (18). Fasten off.
The Tail
- MR, 6 sc (6)
- Rounds 2-7: sc in each stitch for 6 rounds (6). Fasten off.
Assembly
1. Stuff the head, body, arms, and legs firmly with fiberfill.
2. Attach the safety eyes to the head, positioning them between the head and the muzzle.
3. Sew the muzzle to the front of the head.
4. Sew the ears to the top of the head.
5. Sew the tail to the back of the body.
6. Use your needle and thread to sculpt the face for more expression and add a decorative ribbon around the neck for a final touch