How to Crochet a Cute Baby Tiger: A Beginner-Friendly Amigurumi Pattern
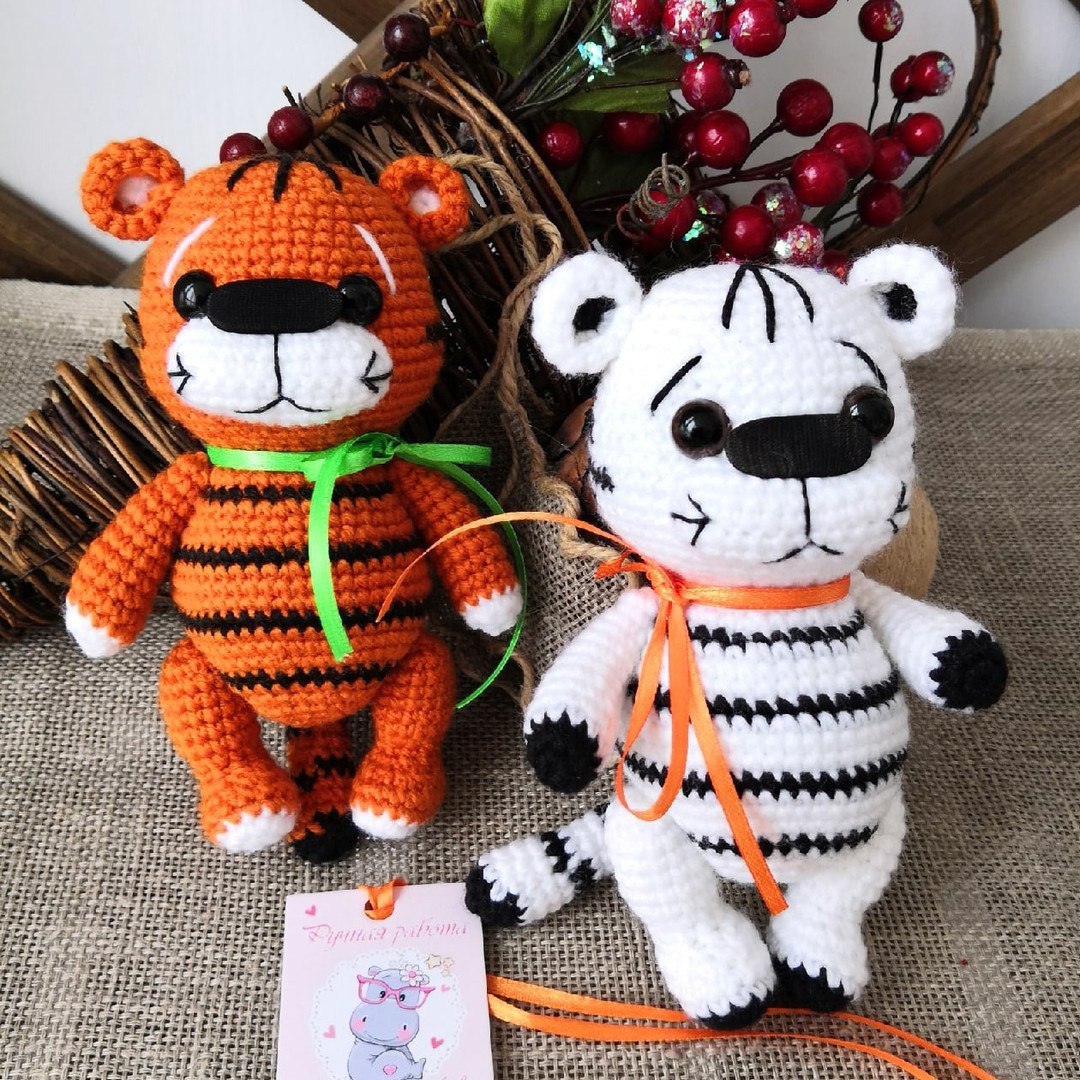
Are you looking for your next adorable crochet project? This little baby tiger is the perfect addition to your amigurumi collection! Whether you want to make a classic bright orange tiger or a rare, snowy white tiger, this pattern is versatile, charming, and incredibly fun to stitch. This little cub is designed with a soft, rounded shape and expressive features that make it a perfect nursery decoration or a sweet gift for a little one.
This pattern is designed with beginners in mind. While there are a few color changes and some assembly involved, the stitches are straightforward. Once finished, your tiger will be sitting upright, looking ready for a nap or a playdate. Let’s dive into the details and get started on this wild adventure!
Materials & Abbreviations
Before you pick up your hook, ensure you have all the necessary supplies ready. You can customize the colors to create different variations, such as a white tiger with black stripes or a traditional orange tiger with black stripes.
Required Materials
- Yarn: Medium weight (worsted) yarn in Orange, White, Black, and a color of your choice for the scarf (e.g., Blue or Green).
- Crochet Hook: A hook appropriate for your yarn weight (typically 3.25mm to 4.0mm).
- Fiberfill: High-quality polyester stuffing for the body and limbs.
- Safety Eyes: Small black safety eyes (or black yarn to embroider eyes).
- Nose Materials: A small piece of black plastic (approx. 0.8 inches x 0.3 inches) and a scrap of black fabric.
- Sewing Supplies: A tapestry needle, scissors, and strong nylon thread for attaching limbs.
- Optional: Pins to help hold the muzzle and ears in place during assembly.
Abbreviations (US Terms)
- MR: Magic Ring
- ch: Chain
- sc: Single Crochet
- inc: Increase (2 sc in one stitch)
- dec: Decrease (sc two stitches together)
- sl st: Slip Stitch
- st(s): Stitch(es)
Step-by-Step Instructions
Note: For a more seamless look, you may choose to work in finished rounds. This involves starting each round with a chain stitch and ending with a slip stitch to create a nearly invisible seam. Alternatively, you can work in a continuous spiral.
The Legs (Make 2)
To create the orange tiger, start with white yarn. For the white tiger, start with black yarn.
Round 1: Start with a 6 ch foundation. Inc in the 2nd ch from the hook, 3 sc, 4 sc in the last ch, 3 sc on the other side of the chain, inc (14). Note: If your count is slightly different, aim for a total of 18 stitches by Round 2.
Round 2: inc, 5 sc, 2 inc, 5 sc, inc (18).
Switch to orange yarn (or white for the white tiger variation).
Round 3-4: 18 sc (18).
Round 5: 5 sc, 4 dec, 5 sc (14).
Round 6: 3 sc, 4 dec, 3 sc (10).
Round 7: 10 sc (10). Stuff the leg firmly.
Round 8: *1 sc, inc*, repeat 5 times (15).
Round 9-13: 15 sc (15).
Round 14: *1 sc, dec*, repeat 5 times (10). Stuff the leg completely.
Round 15: 5 dec (5). Fasten off, leaving a long tail for sewing.
The Arms (Make 2)
Start with white yarn (or black for white tigers).
Round 1: 6 sc in a MR (6).
Round 2: inc in each st (12).
Switch to orange yarn (or white for white tigers).
Round 3-7: 12 sc (12).
Round 8: 1 dec, 10 sc (11).
Round 9: 1 dec, 9 sc (10).
Round 10: 1 dec, 8 sc (9).
Round 11: 1 dec, 7 sc (8).
Round 12: 1 dec, 6 sc (7).
Round 13: 1 dec, 5 sc (6). Stuff as you go. Fasten off, leaving a long tail.
The Ears (Make 2)
Start with white yarn (or black for white tigers).
Round 1: 6 sc in a MR (6).
Switch to orange yarn (or white for white tigers). While working Round 2, weave in any loose ends so they don’t affect the look.
Round 2: inc in each st (12).
Round 3-4: 12 sc (12).
The ear will naturally curl inward. Fasten off, leaving a 6-inch tail for sewing. Use a needle to pull the thread through the curled part to secure the shape.
The Muzzle Overlay
Work in white yarn.
Foundation: 11 ch.
Round 1: inc in 2nd ch from hook, 8 sc, 4 sc in the last ch, 8 sc on the other side of the chain, inc (28).
Round 2: inc, 10 sc, 2 inc, 10 sc, inc (28).
Round 3: 28 sc (28). Fasten off, leaving a 10-inch tail for sewing.
The Tail
Start with black yarn for both tiger variations.
Round 1: 6 sc in a MR (6).
Round 2: inc in each st (12).
Switch to orange yarn. Do not cut the black yarn; you will use it to create stripes.
Round 3-4: 12 sc (12) in orange.
Round 5: 1 dec, 10 sc (11) in orange.
Round 6: 11 sc (11) in black.
Round 7: 11 sc (11) in orange.
Round 8: 1 dec, 9 sc (10) in orange.
Round 9: 10 sc (10) in orange.
Round 10: 10 sc (10) in black.
Round 11: 10 sc (10) in orange.
Round 12: 1 dec, 8 sc (9) in orange.
Round 13: 9 sc (9) in orange.
Round 14: 9 sc (9) in black.
Round 15: 1 dec, 7 sc (8) in orange.
Round 16-17: 8 sc (8) in orange. Fasten off, leaving a long tail. Stuff only the very tip of the tail.
The Head and Body
Start with orange yarn (or white for white tigers).
Round 1: 6 sc in a MR (6).
Round 2: inc in each st (12).
Round 3: *1 sc, inc*, repeat 6 times (18).
Round 4: *2 sc, inc*, repeat 6 times (24).
Round 5: *3 sc, inc*, repeat 6 times (30).
Round 6: 30 sc (30).
Round 7: *4 sc, inc*, repeat 6 times (36).
Round 8: 36 sc (36).
Round 9: *5 sc, inc*, repeat 6 times (42).
Round 10: 42 sc (42).
Round 11: *6 sc, inc*, repeat 6 times (48).
Round 12: 48 sc (48).
Round 13: *7 sc, inc*, repeat 6 times (54).
Round 14: 4 orange, 10 black, 26 orange, 10 black, 4 orange (54). (For white tigers, use black instead of orange).
Round 15: 54 sc (54) in orange.
Round 16: 5 orange, 12 black, 20 orange, 12 black, 5 orange (54).
Round 17: 54 sc (54) in orange.
Round 18: 4 orange, 10 black, 26 orange, 10 black, 4 orange (54).
Round 19: 54 sc (54) in orange.
Round 20: *7 sc, dec*, repeat 6 times (48).
Round 21: *6 sc, dec*, repeat 6 times (42).
Round 22: *5 sc, dec*, repeat 6 times (36).
Round 23: *4 sc, dec*, repeat 6 times (30).
Round 24: *3 sc, dec*, repeat 6 times (24).
Round 25: *3 sc, inc*, repeat 6 times (30).
Round 26: 30 sc (30).
Round 27: *4 sc, inc*, repeat 6 times (36).
Round 28: 36 black sc (36).
Round 29: *5 sc, inc*, repeat 6 times (42).
Round 30: 42 sc (42).
Round 31: *6 sc, inc*, repeat 6 times (48).
Round 32: 48 black sc (48).
Round 33: *7 sc, inc*, repeat 6 times (54).
Round 34-35: 54 sc (54) in orange.
Round 36: 54 black sc (54).
Round 37: 54 sc (54) in orange.
Round 38: 54 sc (54). During this round, join the tail to the center-back of the body by crocheting the tail stitches together with the body stitches.
Round 39: *7 sc, dec*, repeat 6 times (48).
Round 40: *6 sc, dec*, repeat 6 times in black (42). You may cut the black yarn here.
Round 41: *5 sc, dec*, repeat 6 times (36).
Round 42: *4 sc, dec*, repeat 6 times (30).
Round 43: *3 sc, dec*, repeat 6 times (24). Stuff the body firmly.
Round 44: *2 sc, dec*, repeat 6 times (18).
Round 45: *1 sc, dec*, repeat 6 times (12).
Round 46: 6 dec (6). Fasten off and weave in ends.
Finishing
The Face Assembly
The face is where your tiger really comes to life! Follow these steps carefully:
1. The Nose
This creates a realistic, 3D nose effect:
- Cut a neat piece of black plastic (approx. 0.8 inches x 0.3 inches).
- Cut a piece of black fabric slightly larger than the plastic (about 0.4 inches larger in all directions).
- Trim the fabric so that the plastic piece sits inside it, with the fabric edge being about 0.2 inches larger than the plastic.
- Thread a long needle with black thread, tie a knot, and use basting stitches to sew the fabric around the plastic. Pull the thread tight to secure the plastic inside.
- Sew the finished nose onto the center of the muzzle area.
2. The Muzzle and Features
- Muzzle: Pin the white muzzle overlay onto the head, centering it over the crocheted stripes. Sew it carefully in place. When you have about 0.5 inches left, stuff the muzzle slightly before finishing the seam.
- Eyes: Secure the safety eyes onto the head, just above the muzzle.
- Details: Using black yarn, embroider the mouth lines and the eyebrows. Finally, embroider the characteristic stripes onto the forehead.
Attaching Limbs and Scarf
For a professional finish that allows the limbs to move, use a strong nylon thread. Insert the needle into the body and then into the limb, ensuring the thread goes in and out of the same hole in the body. This allows the limbs to pivot. For the arms, aim for the top black stripe on the body; for the legs, aim for the bottom black stripe.
The Scarf: Leave a 4-inch tail. Create a foundation of 3 ch. Without slipping the first ch off your hook, pull through the second and third ch. You should have 3 loops on your hook. Carefully slip them off. Repeat this process until the scarf is 13 to 13.5 inches long. Wrap the scarf twice around the tiger’s neck for a cozy look!
Tips for Success
- Tension is Key: Try to keep your tension consistent throughout the project to ensure a smooth, even surface, especially when working with color changes.
- Stuffing: Don’t be afraid to stuff firmly, but avoid overstuffing to the point where the stitches stretch and show the stuffing through.
- Color Changes: When changing colors, pull the new color through the last two loops of the final stitch of the previous color to ensure a clean transition.
- Seamless Seams: If you aren’t using the “finished rounds” method, try to stagger your increases and decreases so the “seam” doesn’t create a visible line on your tiger.