Adorable Amigurumi Bunny Crochet Pattern: A Step-by-Step Guide
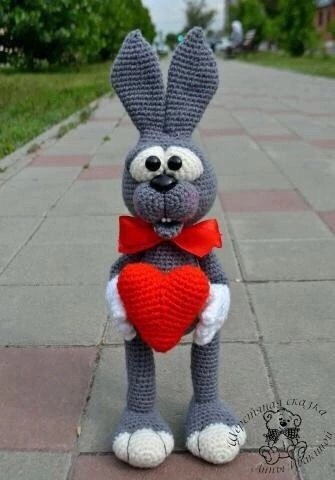
There is something incredibly heartwarming about a handmade bunny. Whether it is for a nursery, a gift for a loved one, or a new addition to your own crochet collection, an amigurumi bunny brings a sense of whimsy and joy to any room. This particular bunny design is special because it features a unique, expressive face and a clever “all-in-one” construction method that simplifies the process while creating a sturdy, lovable character.
In this tutorial, we are going to walk through the creation of this charming bunny. This pattern is perfect for intermediate crocheters or ambitious beginners who are comfortable with basic amigurumi techniques. We will focus on creating a smooth, professional finish with expressive eyes and adorable details like a little belly and tiny hands. Get your hook ready, and let’s dive into this delightful project!
Materials & Abbreviations
Before you start, gather all your supplies. Using high-quality, smooth cotton or acrylic yarn will make the stitching much easier and result in a cleaner look for your bunny.
Materials Needed
- Yarn: Medium weight (worsted) yarn in your main color (brown or grey), white for the belly, eyes, and paws, and a small amount of accent color (like red or blue) for a neck bow.
- Crochet Hook: A hook appropriate for your yarn weight (typically 3.5mm to 4.0mm) to ensure your stitches are tight enough to prevent stuffing from showing.
- Stuffing: High-quality polyester fiberfill.
- Eyes: Plastic safety eyes or large black beads. You will also need small beads for the “teeth.”
- Needle: A blunt-tipped tapestry needle for sewing and embroidery.
- Other: Scissors and stitch markers.
Abbreviations (US Crochet Terms)
- MR: Magic Ring
- sc: Single crochet
- inc: Increase (2 sc in the same stitch)
- dec: Decrease (sc 2 together)
- hdc: Half double crochet
- st(s): Stitch(es)
- sl st: Slip stitch
- Rnd: Round
Step-by-Step Instructions
The Body, Head, and Ears (The All-in-One Piece)
Unlike many patterns where you sew the head to the body, this bunny is worked as one continuous piece from the bottom up. This makes the toy much more durable! Remember to stuff the body firmly as you work your way up.
The Body:
- Rnd 1: 6 sc in a MR = 6
- Rnd 2: (inc) x 6 = 12
- Rnd 3: (1 sc, inc) x 6 = 18
- Rnd 4: (2 sc, inc) x 6 = 24
- Rnd 5: (3 sc, inc) x 6 = 30
- Rnd 6: (4 sc, inc) x 6 = 36
- Rnd 7: 36 sc
- Rnd 8: (5 sc, inc) x 6 = 42
- Rnd 9: (6 sc, inc) x 6 = 48
- Rnd 10-12: 48 sc
- Rnd 13: (6 sc, dec) x 6 = 42
- Rnd 14: 42 sc
- Rnd 15: 6 sc, (3 sc, dec) x 6, 6 sc = 36
- Rnd 16: 6 sc, (2 sc, dec) x 6, 6 sc = 30
- Rnd 17-21: 30 sc
- Rnd 22: (3 sc, dec) x 6 = 24
- Rnd 23-26: 24 sc
- Rnd 27: (2 sc, dec) x 6 = 18
- Rnd 28: 18 sc (Stuff the body firmly at this point and continue working upward)
The Head:
- Rnd 29: (inc) x 18 = 36
- Rnd 30: 36 sc
- Rnd 31: (2 sc, inc) x 12 = 48
- Rnd 32: 48 sc
- Rnd 33: (7 sc, inc) x 6 = 54
- Rnd 34: (8 sc, inc) x 6 = 60
- Rnd 35-37: 60 sc
- Rnd 38: (8 sc, dec) x 6 = 54
- Rnd 39: 54 sc
- Rnd 40: (7 sc, dec) x 6 = 48
- Rnd 41-42: 48 sc
- Rnd 43: (6 sc, dec) x 6 = 42
- Rnd 44: 42 sc
- Rnd 45: (5 sc, dec) x 6 = 36
- Rnd 46: 36 sc
- Rnd 47: (4 sc, dec) x 6 = 30
- Rnd 48-49: 30 sc
- Rnd 50: (3 sc, dec) x 6 = 24
- Rnd 51: 24 sc (Stuff the head very well)
The Ears (Make 2):
Note: Do not stuff the ears; they should remain flat to hold their shape.
Ear 1:
- Rnd 52: 6 sc, skip 12 stitches, 6 sc = 12
- Rnd 53: 12 sc
- Rnd 54: (inc, 10 sc, inc) = 14
- Rnd 55-56: 14 sc
- Rnd 57: (inc, 12 sc, inc) = 16
- Rnd 58: 16 sc
- Rnd 59: (inc, 14 sc, inc) = 18
- Rnd 60: 18 sc, then 1 sc for offset
- Rnd 61: (inc, 16 sc, inc) = 20
- Rnd 62: 20 sc
- Rnd 63: (inc, 18 sc, inc) = 22
- Rnd 64-65: 22 sc
- Rnd 66: 22 sc, 1 sc for offset
- Rnd 67: (dec, 18 sc, dec) = 20
- Rnd 68: 20 sc, 1 sc for offset
- Rnd 69: (dec, 16 sc, dec) = 18
- Rnd 70: (4 sc, dec) x 3 = 15
- Rnd 71: (3 sc, dec) x 3 = 12
- Rnd 72: (2 sc, dec) x 3 = 9
- Rnd 73: (1 sc, dec) x 3 = 6
- Rnd 74: (dec) x 3, fasten off.
Ear 2:
Attach yarn to the inner edge of the head, paying attention to the placement of your increases.
- Rnd 52-53: 12 sc
- Rnd 54: 5 sc, (2 inc), 5 sc = 14
- Rnd 55-56: 14 sc
- Rnd 57: 6 sc, (2 inc), 6 sc = 16
- Rnd 58: 16 sc
- Rnd 59: 7 sc, (2 inc), 7 sc = 18
- Rnd 60: 18 sc, 1 sc for offset
- Rnd 61: 8 sc, (2 inc), 8 sc = 20
- Rnd 62: 20 sc
- Rnd 63: 9 sc, (2 inc), 9 sc = 22
- Rnd 64-66: 22 sc
- Rnd 67: 9 sc, (2 dec), 9 sc = 20
- Rnd 68: 20 sc, 1 sc for offset
- Rnd 69: 8 sc, (2 dec), 8 sc = 18
- Rnd 70: (4 sc, dec) x 3 = 15
- Rnd 71: (3 sc, dec) x 3 = 12
- Rnd 72: (2 sc, dec) x 3 = 9
- Rnd 73: (1 sc, dec) x 3 = 6
- Rnd 74: (dec) x 3, fasten off.
The Expressive Eyes and Eyelids
Eyelids (Make 2 in Main Color):
- Rnd 1: 6 sc in a MR = 6
- Rnd 2: (inc) x 6 = 12
- Rnd 3: (1 sc, inc) x 6 = 18
- Rnd 4: 18 sc
Eyes (Make 2 in White):
Do not stuff these.
- Rnd 1: 6 sc in a MR = 6
- Rnd 2: (inc) x 6 = 12
- Rnd 3: (1 sc, inc) x 6 = 18
- Rnd 4-5: 18 sc
- Rnd 6: (1 sc, dec) x 6 = 12
- Rnd 7: dec until closed
The Muzzle and Lower Lip
Muzzle (Main Color):
- Rnd 1: 6 sc in a MR = 6
- Rnd 2: (inc) x 6 = 12
- Rnd 3: (1 sc, inc) x 6 = 18
- Rnd 4: 6 sc, (3 inc), 6 sc, (3 inc) = 24
- Rnd 5: 6 sc, (hdc, inc hdc) x 3, 6 sc, (hdc, inc hdc) x 3 = 30
- Rnd 6-7: 30 sc
Lower Lip (Main Color):
Do not stuff.
- Rnd 1: 6 sc in a MR = 6
- Rnd 2: (inc) x 6 = 12
- Rnd 3-4: 12 sc
Fold the lip in half and crochet 6 sc through both layers to close the edge.
The Tail and Belly
Tail (Main Color):
- Rnd 1: 6 sc in a MR = 6
- Rnd 2: (inc) x 6 = 12
- Rnd 3: (1 sc, inc) x 6 = 18
- Rnd 4-6: 18 sc
Belly (White):
- Rnd 1: 6 sc in a MR = 6
- Rnd 2: (inc) x 6 = 12
- Rnd 3: (1 sc, inc) x 6 = 18
- Rnd 4: (2 sc, inc) x 6 = 24
- Rnd 5: (3 sc, inc) x 6 = 30
Legs and Feet
Legs (Main Color):
- Rnd 1: 6 sc in a MR = 6
- Rnd 2: (inc) x 6 = 12
- Rnd 3-9: 12 sc
- Rnd 10: (3 sc, inc) x 3 = 15
- Rnd 11-23: 15 sc (Stuff legs as you go)
Feet (Make 2):
White Part:
- Rnd 1: 6 sc in a MR = 6
- Rnd 2: (inc) x 6 = 12
- Rnd 3: (1 sc, inc) x 6 = 18
- Rnd 4: (2 sc, inc) x 6 = 24
- Rnd 5: 24 sc
- Rnd 6: (3 sc, inc) x 6 = 30
- Rnd 7-9: 30 sc
Main Color Part:
- Rnd 10: (8 sc, dec) x 3 = 27
- Rnd 11: 27 sc
- Rnd 12: (7 sc, dec) x 3 = 24
- Rnd 13: 24 sc
- Rnd 14: (6 sc, dec) x 3 = 21
- Rnd 15-16: 21 sc
- Rnd 17: (5 sc, dec) x 3 = 18
- Rnd 18-19: 18 sc
- Rnd 20: (1 sc, dec) x 6 = 12
- Rnd 21: 12 sc
- Rnd 22: dec until closed, fasten off.
The Tiny Hands (Arms)
Fingers (Make 4 in White):
- Rnd 1: 6 sc in a MR = 6
- Rnd 2-4: 6 sc
- Fasten off 3 fingers. For the 4th finger, do not cut the yarn; you will use it to join the palm.
Palm (Joining the fingers):
- Rnd 5: 3 sc around the 1st finger, 3 sc around the 2nd, 6 sc around the 3rd, 3 sc around the 2nd (other side), and 3 sc around the 1st (other side) = 18 sc total.
- Rnd 6: 18 sc
Completing the Arm:
Note: For the left hand, follow instructions 7\*; for the right hand, follow 7\*\*.
- Rnd 7: 3 sc through the loops of the 4th finger and the palm, then 15 sc (or 6 sc, then 3 sc through the loops, then 9 sc for the right hand) = 18 sc.
- Rnd 8: 3 sc through the remaining loops of the 4th finger and palm, then 15 sc (or 6 sc, then 3 sc through loops, then 9 sc for right hand) = 18 sc.
- Rnd 9: 18 sc
- Rnd 10: (1 sc, dec) x 6 = 12
Stuff the palm and continue in the main color:
- Rnd 11-22: 12 sc
- Final Rnd: dec until closed, fasten off.
Finishing
Assembly
Assembly is where your bunny truly comes to life! Follow these steps carefully to achieve that signature expressive look.
1. The Tail & Body: Locate the rows on the body where you made the decreases (Rnds 15-16). Attach the tail there. This helps you easily identify the front and back of your bunny.
2. The Face Shaping (The “Pull” Method): This is the most important step for the bunny’s expression. Stuff the muzzle with fiberfill. Insert your needle into the bottom center of the muzzle where it meets the head. Bring the needle up through the top center where the head and muzzle meet. Wrap the yarn around the muzzle and pull it through again, tightening it slightly. Repeat this to create a small “pinch” or indentation in the face. This creates the cute, squished snout.
3. The Details:
- Teeth: Sew two tiny beads to the bottom of the muzzle, just below the “pinch” area.
- Lip: Sew the lower lip directly under the muzzle tension point.
- Eyes: Shape your white eye pieces by curving them slightly with your fingers (like a little boat). Insert the eye into the eyelid and secure it with thread. Attach the eyelids to the muzzle, ensuring the inner edge is slightly higher than the outer edge. Finally, glue or sew the black pupils/safety eyes into the center.
- Nose: Glue or sew a small nose (you can crochet a tiny piece similar to the tail) at the center of the muzzle.
- Belly: Sew the white belly piece onto the center of the body.
- Limbs: Sew the legs to the feet, and then attach the arms to the sides of the body using a thread-attachment method for extra security.
Tips
- Tension is Key: When making amigurumi, keep your tension tight so that the stuffing doesn’t peek through the holes between stitches.
- Use Stitch Markers: Since amigurumi is worked in continuous rounds, it is very easy to lose count. Always use a marker to indicate the start of your round.
- Symmetry: When making the ears and eyes, try to keep your stitch counts identical to ensure your bunny isn’t lopsided.
- Personalize: Don’t be afraid to add a little color! A tiny crocheted bow or even some pink blush (using actual makeup or pink yarn) can add so much personality to your bunny.