Crochet Ice Cream Amigurumi Pattern: An Easy and Sweet Tutorial
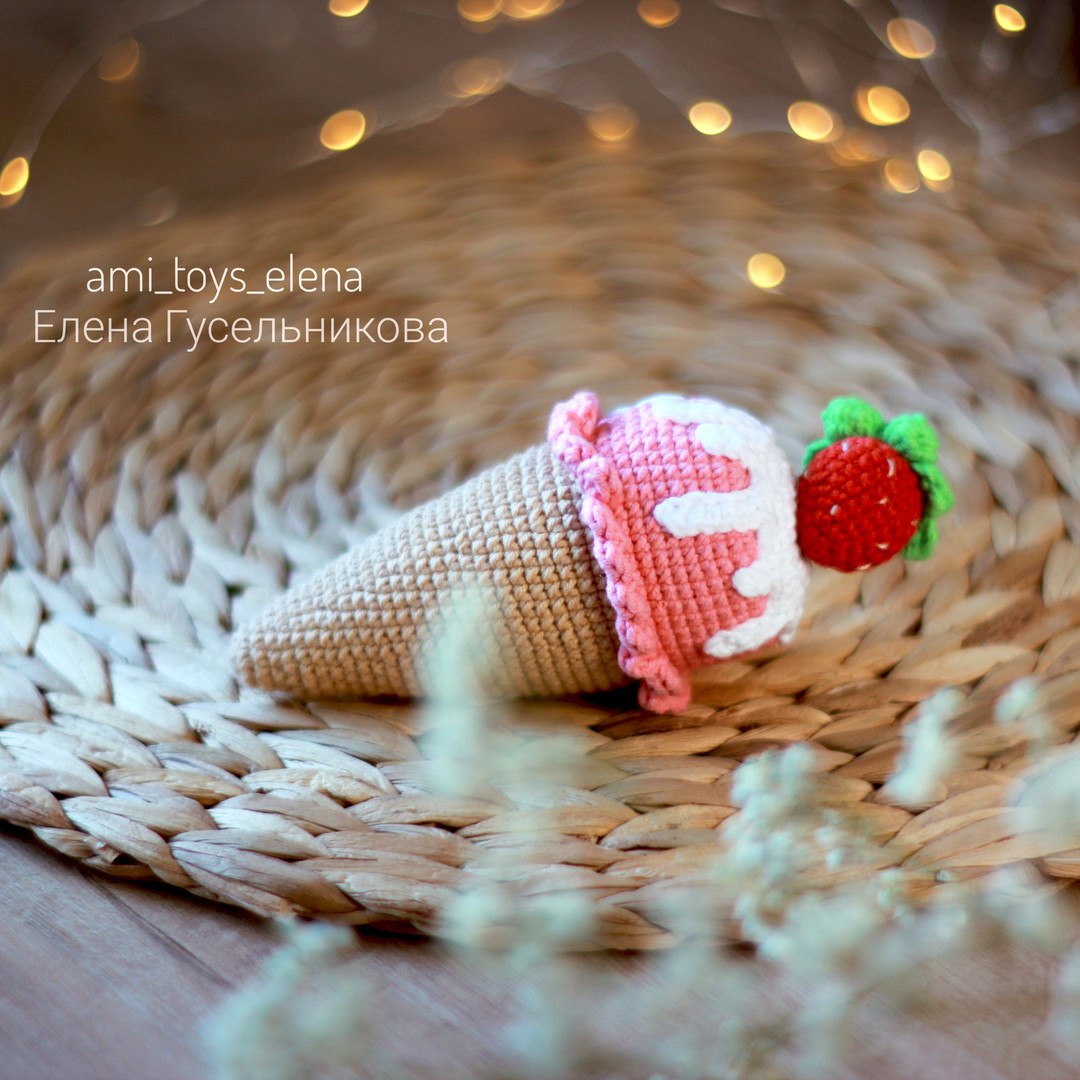
There is nothing quite as delightful as a summer treat, and what better way to capture that joy than with a handmade crochet ice cream cone? This adorable amigurumi ice cream, topped with a juicy strawberry and a sweet white glaze, is the perfect project for anyone looking to add a splash of sweetness to their crochet collection. Whether you are looking to decorate a child’s nursery, create a fun keychain, or simply practice your amigurumi skills, this pattern is a fantastic choice.
This tutorial is designed with beginners in mind. We will walk through the process of creating the waffle cone, the creamy pink scoop, the luscious strawberry, and that iconic dripping glaze. By the end, you will have a charming, 5.5-inch tall little dessert that looks good enough to eat!
Materials & Abbreviations
Before we pick up our hooks, let’s make sure you have everything you need. To get the best results and the exact size shown in the photos, I recommend using a fine-weight cotton yarn.
What You’ll Need
- Yarn: Sport or Fingering weight cotton yarn in the following colors:
- Beige (for the cone)
- Pink (for the ice cream scoop)
- White (for the glaze)
- Red (for the strawberry)
- Green (for the strawberry leaves)
- Crochet Hook: 1.75 mm (approximately 2.5 mm)
- Stuffing: Polyester fiberfill
- Embroidery Thread: Thin yellow thread (to add tiny seeds to your strawberry)
- Other Tools: Scissors and a tapestry needle for sewing and weaving in ends
Abbreviations
Please note that this pattern uses standard US crochet terminology. If you are used to UK terms, be sure to adjust accordingly!
- MR: Magic Ring
- ch: Chain
- sc: Single crochet
- inc: Increase (2 sc in the same stitch)
- dec: Decrease (sc 2 stitches together)
- hdc: Half double crochet
- sl st: Slip stitch
- FLO: Front loop only
- BLO: Back loop only
Step-by-Step Instructions
The Pink Ice Cream Scoop
We begin with the main body of our dessert. This part creates a lovely, ruffled edge that mimics the look of melting ice cream.
Using pink yarn, start with a Magic Ring.
- Round 1: 6 sc in MR (6)
- Round 2: 6 inc (12)
- Round 3: (1 sc, inc) repeat 6 times (18)
- Round 4: 1 sc, inc, (2 sc, inc) repeat 5 times, 1 sc (24)
- Round 5: (3 sc, inc) repeat 6 times (30)
- Round 6: 2 sc, inc, (4 sc, inc) repeat 5 times, 2 sc (36)
- Round 7: (5 sc, inc) repeat 6 times (42)
- Round 8: 3 sc, inc, (6 sc, inc) repeat 5 times, 3 sc (48)
- Rounds 9-17: 48 sc (9 rounds total)
- Round 18: (1 sl st, 4 hdc) repeat 24 times, working in the Front Loops Only (FLO). This creates the decorative ruffle.
Fasten off the yarn, leaving a small tail for later assembly.
The Waffle Cone
The cone provides the sturdy base for our treat. We will work in the back loops to ensure it creates a pocket for the scoop to sit in.
Using beige yarn, start with a Magic Ring.
- Round 1: 6 sc in MR (6)
- Round 2: 6 inc (12)
- Rounds 3-4: 12 sc (2 rounds)
- Round 5: (1 sc, inc) repeat 6 times (18)
- Rounds 6-8: 18 sc (3 rounds)
- Round 9: (2 sc, inc) repeat 6 times (24)
- Rounds 10-11: 24 sc (2 rounds)
- Round 12: (3 sc, inc) repeat 6 times (30)
- Rounds 13-14: 30 sc (2 rounds)
- Round 15: (4 sc, inc) repeat 6 times (36)
- Rounds 16-18: 36 sc (3 rounds)
- Round 19: (5 sc, inc) repeat 6 times (42)
- Rounds 20-23: 42 sc (4 rounds)
- Round 24: (6 sc, inc) repeat 6 times (48)
- Rounds 25-26: 48 sc (2 rounds)
When you reach the end, ensure you are working in the Back Loops Only (BLO) to leave the top of the cone open for the ice cream.
The Sweet White Glaze
This is the secret to making your crochet look realistic! These “drips” add so much character.
Using white yarn, start with a Magic Ring.
- Round 1: 6 sc in MR (6)
- Round 2: 6 inc (12)
- Round 3: (1 sc, inc) repeat 6 times (18)
- Round 4: (2 sc, inc) repeat 6 times (24)
- Round 5: (3 sc, inc) repeat 6 times (30)
The Drip Round:
Now, we will create the melting effect. This round is a bit more technical, so take your time.
- Round 6: ch 5. In the 2nd chain from the hook, work 4 sc, then 1 sl st, then 3 sc. Now, ch 9. In the 2nd chain from the hook, work 8 sc, then 1 sl st, then 2 sc. Finally, ch 2, work 1 sc in the last chain, and finish with a sl st. Repeat these exact steps all the way around the circle to create multiple drips.
Fasten off, leaving a long tail for sewing.
The Juicy Red Strawberry
Every ice cream needs a topping! Let’s make a tiny strawberry.
Using red yarn, start with a Magic Ring.
- Round 1: 6 sc in MR (9)
- Round 2: (1 sc, inc) repeat 3 times (9)
- Round 3: (2 sc, inc) repeat 3 times (12)
- Round 4: (3 sc, inc) repeat 3 times (15)
- Round 5: (4 sc, inc) repeat 3 times (18)
- Round 6: (5 sc, inc) repeat 3 times (21)
- Rounds 7-8: 21 sc (2 rounds)
- Round 9: (5 sc, dec) repeat 3 times (18)
- Round 10: (4 sc, dec) repeat 3 times (15)
- Round 11: (3 sc, dec) repeat 3 times (12)
- Round 12: 6 dec (6)
Stuff the strawberry firmly with fiberfill before closing the hole. Fasten off.
The Strawberry Leaves
Using green yarn, we will make a small leaf to sit atop the strawberry.
- Round 1: 6 sc in MR (9)
- Round 2: (1 sc, inc) repeat 3 times (9)
- Round 3: (2 sc, inc) repeat 3 times (12)
- Round 4: (3 sc, inc) repeat 3 times (15)
- Round 5: (4 sc, inc) repeat 3 times (18)
- Round 6: (5 sc, inc) repeat 3 times (21)
- Rounds 7-8: 21 sc (2 rounds)
- Round 9: (5 sc, dec) repeat 3 times (18)
- Round 10: (4 sc, dec) repeat 3 times (15)
- Round 11: (3 sc, dec) repeat 3 times (12)
- Round 12: 6 dec (6)
Stuff firmly and fasten off.
Finishing
Now comes the fun part—bringing all your hard work together!
Assembly Steps
- Stuffing: Ensure the pink scoop and the cone are both stuffed firmly with fiberfill.
- Joining the Scoop and Cone: Using your tapestry needle and the pink yarn (or beige), sew the pink scoop into the top of the beige cone. Make sure it is secure so it doesn’t wobble.
- Attaching the Glaze: Carefully sew the white glaze piece onto the top of the pink scoop. Try to position the “drips” so they hang naturally over the pink edge.
- The Strawberry Topper: Sew the strawberry onto the very top of the ice cream, and then attach the green leaves to the top of the strawberry.
- Final Details: Using your yellow embroidery thread, stitch small “V” shapes or dots onto the red strawberry to represent the seeds. This tiny detail makes a huge difference!
Tips for Success
To make your amigurumi look professional, keep these tips in mind:
- Mind Your Tension: When working with small hooks and thin yarn, try to keep your stitches even. If your stitches are too loose, the stuffing might peek through.
- The Magic Ring: If you struggle with the magic ring, you can always start with a chain of 2 and work your first round of sc into the first chain.
- Seamless Sewing: When sewing pieces together, use a “whip stitch” for a clean look. If you are joining the scoop to the cone, try to hide your knots inside the stuffing.
- Customization: Don’t be afraid to get creative! You can change the pink to chocolate brown, or the strawberry to a blueberry, to create a whole variety of treats.
Happy crocheting! Your sweet little ice cream creation is ready to brighten up your home!