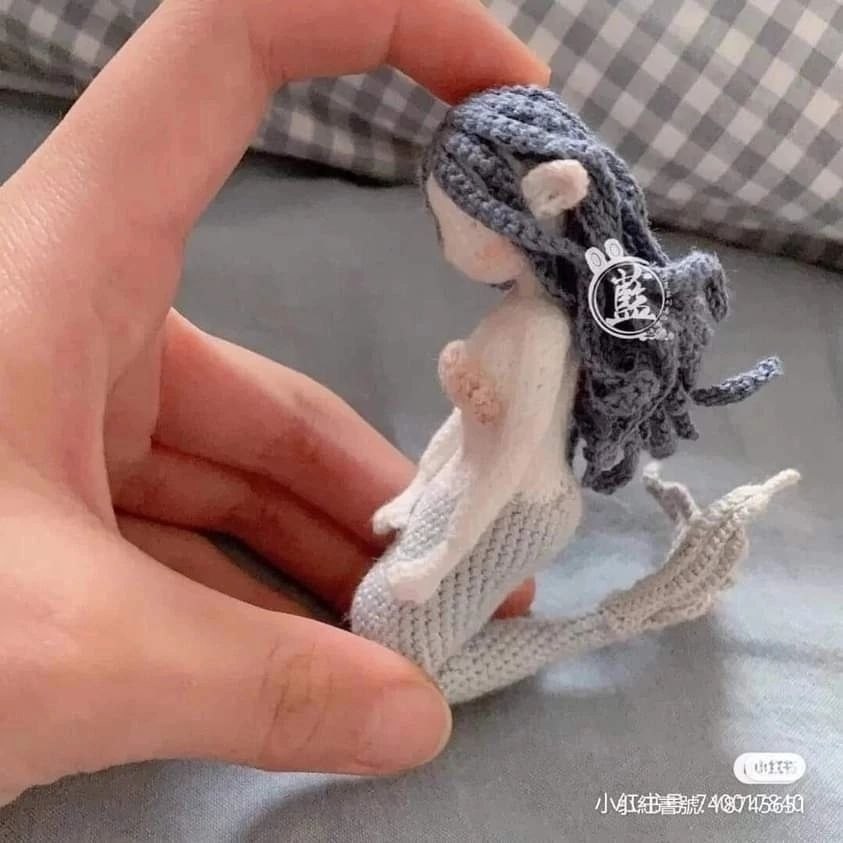
Enchanting Crochet Mermaid Amigurumi Pattern: A Whimsical Step-by-Step Tutorial
Dive into a world of ocean magic with this adorable crochet mermaid amigurumi! Whether you are looking to decorate a nursery, create a unique gift for a sea-loving friend, or simply want a relaxing new project, this mermaid is the perfect companion. This pattern is designed to be beginner-friendly, guiding you through the process of creating a charming character with flowing hair and a beautiful, textured tail.
Grab your favorite yarn and a cozy spot to sit—it is time to bring this little mermaid to life!
Materials & Abbreviations
To ensure your mermaid turns out perfectly, I recommend using a smooth cotton or high-quality acrylic yarn. Using a slightly smaller hook than recommended on your yarn label will help create tight stitches, which is essential for amigurumi to keep the stuffing from peeking through.
Materials Needed
- Yarn: Medium weight (worsted) or DK weight yarn in several colors: skin tone, a color for the tail (e.g., light blue or teal), a color for the hair (e.g., dark blue or grey), and any accent colors you like.
- Crochet Hook: A 3.25mm (D) or 3.5mm hook is ideal for this project.
- Stuffing: High-quality polyester fiberfill.
- Wire: A sturdy craft wire or armature wire to help the mermaid hold her poses.
- Safety Eyes: Small safety eyes (optional) or black embroidery thread if you prefer to stitch the eyes.
- Other: Tapestry needle, scissors, and stitch markers.
Abbreviations (US Terms)
- MR: Magic Ring
- ch: Chain
- sc: Single crochet
- inc: Increase (2 sc in one stitch)
- dec: Decrease (sc 2 together)
- sl st: Slip stitch
- FLO: Front Loop Only
- BLO: Back Loop Only
Step-by-Step Instructions
The Fins
Note: Pay close attention to whether you are working in the front or back loops as indicated to create the correct shape.
- Row 1: 26 sc, 2 dec, 48 sc, 10 sl st (25)
- Row 2: ch 1, work in FLO: 18 sc, 2 dec (20)
- Row 3: ch 1, work in BLO: sl st, 1 sc, 11 sc, 8 sl st (19)
- Row 4: ch 1, work in FLO: 15 sc, 2 dec (17)
- Row 5: ch 1, work in BLO: 1 sc, 9 sc, 78 (16)
- Row 6: ch 1, work in FLO: 128 sc, 2 dec (14)
- Row 7: ch 1, work in BLO: 1 sc, 7 sc, 68 (13)
- Row 8: ch 1, work in FLO: 98 sc, 2 dec (11)
- Row 9: ch 1, work in BLO: 1 sc, 5 sc, 58 (10)
The Tail (Worked in a Spiral)
Keep a stitch marker in the first stitch of every round to track your progress.
- Round 1: 8 sc in MR (8)
- Rounds 2-5: 8 sc (8)
- Round 6: inc, 5 sc, inc, 1 sc (10)
- Round 7: 10 sc (10)
- Round 8: inc, 7 sc, inc, 1 sc (12)
- Round 9: 12 sc (12)
- Round 10: inc, 9 sc, inc, 1 sc (14)
- Round 11: 14 sc (14)
- Round 12: inc, 11 sc, inc, 1 sc (16)
- Round 13: 16 sc (16)
- Round 14: 1 sc, inc, 11 sc, inc, 2 sc (18)
- Round 15: 18 sc (18)
- Round 16: 2 sc, inc, 11 sc, inc, 3 sc (20)
- Round 17: 20 sc (20)
- Round 18: 3 sc, inc, 11 sc, inc, 4 sc (22)
- Round 19: 22 sc (22)
- Round 20: 4 sc, inc, 11 sc, inc, 5 sc (24)
- Round 21: 24 sc (24)
- Round 22: 5 sc, inc, 11 sc, inc, 6 sc (26)
- Round 23: 26 sc (26)
- Round 24: 1 sc, inc, 22 sc, inc, 1 sc (28)
- Round 25: 2 sc, inc, 22 sc, inc, 2 sc (30)
- Round 26: 3 sc, inc, 8 sc, dec, 2 sc, dec, 8 sc, inc, 3 sc (30)
- Round 27: 30 sc (30)
- Round 28: 4 sc, inc, 20 sc, inc, 4 sc (32)
- Round 29: 13 sc, dec, 2 sc, dec, 13 sc (30)
- Round 30: 5 sc, inc, 18 sc, inc, 5 sc (32)
- Round 31: 32 sc (32)
- Round 32: 6 sc, inc, 7 sc, 2 dec, 7 sc, inc, 6 sc (32)
- Round 33: 32 sc (32)
- Round 34: 7 sc, inc, 6 sc, 2 dec, 6 sc, inc, 7 sc (32)
- Round 35: 1 sc, inc, 28 sc, inc, 1 sc (34)
- Round 36: 38 sc (38)
- Round 37: 5 sc, inc, 24 sc, inc, 5 sc (38)
- Round 38: 7 sc, inc, 22 sc, inc, 7 sc (40)
- Round 39: 18 sc, ch 4, 4 sc in each chain, 18 sc (40)
- Round 40: 15 sc, ch 10, 10 sc in each chain, 15 sc (40)
- Round 41: 12 sc, ch 16, 16 sc in each chain, 12 sc (40)
- Round 42: 7 sc, dec, 16 ch, 22 sc (in each chain), dec, 7 sc (38)
- Round 43: 5 sc, dec, 12 ch, 18 sc (in each chain), dec, 5 sc (24)
- Round 44: 5 sc, fasten off.
Upper Body (Worked in a Spiral)
- Round 1: 36 sc in MR (36)
- Round 2: 2 sc, dec, 11 sc, dec, 2 sc, dec, 11 sc, dec, 2 sc (32)
- Round 3: dec, 4 sc, dec, 6 sc, 2 dec, 6 sc, dec, 4 sc, dec (26)
- Round 4: 12 sc, dec, 12 sc (25)
- Rounds 5-6: 25 sc (27)
- Round 7: 2 sc, inc, 20 sc, inc, 1 sc (27)
- Round 8: 27 sc (27)
- Round 9: 3 sc, inc, 5 sc, 3 inc, 3 sc, 3 inc, 6 sc, inc, 2 sc (35)
- Round 10: 7 sc, dec, 1 sc, inc, 4 sc, inc, 3 sc, inc, 4 sc, inc, 1 sc, dec, 7 sc (37)
- Round 11: 4 sc, inc, 28 sc, inc, 3 sc (39)
- Round 12: 10 sc, dec, 4 sc, dec, 3 sc, dec, 4 sc, dec, 10 sc (35)
- Round 13: 5 sc, inc, 5 sc, 2 dec, 5 sc, 2 dec, 6 sc, inc, 4 sc (33)
- Round 14: (Attachment for arms): 8 sc + 8 sc + 5 sc, dec, 3 sc, 5 sc + 8 sc + 8 sc (47)
- Round 15: 7 sc, dec, 6 sc, dec, 2 sc, dec, 5 sc, dec, 2 sc, dec, 6 sc, dec, 7 sc (41)
The Torso (Worked in Rounds)
- Round 2: 2 sc, dec, 11 sc, dec, 2 sc, dec, 11 sc, dec, 2 sc (32)
- Round 3: dec, 4 sc, dec, 6 sc, 2 dec, 6 sc, dec, 4 sc, dec (26)
- Round 4: 12 sc, dec, 12 sc (25)
- Rounds 5-6: 25 sc (27)
- Round 7: 2 sc, inc, 20 sc, inc, 1 sc (27)
- Round 8: 27 sc (27)
- Round 9: 3 sc, inc, 5 sc, 3 inc, 3 sc, 3 inc, 6 sc, inc, 2 sc (35)
- Round 10: 7 sc, dec, 1 sc, inc, 4 sc, inc, 3 sc, inc, 4 sc, inc, 1 sc, dec, 7 sc (37)
- Round 11: 4 sc, inc, 28 sc, inc, 3 sc (39)
- Round 12: 10 sc, dec, 4 sc, dec, 3 sc, dec, 4 sc, dec, 10 sc (35)
- Round 13: 5 sc, inc, 5 sc, 2 dec, 5 sc, 2 dec, 6 sc, inc, 4 sc (33)
- Round 14: (Arm attachment points): 8 sc, 8 sc, 5 sc, dec, 3 sc, 5 sc, 8 sc, 8 sc (47)
- Round 15: 7 sc, dec, 6 sc, dec, 2 sc, dec, 5 sc, dec, 2 sc, dec, 6 sc, dec, 7 sc (41)
Hands & Arms
Hands (Make 2, worked flat)
- Round 16: 5 sc, dec, 7 sc, dec, 1 sc, dec, 3 sc, dec, 1 sc, dec, 1 sc, dec, 7 sc, dec, 5 sc (35)
- L1: 9 ch. From 2nd ch, work 2 sc, 6 sc (8)
- Round 17: 4 sc, 5 dec, 7 sc, 5 dec, 4 sc (25)
- L2: 1 ch, work into back loop: 7 sc (9)
- Round 18: 3 sc, 4 dec, 3 sc, 4 dec, 3 sc (17)
- L3: 2 ch, work into front loop: 1 sc, 1 sc (9)
- Round 19: 1 sc, 8 dec. Do not turn, join to first stitch (9)
Arms (Make 2, worked in a spiral)
- Round 1: Starting from the palm, 6 sc (6)
- Rounds 2-9: 6 sc (6)
- Round 10: inc, 3 sc, inc (8)
- Rounds 11-15: 8 sc (8)
The Head (Worked in Rounds)
- Round 1: 6 sc in MR (6)
- Round 2: 6 inc (12)
- Round 3: 6 * (1 sc, inc) (18)
- Round 4: 9 inc (27)
- Round 5: 9 sc, inc (27)
- Round 6: 7 sc, inc, 11 sc, inc, 7 sc (29)
- Round 7: 6 sc, inc, 15 sc, inc, 6 sc (31)
- Round 8: 11 sc, dec, 2 sc, 2 inc, 2 sc, dec, 10 sc (31)
- Round 9: 9 sc, dec, 3 sc, 4 inc, 3 sc, dec, 8 sc (26)
- Round 10: 7 sc, inc, 11 sc, inc, 6 sc (28)
- Round 11: 6 sc, inc, 15 sc, inc, 5 sc (30)
- Rounds 12-13: 30 sc (30)
- Round 14: (3 sc, dec) * 6 (24)
- Round 15: (2 sc, dec) * 6 (18)
- Round 16: (1 sc, dec) * 6 (12)
- Round 17: 6 dec (6)
The Hair (Two-Layer Technique)
The hair adds incredible depth to your mermaid. We will create two distinct layers of strands.
Layer 1 (14 Strands, start with MR)
- Rounds 1-2: ch 30, from 2nd ch, work 25-27 sc (29)
- Rounds 3-4: ch 35, from 2nd ch, work 28-32 sc (34)
- Rounds 5-6: ch 45, from 2nd ch, work 28-37 sc (39)
- Rounds 7-8: ch 40, from 2nd ch, work 28-37 sc (39)
- Rounds 9-10: ch 35, from 2nd ch, work 28-32 sc (34)
- Rounds 11-12: ch 35, from 2nd ch, work 28-32 sc (34)
- Rounds 13-14: ch 30, from 2nd ch, work 25-27 sc (29)
Layer 2 (10 Strands, start with MR)
- Rounds 1-2: ch 30, from 2nd ch, work 28-27 sc (29)
- Rounds 3-4: ch 35, from 2nd ch, work 28-32 sc (34)
- Rounds 5-6: ch 40, from 2nd ch, work 28-37 sc (39)
- Rounds 7-8: ch 35, from 2nd ch, work 28-34 sc (34)
- Rounds 9-10: ch 30, from 2nd ch, work 25-27 sc (29)
Finishing
Now for the fun part—assembly! Assembly is where your mermaid truly comes together.
- Attach Arms: Secure the arms into the designated attachment points on the torso.
- Add Pose: Insert a sturdy craft wire through the body to ensure the mermaid can sit or stand as you wish.
- Stuffing: Stuff the tail, torso, and head. Be careful not to overstuff the tail so it maintains its graceful curve.
- Hair Application: Attach the hair strands to the head. For best results, work a slip stitch to the base of each strand to secure it before pulling tight.
- Face: Use embroidery thread to add delicate eyes or a small mouth, or leave her expression neutral for a more mysterious look.
Tips for Success
- Wire for Stability: When inserting the wire for the body, make sure it is thick enough to support the weight of the head and tail.
- Tension Matters: Keep your tension consistent, especially when working in the “inner/outer loop” sections, to ensure the shapes stay defined.
- Hair Texture: For a more realistic look, you can lightly brush out the yarn used for the hair once it is attached.
- Color Coordination: When choosing colors, try to pick shades that complement each other (e.g., seafoam green and soft lavender) to keep the look aesthetic and professional.