Adorable Amigurumi Monster Crochet Pattern: A Step-by-Step Beginner Guide
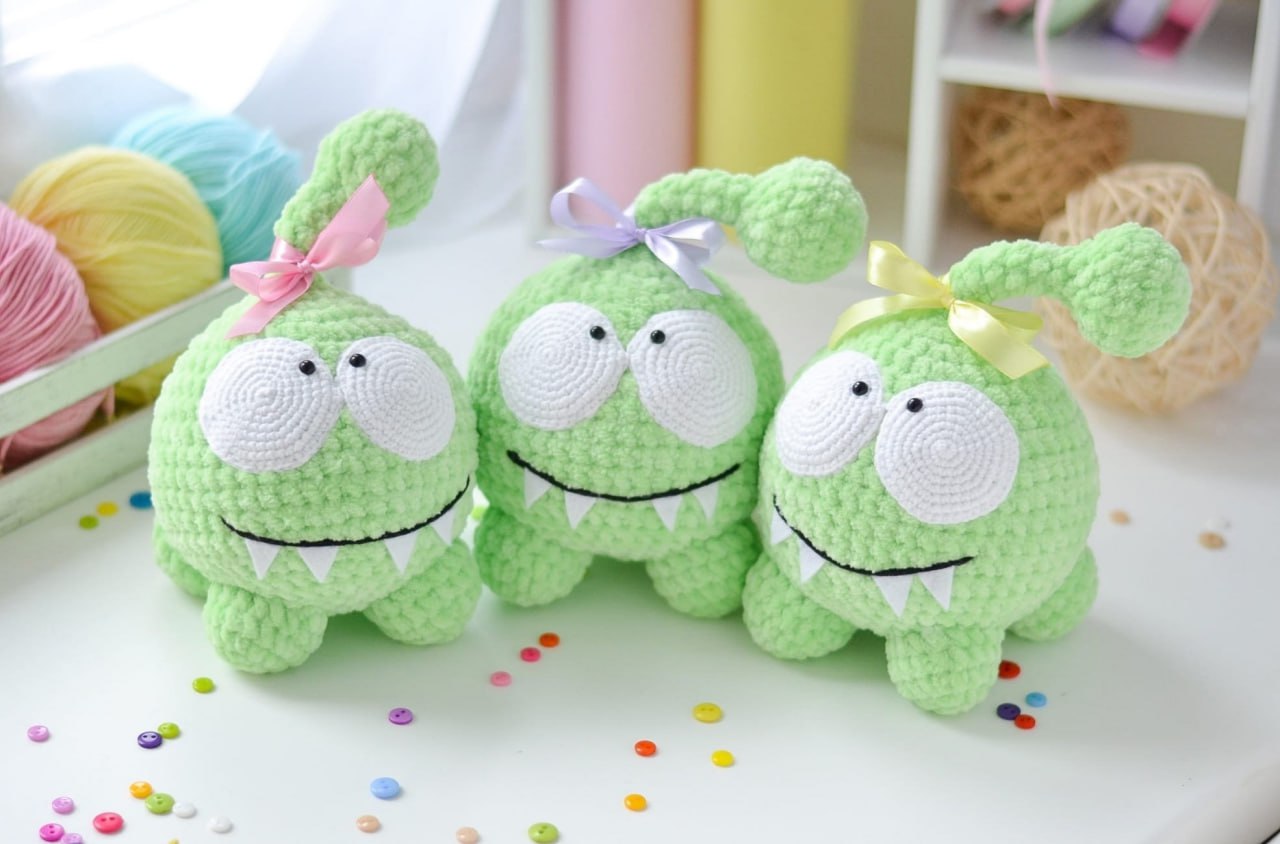
Are you looking for your next adorable amigurumi project? If you love creatures that are equal parts spooky and sweet, you have come to the right place! This “Am-Nyam” monster is the perfect addition to your crochet collection. With its squishy plush body, large expressive eyes, and tiny little teeth, this little guy is bound to become a favorite desk companion or a nursery decoration.
This pattern is designed specifically with beginners in mind. While it uses plush yarn—which can sometimes be a little tricky to work with—the construction is straightforward and the shaping is very logical. By the end of this tutorial, you will have a finished monster measuring approximately 5 inches (12 cm) tall, perfect for gifting or displaying on a shelf.
Materials & Abbreviations
Before we pick up our hooks, let’s make sure you have everything you need. Using the right tools will make the process much smoother, especially when working with thicker, plush yarns.
What You Will Need
- Plush/Chenille Yarn: A bright green color (approximately half a skein). A soft, velvet-style yarn works best for that extra squishy feel.
- Cotton Yarn: A bright white color for the eyes. A standard worsted weight cotton is perfect here.
- Embroidery Yarn: A small amount of black yarn to outline the mouth.
- Safety Eyes: One pair of 8mm safety eyes.
- Stuffing: Polyester fiberfill (polyfill) to give your monster its shape.
- Crochet Hooks: A 3mm (US size D/3) hook for the body and legs, and a 2mm (US size B/2) hook for the smaller eye details.
- Notions: A yarn needle, sharp scissors, sewing pins, and a bit of fabric glue (if you prefer to glue the teeth instead of embroidering them).
Abbreviations (US Terms)
Please note that all instructions are worked in a continuous spiral. We recommend using a stitch marker to keep track of your rounds.
- ch: chain
- sc: single crochet
- inc: increase (two single crochets in one stitch)
- dec: decrease (invisible decrease preferred; work two sc together through the front loops only)
- st(s): stitch(es)
- MR: magic ring (or alternatively, starting with a chain loop)
Step-by-Step Instructions
The Main Body
The body is worked in one continuous piece using a 3mm crochet hook. This creates a “double-bulb” shape that gives the monster its unique look.
The Lower Section:
- Round 1: Start with a magic ring and work 6 sc into the ring. (6) (Note: You can also ch 2 and work 6 sc into the second ch from the hook).
- Round 2: 6 inc. (12)
- Round 3: (1 sc, inc) repeat 6 times. (18)
- Rounds 4-5: 18 sc.
- Round 6: (1 sc, dec) repeat 6 times. (12)
- Round 7: 6 dec. (6)
Stop here to stuff the lower section firmly with fiberfill before continuing.
The Middle/Neck Section:
- Rounds 8-14: 6 sc for each round (7 rounds total).
The Upper Section:
- Round 15: 6 inc. (12)
- Round 16: (1 sc, inc) repeat 6 times. (18)
- Round 17: (2 sc, inc) repeat 6 times. (24)
- Round 18: (3 sc, inc) repeat 6 times. (30)
- Round 19: (4 sc, inc) repeat 6 times. (36)
- Round 20: (5 sc, inc) repeat 6 times. (42)
- Round 21: (6 sc, inc) repeat 6 times. (48)
- Rounds 22-28: 48 sc for each round (7 rounds total).
Tapering the Top:
- Round 29: (6 sc, dec) repeat 6 times. (42)
- Round 30: (5 sc, dec) repeat 6 times. (36)
- Round 31: (4 sc, dec) repeat 6 times. (30)
- Round 32: (3 sc, dec) repeat 6 times. (24)
- Round 33: (2 sc, dec) repeat 6 times. (18)
Stuff the upper section very firmly. Ensure the stuffing is distributed evenly so there are no lumps.
- Round 34: (1 sc, dec) repeat 6 times. (12)
- Round 35: 6 dec. (6)
Fasten off, leaving a tail. Pull the tail through the remaining stitches to close the hole, then weave in your ends inside the body.
The Legs (Make 4)
Use a 3mm crochet hook and your green plush yarn.
- Round 1: Start with a magic ring and work 6 sc into the ring. (6)
- Round 2: 6 inc. (12)
- Round 3: (1 sc, inc) repeat 6 times. (18)
- Rounds 4-5: 18 sc.
Fasten off, leaving a long tail of about 12 inches (30 cm) for sewing. Stuff the legs lightly before closing them.
The Large White Eyes (Make 2)
Use a 2mm crochet hook and your white cotton yarn.
- Round 1: Work 6 sc into a magic ring. (6)
- Round 2: 6 inc. (12)
- Round 3: (1 sc, inc) repeat 6 times. (18)
- Round 4: (2 sc, inc) repeat 6 times. (24)
- Round 5: (3 sc, inc) repeat 6 times. (30)
- Round 6: (4 sc, inc) repeat 6 times. (36)
- Round 7: (5 sc, inc) repeat 6 times. (42)
- Round 8: 42 sc.
Fasten off, leaving a long tail of about 12 inches (30 cm) for sewing.
Finishing
Now comes the fun part—bringing your monster to life! Follow these steps carefully to ensure your Am-Nyam looks just as cute as the photos.
Assembly Steps
- Attach the Eyes: Using your yarn needle and the long tails from the white eye pieces, sew the large white circles onto the upper half of the body. Position them close together for a “silly” look.
- Add the Pupils: Once the white eyes are secure, use your glue gel to attach the 8mm safety eyes to the center of the white circles.
- Embroider the Mouth: Using your black embroidery yarn, stitch a wide, slightly curved line across the lower half of the face to create a big grin.
- Add the Teeth: You have two options here! You can either embroider small white triangles along the bottom edge of the mouth using white yarn, or for a more 3D look, cut small triangles out of white felt and glue them onto the mouth.
- Attach the Legs: Position the four legs on the bottom of the body. Use your pins to make sure they are symmetrical and evenly spaced. Once you are happy with the placement, sew them on securely.
Tips for Success
Working with plush yarn is a different experience than working with standard cotton or acrylic. Here are a few tips to help you avoid frustration:
- Watch your tension: Plush yarn can be slippery. Try to keep your tension even so that the stuffing doesn’t peek through the stitches.
- Use stitch markers: Because the stitches in plush yarn can be hard to see, a stitch marker is essential to tell where your round begins and ends.
- Be careful with mistakes: One tip for working with chenille/plush yarn is to avoid “frogging” (ripping out stitches) too often. The fibers can fray and shed if you undo them repeatedly. Double-check your stitch counts as you go!
- Stuffing technique: When stuffing, push the fiberfill into the corners of the piece. This prevents the “lumpy” look and ensures a smooth, professional finish.
Happy crocheting! We can’t wait to see your finished Am-Nyam monsters!