How to Crochet Cute Dog Face Baby Booties: A Complete Beginner-Friendly Tutorial
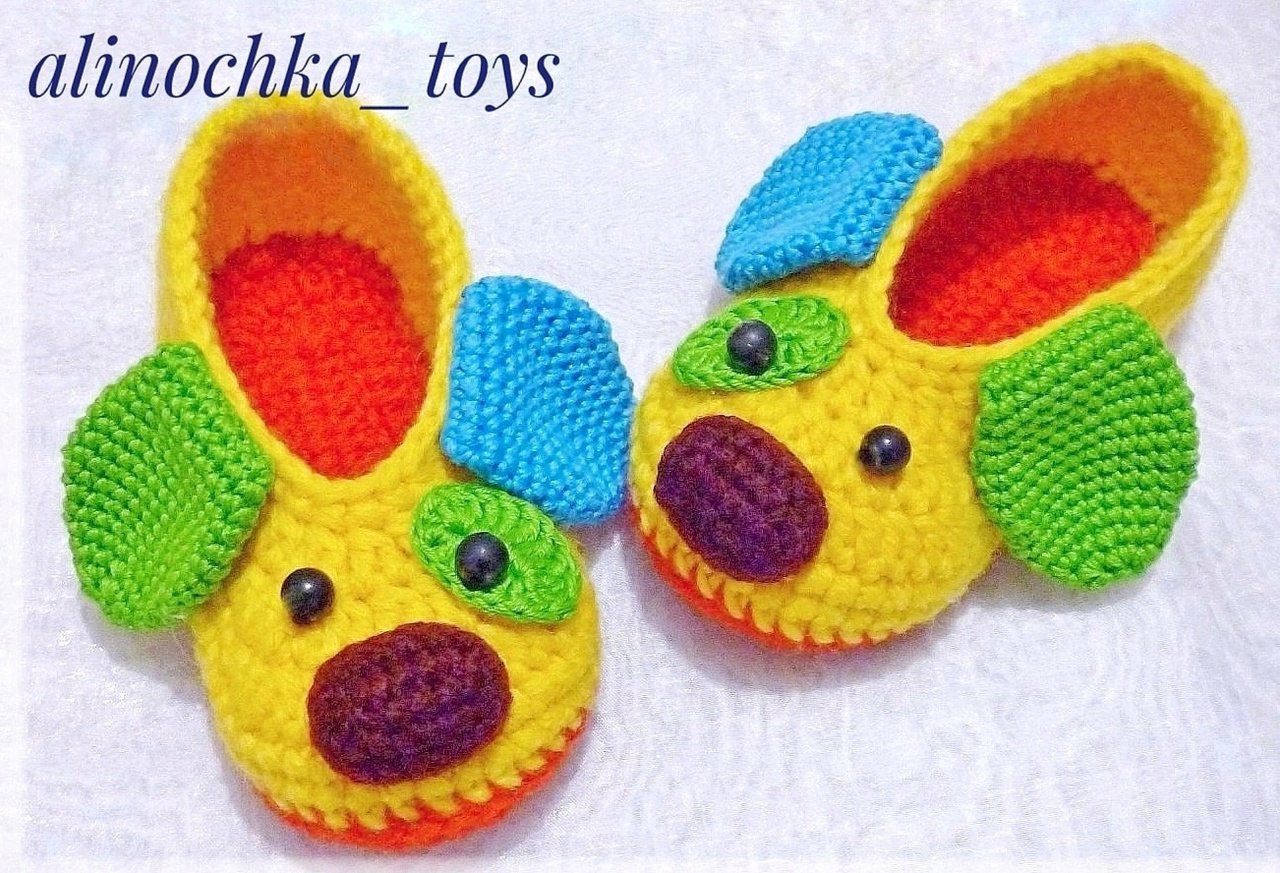
Are you looking for the perfect, adorable DIY gift for a baby shower? There is nothing quite as heartwarming as a pair of tiny, handmade baby shoes. Today, we are diving into a project that is as fun to make as it is to wear: these vibrant, colorful Crochet Dog Face Baby Booties! These booties are designed with a whimsical puppy theme, featuring bright yellow bodies, floppy ears, and a sweet little nose. They are perfect for newborn photo shoots or as a cozy addition to a baby’s wardrobe.
Whether you are an experienced crocheter looking for a quick project or a beginner wanting to practice shaping and amigurumi-style details, this pattern is for you. The bright colors and playful design make these booties a standout piece. Let’s grab our hooks and get started on these adorable puppy slippers!
Materials & Supplies
To ensure your booties turn out looking professional and feel soft against delicate baby skin, I recommend using high-quality cotton or a soft acrylic blend. You will need several colors to bring this puppy to life.
- Yarn: Medium weight (Worsted) yarn in the following colors:
- Bright Yellow (Main body)
- Orange or Red (Sole and lining)
- Brown or Deep Purple (Nose)
- Green (One set of ears and eye patches)
- Blue (Second set of ears and eye patches)
- Crochet Hook: 3.5mm (E) or 4.0mm (G) hook, depending on your tension.
- Eyes: Small black beads or black safety eyes.
- Stuffing: A small amount of polyester fiberfill for the nose.
- Tools: Tapestry needle for sewing, scissors, and stitch markers.
- Optional: A handheld garment steamer for final shaping.
Crochet Abbreviations
This pattern uses standard US crochet terminology. Please ensure you are familiar with these terms before beginning:
- ch: chain
- sc: single crochet
- hdc: half double crochet
- dc: double crochet
- tr: treble crochet
- inc: increase (two stitches in one stitch)
- dec: decrease (two stitches worked together into one)
- st(s): stitch(es)
- sl st: slip stitch
- st(s) in next(s): work the indicated number of stitches into the next stitch(es)
Step-by-Step Instructions
The Sole and Base
We begin by creating the foundation of the bootie, which forms the sole. We will work in rows to create an oval shape.
Round 1: Start by making a chain of 20. To begin shaping, skip the first 3 chains and work 16 sc into the 4th chain from your hook. In the very last chain, work 5 sc to turn the corner. Now, working along the opposite side of your foundation chain, work 16 sc. In the remaining end chain, work 5 sc. This creates your oval base.
Round 2: Work 16 sc. In the final chain, work 5 sc. Turning to the other side of the chain, work 16 sc. In the final chain, work 5 sc.
Round 3: To add volume and shape, we will use taller stitches. Work 2 ch (this counts as your first stitch). Work 16 dc. In the middle 5 stitches of the toe section, work 2 dc in each stitch (this creates the curve). Work 16 dc along the side. In the middle 5 stitches of the heel section, work 2 dc in each stitch. Work 16 dc back toward the start.
Round 4: We will now transition into shaping the sides. Work 1 ch. Work 7 hdc. Work 2 dc. Work 7 sc. In the middle 10 stitches, follow the increasing pattern to expand the width slightly as shown in your visual guide. Work 7 sc, 2 dc, and 7 hdc to complete the round.
Shaping the Bootie Body and Toe
Now that we have a sturdy base, we need to build the “walls” of the bootie and taper the toe to create that rounded puppy face shape.
The Sides: Work the first few rounds of the edges using sc. This creates a firm border that holds the shape of the foot.
The Toe Shaping: To create the nose area, we need to decrease the stitches. Starting from the middle of the foot, work rounds of sc, alternating with decreases. As you work toward the tip of the toe, follow a pattern of decreasing every few stitches. You will eventually reach a point where you are working with about 14 to 18 stitches for the final toe section.
Final Body Rounds: Continue working rounds of sc around the opening of the bootie. Ensure your tension is even so the “ankle” of the bootie stays snug but comfortable for a baby.
Making the Puppy Nose
The nose is a small, stuffed oval that gives the bootie its character.
Row 1: Ch 7. Starting in the 4th ch from the hook, work 4 sc. In the last chain, work 3 sc. Turn to work on the other side of the chain: work 4 sc, and in the last chain, work 3 sc. You should have a small oval.
Row 2: Ch 1. Work 5 sc. In the end chain, work 2 sc. Work 6 sc. In the end chain, work 2 sc. Work 1 sc.
Row 3: Work 5 sc. In the end chain, work 2 sc. Work 6 sc. In the end chain, work 2 sc. Work 1 sc.
Assembly: Once finished, lightly stuff the nose with polyester fiberfill. You will create two identical pieces (or one piece folded) and sew them together to form a 3D shape.
Crafting the Eye Patches
The eye patches add that extra pop of color. You can make these in green or blue.
Row 1: Ch 7. In the 4th ch from the hook, work 1 hdc. In the last chain, work 2 hdc. Turn to the other side and work 1 hdc, then work 2 hdc in the final chain.
Row 2: Work in a round. Use 2 sc, then 2 dc, then move to the middle section and work 7 tr (treble crochet) to create a wide, flat center. Finish with 2 dc and 2 sc.
Row 3: Work sc in every stitch around to stabilize the shape.
Creating the Floppy Puppy Ears
The ears are the most important part of the “dog” look! We will make these in a contrasting color.
The Foundation: Ch 17 and join the chain into a ring (magic ring or slip stitch into the first ch).
Round 1: Work 16 sc into the ring.
Round 2: (sc, inc) repeat around.
Round 3: Work 4 sc, inc, 7 sc, inc, 3 sc.
Round 4: Work 5 sc, inc, 8 sc, inc, 3 sc.
Round 5: Work 5 sc, inc, 9 sc, inc, 4 sc.
Round 6: Work 6 sc, inc, 10 sc, inc, 4 sc.
Middle Rounds: Work 3 rounds of sc without any increases to give the ear some depth.
Decreasing Section: To taper the ear, begin decreasing. Work 6 sc, dec, 9 sc, dec, 5 sc. Continue decreasing in a pattern (e.g., 6 sc, dec, 8 sc, dec, 4 sc) until you reach the desired pointed shape of the ear. Fasten off, leaving a long tail for sewing.
Assembly & Finishing Touches
This is where the magic happens! It is time to turn your crochet pieces into a puppy.
- The Nose: Center the stuffed nose at the very front of the bootie. Use your tapestry needle and a matching color of yarn to sew it securely in place.
- The Eye Patches: Position the green or blue eye patches just above the nose. Sew them down firmly.
- The Eyes: Once the patches are in place, sew your black beads or safety eyes onto the eye patches. This brings the puppy’s expression to life!
- The Ears: Sew the ears to the sides of the bootie, just above the eye patches. Make sure they sit at a natural, floppy angle.
- Final Shaping: For a professional “boutique” look, use a handheld steamer to lightly steam the booties. This helps even out the stitches and gives the fabric a smooth, high-quality finish. Flatten them slightly once steamed.
Expert Tips for Success
To make sure your doggy booties are perfect, keep these tips in mind:
- Mind Your Tension: Since these are for babies, ensure your stitches aren’t too tight, which can make the booties stiff. A consistent, medium tension is key.
- Use Stitch Markers: When working in rounds or creating complex increases/decreases, always use a stitch marker to keep track of your starting point.
- Blocking is Your Friend: Even if you don’t want to steam them, “wet blocking” (shaping them while slightly damp) can help the toe and heel maintain their intended shape.
- Safety First: If you are making these for a newborn, ensure all beads or eyes are sewn on extremely securely to prevent any choking hazards. Many parents prefer to embroider the eyes with black yarn for maximum safety.