How to Crochet a Cute Amigurumi Giraffe: A Step-by-Step Tutorial
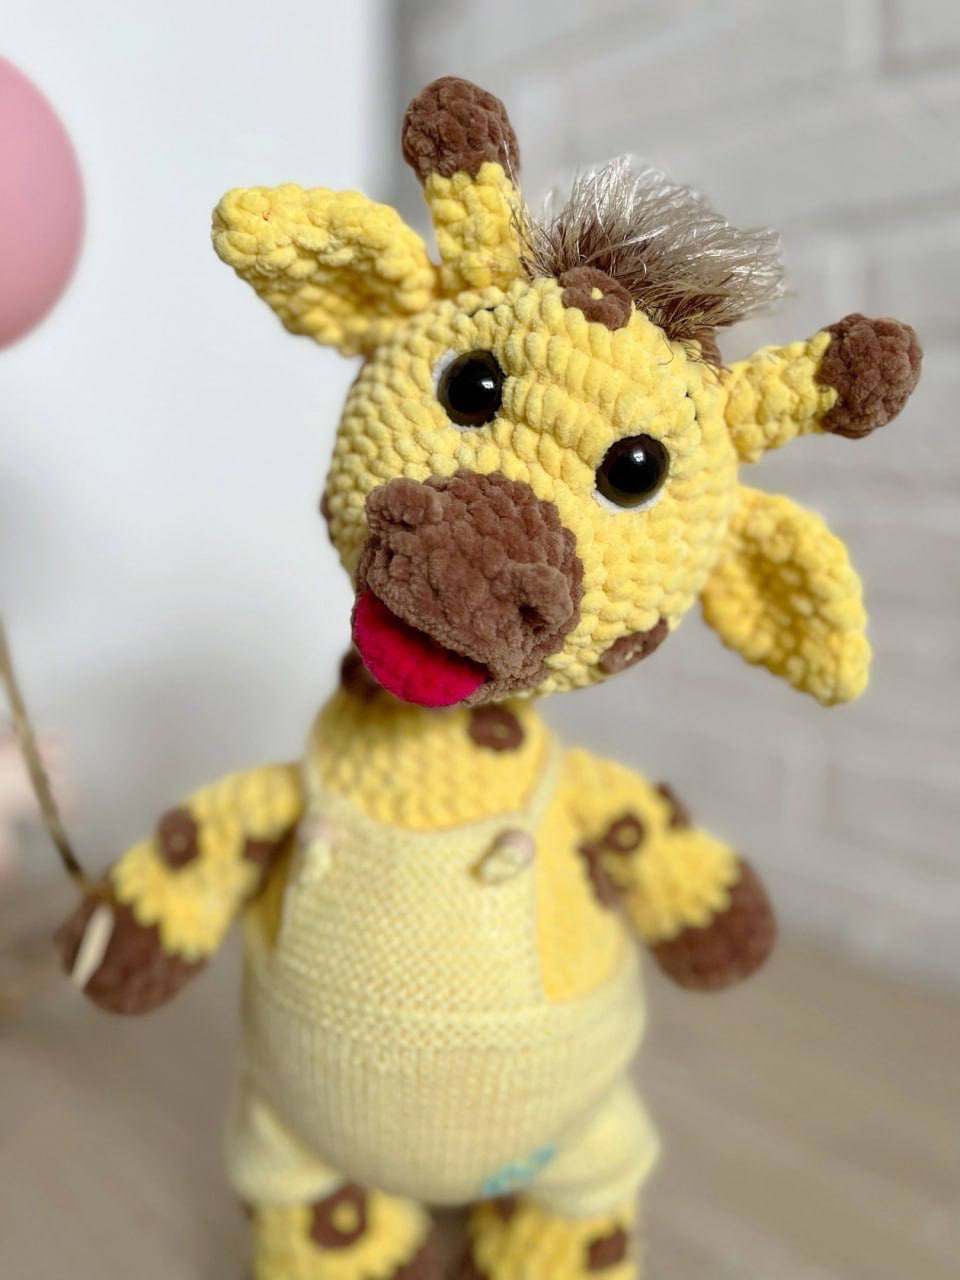
Are you looking for your next adorable crochet project? This DIY amigurumi giraffe is the perfect addition to your stuffed animal collection! With its charming little overalls, tiny spots, and sweet expression, this giraffe is an ideal gift for baby showers, birthdays, or even just a special treat for yourself. This pattern is designed to be beginner-friendly, focusing on basic stitches while teaching you how to shape a character’s face and body.
In this tutorial, we will guide you through every step of the process, from creating the tiny horns to assembling the final, huggable friend. Whether you are a seasoned pro or just starting your amigurumi journey, you will love the results of this project. Grab your favorite velvet yarn and let’s get started!
Materials & Abbreviations
To achieve the soft, plush look seen in the photos, I highly recommend using a velvet or chenille-style yarn. This gives the giraffe that extra “squish” factor that makes amigurumi so wonderful.
What You Will Need:
- Yarn: Velvet/Chenille yarn in Yellow (main color), Brown (spots and horns), Pink (tongue/muzzle), and Cream/Off-white (for the overalls).
- Crochet Hook: A 4.0mm or 5.0mm hook (depending on your yarn weight) to ensure tight stitches.
- Safety Eyes: Large black safety eyes (approx. 10mm-12mm).
- Stuffing: High-quality polyester fiberfill.
- Tools: A tapestry needle for sewing, scissors, and stitch markers.
Abbreviations (US Terms):
- MR: Magic Ring
- ch: Chain
- sc: Single crochet
- hdc: Half double crochet
- sl st: Slip stitch
- inc: Increase (2 sc in one stitch)
- dec: Decrease (sc 2 together)
- st(s): Stitch(es)
- BLO: Back loops only
- rep: Repeat
Step-by-Step Instructions
Before we begin, remember to keep your tension even to ensure the stuffing doesn’t peek through your stitches. Use stitch markers to keep track of the start of every round.
The Head (Muzzle & Main Head)
The head is constructed in two parts: the muzzle (which is made of a top and bottom half) and the main head that surrounds it.
The Upper Muzzle (Yellow)
Start with a MR and work as follows:
- Rnd 1: 5 sc in MR (5)
- Rnd 2: ch, turn, 5 inc (10)
- Rnd 3: ch, turn, 9 sc, 1 sc in back loop (10)
Note: To create the snout shape, you will work specific stitches into the sides of the previous rows to create a bulge. Mark your first and last stitches. Following the shaping instructions, work your ch, sc, and sl st sequences to build the protrusion. Leave a long tail for sewing.
The Lower Muzzle (Pink)
Using pink yarn, start with a MR:
- Rnd 1: 5 sc in MR (5)
- Rnd 2: ch, turn, inc, 3 sc, inc (7)
Switch to your main yellow yarn, working the next round in BLO:
- Rnd 3: 7 sc (7)
Now, shape the bottom of the muzzle by working ch, sc, and sl st into the marked edges to create the curved bottom. Leave a long tail.
Joining & The Main Head
Once the two muzzle pieces are shaped, sew them together. To join them to the head, insert your hook into the opening of the joined muzzle. You should have 17 stitches total. Add 1 extra stitch where the opening begins so you have 18 stitches to work with.
- Rnd 1: (2 sc, inc) x 6 (24). Change to yellow.
- Rnd 2: 24 sc (24)
- Rnd 3: (1 sc, inc) x 3, 2 sc, (inc, 1 sc) x 3, 10 sc (30)
- Rnd 4: (inc, 1 sc) x 4, inc, 2 sc, inc, (1 sc, inc) x 4 (40)
- Rnd 5: 11 sc, 8 inc, 21 sc (48)
- Rnd 6-11: 6 rounds of 48 sc (48)
Important: At this stage, start crocheting your brown spots into the head. Insert your safety eyes between rounds 3 and 4 from the muzzle connection.
Now, begin decreasing to close the head:
- Rnd 12: (6 sc, dec) x 6 (42)
- Rnd 13-14: 2 rounds of 42 sc (42)
- Rnd 15: (5 sc, dec) x 6 (36)
- Rnd 16: 36 sc (36)
- Rnd 17: (4 sc, dec) x 6 (30)
- Rnd 18: (3 sc, dec) x 6 (24)
- Rnd 19: (2 sc, dec) x 6 (18)
- Rnd 20: (1 sc, dec) x 6 (12)
- Rnd 21: 6 dec (6)
Stuff the head firmly, fasten off, and leave a tail for sewing.
The Body
The body is worked in rounds and includes the integration of the legs.
- Rnd 1: 12 sc in MR (12)
- Rnd 2: 12 hdc (24)
- Rnd 3: (3 sc, inc) x 6 (30)
- Rnd 4: (4 sc, inc) x 6 (36)
- Rnd 5: (5 sc, inc) x 5, then for the left leg: 5 sc, inc (42)
- Rnd 6: 6 sc, inc, 1 sc, then for the right leg: 5 sc, inc, (6 sc, inc) x 3 (48)
- Rnd 7-12: (11 sc, inc) x 4 (52), then 6 rounds of 52 sc (52)
Follow the decrease pattern to shape the torso: work your decreases (e.g., 3 sc, dec) to narrow the body down to 18 stitches. Before finishing, attach the tail and crochet your brown spots onto the body.
Stuff the body thoroughly and leave a tail for assembly.
Arms (Make 2)
Use yellow yarn, then switch to brown for the hands/spots.
- Rnd 1: 8 sc in MR (8)
- Rnd 2: 8 hdc (16)
- Rnd 3: (7 sc, inc) x 2 (18)
- Rnd 4: 18 sc (18)
- Rnd 5: (7 sc, dec) x 2 (16)
Switch to brown yarn and continue shaping the arms by decreasing until you reach 10 stitches. Stuff the arms halfway, fold, and sew the ends shut.
Legs (Make 2)
Legs are worked flat and then joined.
- Rnd 1: 6 sc in MR (6)
- Rnd 2: ch, turn, 6 inc (12)
- Rnd 3: ch, turn, 11 hdc, 1 sc (23)
- Rnd 4: 22 sc, 1 sc in BLO (23)
Work the decorative edge, turn the work, and crochet 29 sc. Follow the decrease pattern (e.g., 5 sc, dec) while switching to brown for the feet. Stuff the legs and sew them to the bottom of the body.
Ears & Horns
Horns: Start with a MR of 6 sc. Increase to 9 sc. Change to brown for the tips. Decrease to 5 sc, then increase back to 7 sc.
Ears: Start with a MR of 4 sc. Increase to 6, then to 9, then to 14 sc. Work 3 rounds of 14 sc, then decrease to 7 sc.
Tail
Chain 15. Turn and work 14 sc on one side and 14 sc on the other to create a thin strip. Attach a tassel to the end for a fluffy look.
Finishing
Now comes the most rewarding part—assembly! Use your tapestry needle and the yarn tails to carefully attach each piece:
- Sew the head onto the body, ensuring it sits upright.
- Attach the ears to the top of the head and the horns between them.
- Sew the arms to the sides of the body and the legs to the bottom.
- Attach the tail to the back.
- The Details: Sew on the nostrils (made from a small 3-sc MR), add the eyebrows, and attach the hair tuft to the top of the head. Finally, embroider any remaining spots.
Tips for Success
- Safety First: If making this for a very young infant, consider embroidering the eyes instead of using plastic safety eyes to prevent choking hazards.
- Tight Tension: Amigurumi requires tight stitches so that the stuffing stays inside. If you find holes appearing, try using a smaller hook.
- Spot Placement: Don’t worry about making the spots perfectly symmetrical! The charm of amigurumi is its unique, handmade character.
- Measuring: If you want a larger giraffe, simply use thicker yarn and a larger hook. This pattern scales up beautifully!