Adorable Amigurumi Sheep Crochet Pattern: A Step-by-Step Guide
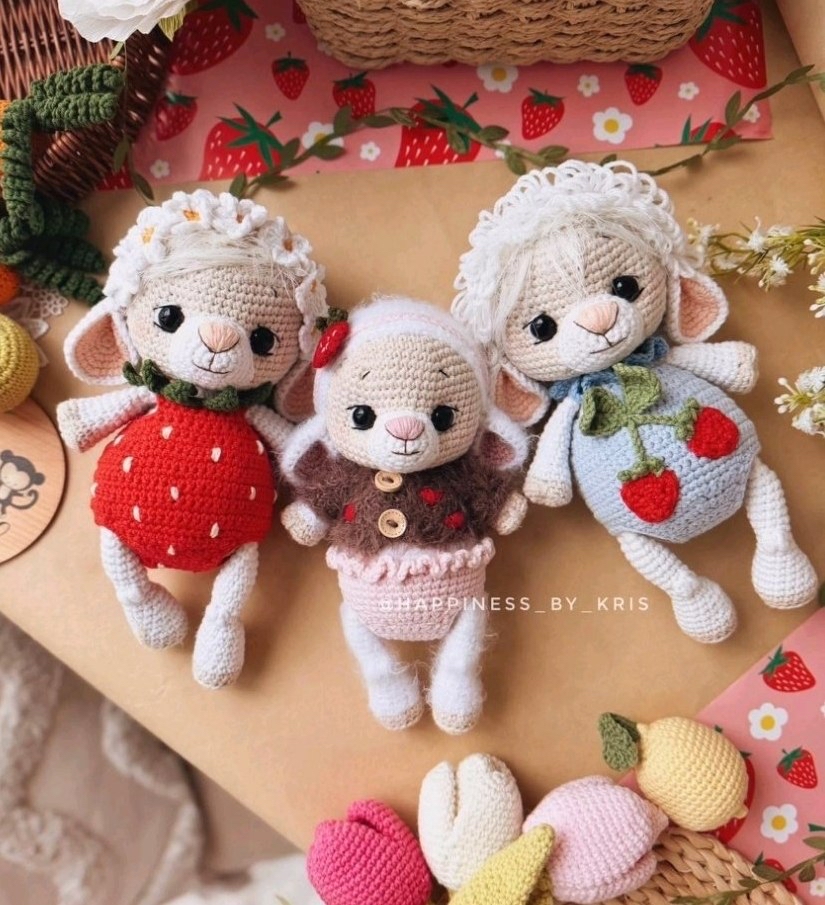
Are you looking for your next heartwarming crochet project? This adorable amigurumi sheep is the perfect blend of sweet and whimsical! Whether you choose to make a classic version using smooth cotton yarn or a super-soft version using fuzzy chenille-style yarn, this little sheep is bound to become a favorite companion for children or a charming piece of nursery decor.
If you use a standard cotton weight yarn, your finished sheep will stand approximately 8.5 to 9 inches tall. If you opt for a fluffier, bulkier yarn, the finished size will be a cozy 7.5 to 8 inches. This tutorial is designed to be beginner-friendly, walking you through every tiny stitch to ensure your little lamb turns out just as cute as the pictures!
Materials and Abbreviations
Before we dive into the stitches, let’s make sure you have everything you need on your crochet hook.
What You Will Need
- Yarn: Cotton yarn (DK or Sport weight) for the classic look, or a soft, fuzzy yarn for a plush effect. You will need white (for the body/limbs), a cream/off-white (for the head), and various accent colors (red, green, and blue) for the clothing and accessories.
- Crochet Hook: 2.0mm (B) hook is recommended for tight, clean stitches.
- Safety Eyes: 12mm safety eyes.
- Stuffing: Polyester fiberfill (poly-fill).
- Tools: A tapestry needle (blunt end) for sewing, a long needle for facial shaping, scissors, and optional makeup/dry blush to give the sheep rosy cheeks.
- Accessories: Two small buttons (approx. 0.2 inches diameter) for the overalls.
US Crochet Abbreviations
This pattern uses standard US terminology. Please ensure you are following US terms to avoid confusion!
- MR: Magic Ring
- ch: Chain
- sc: Single crochet
- inc: Increase (2 sc in one stitch)
- dec: Decrease (sc 2 together)
- hdc: Half double crochet
- dc: Double crochet
- tr: Treble crochet
- sl st: Slip stitch
- BLO: Back Loops Only
- st(s): Stitch(es)
Step-by-Step Instructions
The Legs (Lower Limbs)
Start with your accent color (e.g., shade #05). You will make two legs.
- Rnd 1: 6 sc in MR (6)
- Rnd 2: 6 inc (12)
- Rnd 3: (1 sc, inc) x 6 (18)
- Rnd 4: 18 sc in BLO (18)
- Rnd 5: 18 sc. Change color to white (18)
- Rnd 6: 18 sc (18)
- Rnd 7: (7 sc, dec) x 2 (16)
- Rnd 8–9: 16 sc (16) for 2 rounds
- Rnd 10: (6 sc, dec) x 2 (14)
- Rnd 11–12: 14 sc (14) for 2 rounds. Tip: Stuff the bottom part of the leg firmly.
- Rnd 13: dec, 12 sc (13)
- Rnd 14: 2 dec, 9 sc (11)
- Rnd 15: dec, 4 sc, (3 dc into one stitch to create a “knee” effect) x 2, 3 sc (10)
- Rnd 16: 10 sc (10)
- Rnd 17: (4 sc, inc) x 2 (12)
- Rnd 18–23: 12 sc (12) for 6 rounds.
Note: After finishing, stuff the top part of the leg slightly, fold the piece in half, and sc through both layers for 5 stitches to create a flat bottom. Fasten off and weave in ends.
The Arms (Upper Limbs)
Make two arms using your accent color.
- Rnd 1: 6 sc in MR (6)
- Rnd 2: 6 inc (12)
- Rnd 3: (3 sc, inc) x 3 (15)
- Rnd 4: 15 sc in BLO (15)
- Rnd 5: 15 sc. Change color to white (15)
- Rnd 6: 13 sc, dec (14)
- Rnd 7: 14 sc (14)
- Rnd 8: (5 sc, dec) x 2 (12)
- Rnd 9–10: 12 sc (12) for 2 rounds
- Rnd 11: 10 sc, dec (11)
- Rnd 12: 11 sc (11)
- Rnd 13: 9 sc, dec (10)
- Rnd 14–16: 10 sc (10) for 3 rounds.
Note: Stuff the lower part firmly, but leave the upper part lightly stuffed. Fold in half and sc through both layers for 4 stitches. Fasten off.
The Body
Using your white/cream yarn, we will create the main torso.
- Rnd 1: 6 sc in MR (6)
- Rnd 2: 6 inc (12)
- Rnd 3: (1 sc, inc) x 6 (18)
- Rnd 4: (2 sc, inc) x 6 (24)
- Rnd 5: (3 sc, inc) x 6 (30)
- Rnd 6: (4 sc, inc) x 6 (36)
- Rnd 7: (5 sc, inc) x 6 (42)
- Rnd 8: (6 sc, inc) x 6 (48)
- Rnd 9: (7 sc, inc) x 6 (54)
- Rnd 10: (8 sc, inc) x 6 (60)
- Rnd 11: Join the legs here: 14 sc, 5 sc together with the first leg, 22 sc, 5 sc together with the second leg, 14 sc (60)
- Rnd 12–17: 60 sc (60) for 6 rounds.
Note: To keep the legs from splaying out, secure them from the inside with a few stitches using white thread.
- Rnd 18: (8 sc, dec) x 6 (54)
- Rnd 19: 54 sc (54)
- Rnd 20: (7 sc, dec) x 6 (48)
- Rnd 21: 48 sc (48)
- Rnd 22: (6 sc, dec) x 6 (42)
- Rnd 23: 42 sc (42)
- Rnd 24: (5 sc, dec) x 6 (36)
- Rnd 25: 36 sc (36)
- Rnd 26: (4 sc, dec) x 6 (30)
- Rnd 27: (3 sc, dec) x 6 (24)
- Rnd 28: Join the arms here: 7 sc, 4 sc together with the first arm, 8 sc, 4 sc together with the second arm, 1 sc (24)
- Rnd 29: (6 sc, dec) x 3 (21)
- Rnd 30: (5 sc, dec) x 3 (18)
- Rnd 31: 18 sc, sl st. Fasten off.
The Head
Using your cream/off-white yarn.
- Rnd 1: 6 sc in MR (6)
- Rnd 2: 6 inc (12)
- Rnd 3: (1 sc, inc) x 6 (18)
- Rnd 4: (2 sc, inc) x 6 (24)
- Rnd 5: (3 sc, inc) x 6 (30)
- Rnd 6: (4 sc, inc) x 6 (36)
- Rnd 7: (5 sc, inc) x 6 (42)
- Rnd 8: (6 sc, inc) x 6 (48)
- Rnd 9: (7 sc, inc) x 6 (54)
- Rnd 10: (8 sc, inc) x 6 (60)
- Rnd 11–23: 60 sc (60) for 13 rounds.
Eye Placement: Insert your 12mm safety eyes between rounds 17 and 18, approximately 11 stitches apart.
- Rnd 24: (8 sc, dec) x 6 (54)
- Rnd 25: (7 sc, dec) x 6 (48)
- Rnd 26: (6 sc, dec) x 6 (42)
- Rnd 27: (5 sc, dec) x 6 (36)
- Rnd 28: (4 sc, dec) x 6 (30)
- Rnd 29: (3 sc, dec) x 6 (24)
- Rnd 30: (2 sc, dec) x 6 (18), sl st. Fasten off.
Tip: Stuff the head very firmly, especially at the bottom, to ensure that when you pull the eye tension, you get cute, plump cheeks!
The Muzzle and Ears
Muzzle: Use white yarn. MR 6, 6 inc (12), (2 sc, inc) x 4 (16), (3 sc, inc) x 4 (20), (4 sc, inc) x 4 (24), sl st. Fasten off, leaving a long tail for sewing.
Ears: You will need an inner and outer part for each ear.
- Inner Ear: MR 6, 6 inc (12), (1 sc, inc) x 6 (18), (2 sc, inc) x 6 (24), (3 sc, inc) x 6 (30). Fasten off.
- Outer Ear: MR 6, 6 inc (12), (1 sc, inc) x 6 (18), (2 sc, inc) x 6 (24), (3 sc, inc) x 6 (30). Do not fasten off. Join the inner and outer pieces together and sc through both layers for 6 rounds. Fasten off.
Finishing and Assembly
Assembly Steps
- Head to Body: Using a thread the color of the body, sew the head to the body. Find the center of the body and the center of the head. Use a “loop-to-loop” sewing method (18 stitches for both) to ensure a sturdy connection. Be sure to stuff the neck area well during this process.
- Facial Features:
- Sew the muzzle onto the head between rounds 17 and 25.
- Embroider the nose between rounds 2 and 5 of the muzzle using brown yarn.
- Embroider the eyebrows at the level of round 11 of the head using black yarn.
- Add a little rosy blush to the cheeks for extra cuteness!
- Ears: Sew the ears onto the head at the level of the eyes (between rounds 17 and 19 of the head).
- The Hood: Use white yarn. MR 6, 6 inc (12), (1 sc, inc) x 6 (18), (2 sc, inc) x 6 (24), (3 sc, inc) x 6 (30), (4 sc, inc) x 6 (36), (5 sc, inc) x 6 (42), (6 sc, inc) x 6 (48), (7 sc, inc) x 6 (54), (8 sc, inc) x 6 (60), (19 sc, inc) x 3 (63), 63 sc for 8 rounds. Place the hood on the head so it covers the back completely and ends at the last row of the body. Fasten off and sew to the head.
- The Accessories: You can crochet small white flowers to decorate the hood or a little headband with a strawberry attached!
The Strawberry Overalls
This cute little outfit is perfect for a “girl” version of the sheep.
- The Body of Overalls: Ch 27, turn. Rnd 2: 26 sc (26). Rnd 3: 1 sc, (5 sc, inc) x 4, 1 sc (30). Rnd 4: Form sleeves by working 3 sc, inc, ch 6 (skip 6 sts), 10 sc, ch 6 (skip 6 sts), inc, 3 sc (32). Rnd 5: (7 sc, inc) x 4 (36). Rnd 6: 4 sc, inc, (8 sc, inc) x 3, 4 sc (40). Rnd 7: (9 sc, inc) x 4 (44). Rnd 8: 5 sc, inc, (10 sc, inc) x 3, 5 sc (48). Rnd 9: (11 sc, inc) x 4 (52). Rnd 10: 6 sc, inc, (12 sc, inc) x 3, 6 sc (56). Rnd 11: 56 sc. Rnd 12: 2 sc, inc, 50 sc, inc, 2 sc (58). Rnd 13: 58 sc. Rnd 14: 10 sc, inc, 36 sc, inc, 10 sc (60). Rnd 15–18: 60 sc for 4 rounds.
- The Straps: Ch 25, repeat for second strap. Sew to the front of the overalls.
- Details: Embroider small white “seeds” on the red fabric. For the leaves, crochet small green shapes and sew them to the top.
Expert Tips
- Tension is Key: When stuffing your amigurumi, make sure it is very firm. This prevents the stuffing from showing through the stitches and helps maintain the shape of the face.
- Eye Tension: When inserting safety eyes, pull the thread slightly to “sink” them into the head. This creates those adorable, deep-set eyes and helps form the cheek shape.
- Smooth Transitions: When changing colors (like moving from the accent color to white on the legs), try to do so mid-stitch to avoid a harsh line.
- Customization: Don’t be afraid to get creative! You can change the color of the overalls to blue and add different decorations to make a “boy” version.