Adorable Crochet Monkey Pattern: A Step-by-Step Amigurumi Tutorial
Are you looking for your next cozy crochet project? There is nothing quite as heartwarming as a handmade amigurumi animal, and this little crochet monkey is no exception! Whether you are looking to decorate a nursery, create a unique gift for a child, or simply want to practice your amigurumi skills, this monkey is the perfect companion. With its soft, fuzzy texture and expressive face, this little primate is sure to become a favorite on any shelf.
This tutorial is designed to be beginner-friendly. While amigurumi requires some attention to detail—especially when it comes to shaping and color changes—the steps are straightforward. By the end of this guide, you will have a charming, huggable monkey that looks professional and incredibly cute!
Materials & Abbreviations
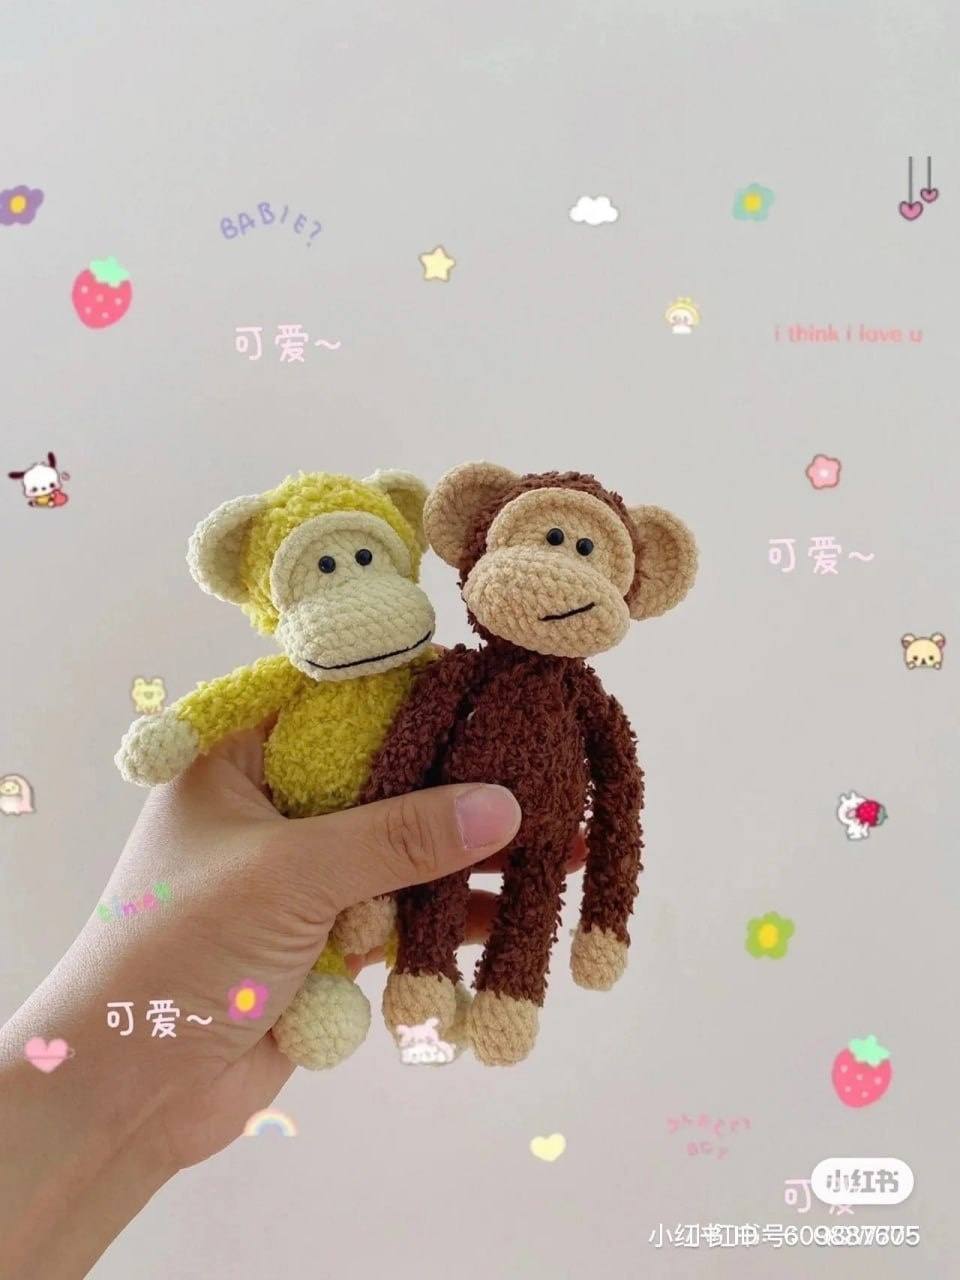
Before you pick up your hook, let’s make sure you have everything you need. For the best results and to match the plush, velvety look seen in the photos, I highly recommend using a chenille or velvet-style yarn.
What You Will Need:
- Yarn: Medium weight (worsted) chenille or velvet yarn in two colors: a “skin” tone (beige, tan, or cream) and a “fur” tone (brown or dark chocolate). You will also need a small amount of yellow yarn if you wish to make the outfit shown in the photos.
- Crochet Hook: A hook size suitable for your yarn (typically 3.5mm to 5.0mm for velvet yarn).
- Safety Eyes: Small black plastic safety eyes (approx. 8mm to 10mm).
- Stuffing: High-quality polyester fiberfill.
- Tapestry Needle: A large-eyed blunt needle for sewing parts together and weaving in ends.
- Stitch Markers: Essential for keeping track of your rounds in amigurumi.
- Scissors: To trim your yarn.
Abbreviations (US Terms):
Please ensure you are using US crochet terms to follow this pattern accurately:
- MR: Magic Ring
- sc: Single crochet
- inc: Increase (2 sc in the same stitch)
- dec: Decrease (sc two stitches together)
- ch: Chain
- dc: Double crochet
- hdc: Half double crochet
- st(s): Stitch(es)
- BLO: Back loop only
- FLO: Front loop only
Step-by-Step Instructions
Remember to use stitch markers at the beginning of every round to avoid getting lost! Most of this pattern is worked in continuous spirals.
The Arms
Make two arms. Start with the skin color.
Round 1: 1 sc in a MR (1)
Round 2: (1 sc, inc) repeat 3 times (9)
Rounds 3-4: 9 sc (9)
Change to fur color.
Rounds 5-20: 9 sc (9)
Fasten off, leaving a long tail for sewing.
The Ears
Make two ears. These are worked in rows rather than rounds. Start with the skin color.
Row 1: 5 sc in a MR. Do not join the ring; work in rows.
Row 2: Ch 1, sc, 3 inc, sc (8)
Row 3: Ch 1, sc, (sc, inc) repeat 3 times, sc (11)
Row 4: Ch 1, 11 sc (11)
Fasten off, leaving a long tail for sewing.
The Muzzle
Use the skin color.
Round 1: Ch 8. Starting in the 2nd ch from the hook: inc, 5 sc, 3 sc in the very last stitch, sc in the next stitch (16)
Round 2: 2 inc, 5 sc, 3 inc, 5 sc, inc (22)
Rounds 3-6: 22 sc (22)
Fasten off, leaving a long tail for sewing.
The Head
Start with the skin color. Stuff lightly as you go.
Round 1: 1 sc in a MR (1)
Round 2: 6 inc (12)
Round 3: (1 sc, inc) repeat 6 times (18)
Round 4: (1 sc, inc, 1 sc) repeat 6 times (24)
Round 5: (3 sc, inc) repeat 6 times (30)
Round 6: 30 sc (30)
Change to fur color.
Round 7: (1 sc, dec) repeat 3 times, 1 sc, 2 dc, 6 inc (of dc), 2 dc, 1 sc, (dec, 1 sc) repeat 3 times (30)
Round 8: 9 sc, (3 sc, inc, hdc), 9 sc (33)
Rounds 9-13: 33 sc (33)
Round 14: 10 sc, (3 sc, dec) repeat 3 times, 8 sc (30)
Round 15: (3 sc, dec) repeat 6 times (24)
Round 16: (1 sc, dec, 1 sc) repeat 6 times (18)
Round 17: (1 sc, dec) repeat 6 times (12)
Round 18: 6 dec (6)
Fasten off, leaving a long tail for sewing. Stuff the head firmly.
The Legs and Body
Make two legs. Start with the skin color.
Round 1: 6 sc in a MR (6)
Round 2: 6 inc (12)
Rounds 3-5: 12 sc (12)
Round 6: (4 sc, dec) repeat 2 times (10)
Change to fur color.
Rounds 7-16: 10 sc (10)
Stop here for the first leg. Do not fasten off!
Round 17: Ch 2, join to the first leg.
Round 18: 10 sc around the first leg, 2 sc across the foundation chain, 10 sc around the second leg, 2 sc across the foundation chain (24)
Round 19: (2 sc, inc) repeat 8 times (32)
Rounds 20-24: 32 sc (32)
Round 25: (6 sc, dec) repeat 4 times (28)
Round 26: 28 sc (28)
Round 27: (5 sc, dec) repeat 4 times (24)
Round 28: 24 sc (24)
Round 29: (4 sc, dec) repeat 4 times (20)
Round 30: (3 sc, dec) repeat 4 times (16)
Round 31: (2 sc, dec) repeat 4 times (12)
Round 32: (1 sc, dec) repeat 4 times (8)
Fasten off, leaving a long tail for sewing. Stuff the body firmly.
The Tail
Join your yarn to the body.
Round 1: Ch 10. Starting in the 2nd ch from the hook: 8 sc (8)
Fasten off and weave the tail into the body.
Finishing
Now comes the magical part: assembly! This is where your monkey really comes to life.
1. The Face
First, attach your safety eyes to the head. I recommend placing them roughly between rounds 13 and 15, centered with the width of the head. Once the eyes are secure, sew the muzzle onto the face.
Pro Detail: To give the muzzle a professional finish, once it is sewn on, work a single crochet edging around the base of the muzzle (around row 6 of the muzzle) using only the front loops (FLO). This creates a lovely defined border.
2. Adding Features
Sew the ears to the sides of the head. Use a black embroidery thread or thin yarn to stitch a simple curved line for the mouth on the muzzle. You can also add small dots for nostrils if you like!
3. Body Assembly
Sew the arms to the sides of the body and the tail to the back. Ensure the stitches are tight so no stuffing escapes.
4. Optional: The Outfit
To replicate the adorable look in the photo, you can crochet a small yellow rectangular piece or a simple skirt/overall pattern to fit around the monkey’s middle. You can even add tiny gold-colored beads or sequins to mimic the “studs” seen on the yellow outfit!
Tips
To ensure your monkey turns out perfectly, keep these professional tips in mind:
- Tension is Key: Since we are making amigurumi, you want your stitches to be tight enough so that the stuffing doesn’t show through the holes. If you find your stitches are too loose, try using a smaller hook.
- Use a Stitch Marker: Working in continuous rounds can be tricky. Always mark the first stitch of every round so you don’t accidentally skip a row.
- Stuffing Technique: When stuffing the head and body, push the fiberfill into the corners and small crevices. This prevents “lumps” and ensures a smooth, professional shape.
- Invisible Decreases: For a cleaner look, try using the “invisible decrease” method (inserting the hook into the front loops only of the next two stitches) instead of a standard decrease. This prevents visible gaps in your work.
- Yarn Management: When changing colors, try to do so on the last pull of the previous color to create a seamless transition.