Adorable Strawberry Baby Crochet Pattern: A Step-by-Step Amigurumi Tutorial
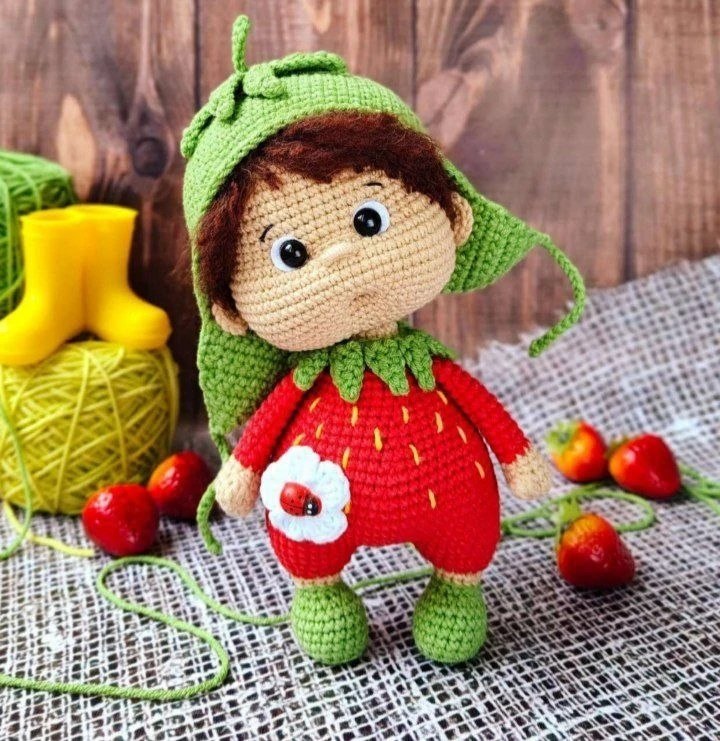
Looking for a sweet and whimsical project to brighten up your crochet nook? This Strawberry Baby doll is the perfect blend of cute and creative. With its vibrant red strawberry body, cozy green hat, and a tiny flower accent, this doll is sure to be a hit with children and collectors alike. Whether you are looking to make a unique gift or a charming addition to your amigurumi collection, this detailed tutorial will guide you through every stitch.
This project is designed for intermediate crocheters. We will be working mostly in spirals, using a technique that creates a dense, professional fabric—perfect for keeping the stuffing inside. The finished doll stands approximately 7 inches tall.
Materials & Abbreviations
To get started, gather the following materials. We recommend using a cotton-acrylic blend for a smooth finish and a specialized fuzzy yarn for the hair to give the baby a realistic look.
Yarn Requirements
- Beige (Skin Tone): Approximately 0.7 oz (20g) of sport-weight cotton blend.
- Green: Approximately 0.7 oz (20g) of sport-weight cotton blend.
- Red: Approximately 0.6 oz (16g) of sport-weight cotton blend.
- White & Yellow: Small amounts for the flower and seed embroidery.
- Dark Brown: Approximately 0.5 oz (14-16g) of fuzzy/moss-style yarn for the wig.
- Embroidery Thread: Black or dark brown for the eyebrows.
Tools & Notions
- Crochet Hooks: 2.0mm (for the cotton blend) and 2.25mm (for the fuzzy yarn).
- Eyes: 8mm safety eyes or black half-beads.
- Felt: Small white or beige felt circles (10mm diameter) for the eye backing.
- Support: 2-3mm wire for the neck to help the head stay upright.
- Soles: A small piece of thin plastic (like a food container lid) for the feet.
- Filling: High-quality polyester fiberfill.
- Extras: Yarn needle, scissors, stitch markers, and clear fabric glue.
US Crochet Terms & Abbreviations
- MR: Magic Ring
- sc: Single crochet
- inc: Increase (2 sc in one stitch)
- dec: Decrease (sc 2 together)
- ch: Chain
- sl st: Slip stitch
- hdc: Half double crochet
- dc: Double crochet
- BLO: Back loops only
- FLO: Front loops only
- (…) * X: Repeat the instructions inside the parentheses X times
Step-by-Step Instructions
The Head
Using the beige yarn, work in a spiral. Do not join rounds unless specified.
- Round 1: 6 sc in MR (6)
- Round 2: 6 inc (12)
- Round 3: (1 sc, inc) * 6 (18)
- Round 4: (2 sc, inc) * 6 (24)
- Round 5: (3 sc, inc) * 6 (30)
- Round 6: (4 sc, inc) * 6 (36)
- Round 7: (5 sc, inc) * 6 (42)
- Round 8: (6 sc, inc) * 6 (48)
- Round 9: (7 sc, inc) * 6 (54)
- Round 10: (8 sc, inc) * 6 (60)
- Rounds 11-18: sc in each stitch around (60)
- Round 19 (Cheeks): 15 sc, (1 sc, inc) * 6, 7 sc, (inc, 1 sc) * 6, 14 sc (72)
- Rounds 20-26: sc in each stitch around (72)
Important Note: Between rounds 20 and 21, count 35 sc from the start of the round and mark the next 3 sc. These will be used for embroidering the nose later.
Eyes: If using safety eyes, place them between rounds 18 and 19, spaced 7-8 sc apart, centered above the nose markers.
- Round 27: (7 sc, dec) * 8 (64)
- Round 28: (6 sc, dec) * 8 (56)
- Round 29: (5 sc, dec) * 8 (48)
- Round 30: (4 sc, dec) * 8 (40)
- Round 31: (3 sc, dec) * 8 (32)
- Round 32: (2 sc, dec) * 8 (24)
- Round 33: (1 sc, dec) * 8 (16)
Stuff the head firmly, paying extra attention to the cheeks to make them plump. Fasten off and weave in the ends.
The Arms (Make 2)
Using beige yarn:
- Round 1: 6 sc in MR (6)
- Round 2: 6 inc (12)
- Round 3: 12 sc
- Round 4: 5 sc, 3 dc in the next stitch, 6 sc (12)
- Round 5: 5 sc, dec, 4 sc, dec (10)
- Round 6: 10 sc
Change to red yarn:
- Round 7: 4 sc, inc, 4 sc, inc (12)
- Rounds 8-17: 12 sc
Lightly stuff the lower part of the arm. Flatten the end and sc across 5 stitches to close. Leave a long tail for sewing.
The Legs & Feet (Make 2)
Using green yarn:
- Foundation: Ch 6.
- Round 1: Starting from 2nd ch from hook: 4 sc, 4 sc in last ch; work along other side of chain: 3 sc, inc (13).
- Round 2: inc, 3 sc, 4 inc, 3 sc, 2 inc (20).
- Round 3: 20 sc in BLO (20).
- Rounds 4-7: sc in each stitch around (26 – adjust tension to match).
- Round 8: 4 sc, 6 dec, 4 sc (14).
Cut a small oval of plastic from a container to fit the sole and insert it now.
- Round 9: 5 sc, 2 dec, 5 sc (12).
Change to beige yarn:
- Round 10: 12 sc in BLO (12).
- Round 11: 12 sc (12).
Change to red yarn (working in FLO for Round 12):
- Round 12: (1 sc, inc) * 6 (18).
- Round 13: 18 sc (18).
- Round 14: (2 sc, inc) * 6 (24).
Stuff the feet. Join the two legs together by chaining 3 stitches.
The Body
Continue with red yarn:
- Round 1: 24 sc around first leg, 3 inc across the joining chain, 24 sc around second leg, 3 inc across the other side of the chain (60).
- Round 2: (9 sc, inc) * 6 (66).
- Rounds 3-8: sc in each stitch around (66).
- Round 9: (9 sc, dec) * 6 (60).
- Round 10: 60 sc (60).
- Round 11: (8 sc, dec) * 6 (54).
- Round 12: 54 sc (54).
- Round 13: (7 sc, dec) * 6 (48).
- Round 14: 48 sc (48).
- Round 15: (6 sc, dec) * 6 (42).
- Round 16: 42 sc (42).
- Round 17: (5 sc, dec) * 6 (36).
- Round 18: 36 sc (36).
- Round 19: (4 sc, dec) * 6 (30).
- Round 20: 30 sc (30).
Stuff the body firmly, leaving about 0.5 inches of space at the top for arm attachment.
- Round 21 (Attach Arms): 7 sc, 5 sc worked together with the first arm, 10 sc, 5 sc worked together with the second arm, 3 sc (30).
- Round 22: 30 sc (30).
- Round 23: (3 sc, dec) * 6 (24).
- Round 24: (1 sc, dec) * 8 (16).
Change to beige yarn for the neck:
- Rounds 25-27: sc in each stitch around (16).
Fasten off, leaving a tail for sewing the head.
Finishing Touches
Head Assembly & Face
Insert a piece of wire (approx 3 inches) into the neck and extend it into the head for stability. Sew the head to the body and stuff the neck area firmly.
Sculpting: Use a long needle and strong thread to create facial indentations. Connect the mouth area (between rounds 26-27) and the eye sockets (between rounds 18-19) by pulling the thread through to the back of the head and tying tightly.
Nose & Eyes: Embroider the nose using a Rococo stitch (approx 15 loops). Glue the safety eyes onto the felt circles, then glue the felt circles onto the head.
The Wig & Hat
The Wig: Use the fuzzy yarn and a 2.25mm hook. Work from the center out: R1: 6 sc in MR; R2: 6 inc; R3: 12 inc; R4: (3 sc, inc)*6; R5: (4 sc, inc)*6; R6: (5 sc, inc)*6; R7: (6 sc, inc)*6; R8: (7 sc, inc)*6; R9-18: sc around (54). Add fringe by attaching 2-3 inch strands of yarn across the front.
The Hat: Using green yarn, follow a similar increase pattern as the wig, continuing until you reach 78 stitches (Round 12). Work several rounds of sc to reach the desired depth. Create ear flaps by working in rows of sc, decreasing at the edges until only a few stitches remain, and finishing with a chain strap.
Hat Details: To create the strawberry sepals, ch 7 and work back along the chain: sl st, 2 sc, 2 hdc, 1 dc. Attach 8 of these leaves to the top of the hat, alternating stitches.
Final Accents
- Collar: Ch 77. Attach 8 strawberry-leaf patterns (same as the hat) along the center, leaving 30 chains on each side for ties.
- Flower: In a MR, work (ch 2, 3 dc, ch 2, sl st) five times to create petals. Sew or glue to the body.
- Strawberry Seeds: Use yellow yarn to embroider small vertical stitches across the red body to mimic seeds.
Tips for Success
- Tension Matters: If your fabric is too loose and the stuffing is showing, try dropping down a hook size. Conversely, use a larger hook for the fuzzy hair to keep it from becoming too stiff.
- Symmetry: Use stitch markers religiously, especially when attaching the arms and creating the face sculpting.
- Customization: Feel free to change the colors! You could make a “Blueberry Baby” or a “Pineapple Baby” using the same basic pattern.
- Stable Neck: Don’t skip the wire reinforcement; it prevents the head from flopping over time.