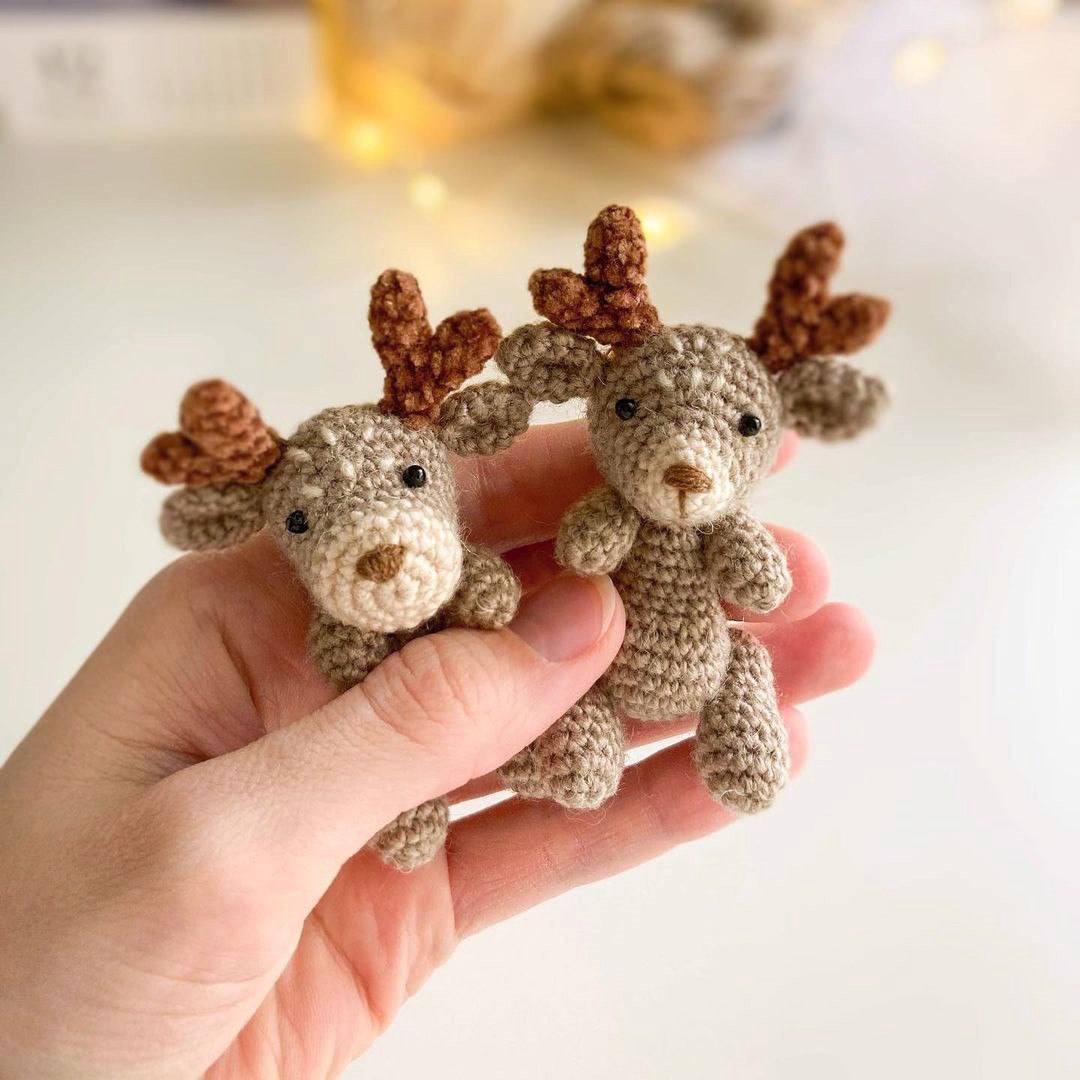
Adorable Mini Crochet Reindeer Pattern: A Step-by-Step Amigurumi Tutorial
Looking for a quick and cute project to add to your holiday crochet list? This mini amigurumi reindeer is the perfect choice! Whether you are making these as festive ornaments, tiny stocking stuffers, or just a cute desk companion, these little deer are sure to bring a smile to anyone’s face. Best of all, this project is beginner-friendly and works up quickly, making it a great choice for gift-giving during the holiday season.
In this tutorial, we will guide you through the process of creating your own tiny reindeer. We have even included two different options for the head shape—a wider muzzle for a cuddlier look or a narrower muzzle for a more classic deer appearance. Let’s grab our hooks and get started!
Materials & Abbreviations
To ensure your reindeer turns out as cute as possible, we recommend using a tight tension to keep the stuffing from showing through. Here is everything you will need for this project.
Materials Needed
- Yarn: A fine or sport weight yarn in three colors: Beige (main body), Milky/Cream (muzzle), and Brown (horns).
- Crochet Hook: 1.5 mm hook (or a size that keeps your stitches tight).
- Safety Eyes: 3 mm plastic safety eyes.
- Embroidery Thread: A small amount of brown thread for the nose.
- Stuffing: Polyester fiberfill.
- Tools: Yarn needle, scissors, and stitch markers.
Finished Size: Approximately 2.5 inches (6-7 cm) tall.
Abbreviations (US Terms)
- MR: Magic Ring
- ch: Chain
- sc: Single crochet
- inc: Increase (two single crochets in one stitch)
- dec: Decrease (single crochet two stitches together)
- slst: Slip stitch
- st: Stitch
Step-by-Step Instructions
This reindeer is worked in continuous rounds. Please use a stitch marker to keep track of the beginning of each round.
The Head
You can choose between two different styles for the muzzle. Choose the one that suits your preference!
Option 1: Wide Muzzle
Start with Milky yarn.
- Round 1: 6 sc in MR (6)
- Round 2: 6 inc (12)
- Round 3: (1 sc, inc) * 6 (18)
- Round 4: 18 sc (18)
Change to Beige yarn.
- Rounds 5-6: 18 sc (18)
- Round 7: 7 sc, 4 inc, 7 sc (22)
- Round 8: 7 sc, inc, 6 sc, inc, 7 sc (24)
- Round 9: (3 sc, inc) * 6 (30)
- Rounds 10-12: 30 sc (30)
- Round 13: (3 sc, dec) * 6 (24)
- Round 14: (2 sc, dec) * 6 (18)
- Round 15: (1 sc, dec) * 6 (12)
Stuff the head firmly. Finish with Round 16: 6 dec. Secure the end and weave in the yarn.
Option 2: Narrow Muzzle
Start with Milky yarn.
- Round 1: 6 sc in MR (6)
- Round 2: (1 sc, inc) * 3 (9)
- Round 3: (2 sc, inc) * 3 (12)
Change to Beige yarn.
- Round 4: (3 sc, inc) * 3 (15)
- Round 5: (4 sc, inc) * 3 (18)
- Round 6: 7 sc, 4 inc, 7 sc (22)
- Round 7: 7 sc, inc, 6 sc, inc, 7 sc (24)
- Round 8: (3 sc, inc) * 6 (30)
- Rounds 9-11: 30 sc (30)
- Round 12: (3 sc, dec) * 6 (24)
- Round 13: (2 sc, dec) * 6 (18)
- Round 14: (1 sc, dec) * 6 (12)
Stuff the head firmly. Finish with Round 15: 6 dec. Secure the end and weave in the yarn.
The Ears (Make 2)
Use Beige yarn.
- Round 1: 6 sc in MR (6)
- Round 2: (1 sc, inc) * 3 (9)
- Round 3: (2 sc, inc) * 3 (12)
- Round 4: 12 sc (12)
- Round 5: (2 sc, dec) * 3 (9)
Fasten off, leaving a long tail for sewing. Fold the edges together and sew them shut with a needle, then fold the ear in half and sew it once more to give it a flat, natural shape.
The Horns (Make 2)
Use Brown yarn. The horns are made by crocheting two small pieces and joining them.
- Round 1: 5 sc in MR (5)
- Rounds 2-3: 5 sc (5)
Crochet two of these small parts. Fasten off the first part, but keep the second part attached to the yarn. Now, we will join them:
- Round 4: 5 sc around the first part, then 5 sc around the second part (10)
- Round 5: 5 dec (5)
- Round 6: 5 sc (5)
Fasten off, leaving a tail for sewing. Do not stuff the horns.
The Body
Use Beige yarn.
- Round 1: 6 sc in MR (6)
- Round 2: 6 inc (12)
- Round 3: (1 sc, inc) * 6 (18)
- Round 4: (2 sc, inc) * 6 (24)
- Rounds 5-7: 24 sc (24)
- Round 8: 6 dec, (1 sc, dec) * 4 (14)
- Rounds 9-11: 14 sc (14)
- Round 12: (5 sc, dec) * 2 (12)
- Round 13: 12 sc (12)
Fasten off, leaving a long tail for sewing. Stuff the body firmly.
The Legs (Make 2)
Use Beige yarn.
- Round 1: 6 sc in MR (6)
- Round 2: 6 inc (12)
- Rounds 3-5: 12 sc (12)
- Round 6: (2 sc, dec) * 3 (9)
- Rounds 7-10: 9 sc (9)
Stuff the legs lightly. Tighten the hole, fasten off, and weave in the ends.
The Arms (Make 2)
Use Beige yarn.
- Round 1: 6 sc in MR (6)
- Round 2: (1 sc, inc) * 3 (9)
- Rounds 3-4: 9 sc (9)
- Round 5: (1 sc, dec) * 3 (6)
- Rounds 6-7: 6 sc (6)
Stuff the arms lightly. Tighten the hole, fasten off, and weave in the ends.
The Tail
Use Beige yarn.
- Round 1: 6 sc in MR (6)
- Round 2: (1 sc, inc) * 3 (9)
- Round 3: 9 sc (9)
Fasten off, leaving a tail. Fold the edges together and sew it flat.
Finishing & Assembly
Now it’s time to bring your little reindeer to life! Follow these steps for assembly:
- Face Details:
- For the wide muzzle: Place safety eyes between rounds 7 and 8, at the edges of the 4 increases from round 7.
- For the narrow muzzle: Place safety eyes between rounds 6 and 7, at the edges of the 4 increases from round 6.
- Use brown thread to embroider a small nose on the second round of the muzzle.
- Ears & Horns:
- Sew the ears on the sides of the head at the level of the eyes. (For wide muzzle: rounds 11-12; for narrow muzzle: rounds 10-11).
- Sew the horns just above the ears.
- Optional: Use white thread to embroider tiny random spots on the forehead.
- Connecting the Body: Sew the head securely to the body.
- Limbs:
- Attach the arms one round below the head-to-body seam.
- Attach the legs to the sides of the body between rounds 4 and 5.
- Tail: Sew the tail to the back of the body around rounds 5-6.
Tips for Success
To make your amigurumi reindeer look professional, keep these tips in mind:
- Tension is Key: If you see holes in your work, try switching to a smaller crochet hook. Amigurumi needs to be tight so the stuffing doesn’t leak out.
- Use a Stitch Marker: Since we work in continuous spirals, it is very easy to lose your place. A simple piece of scrap yarn or a plastic marker will save you a lot of frustration!
- Stuffing Technique: Use small bits of fiberfill and push them into the corners using a crochet hook or a chopstick to avoid lumps.
- Customization: Feel free to experiment with colors! You could make a snowy white reindeer or a magical gold one for the holidays.