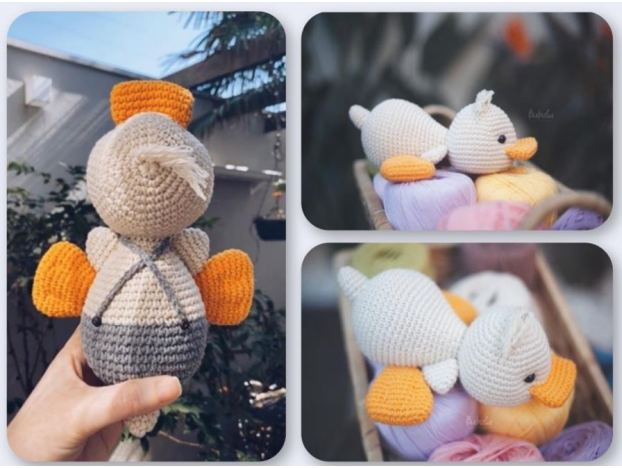
Adorable Crochet Duckling Pattern: Easy Amigurumi Tutorial
Looking for a cozy, cute project to brighten up your day? This adorable crochet duckling is the perfect project for anyone from a confident beginner to an experienced amigurumi artist. With its plump body and sweet expression, this little bird makes a wonderful gift, a nursery decoration, or a charming companion for your desk.
In this tutorial, we will walk you through every step of creating your own little duckling. We will use the standard amigurumi technique of working in continuous rounds to create a seamless, professional look. Whether you are looking to practice your shaping or simply want to create something heartwarming, this pattern is for you!
Materials & Abbreviations
To get started, gather the following materials. We recommend using a cotton or acrylic blend yarn to ensure the duckling holds its shape well over time.
Materials Needed
- Yarn: Medium weight (Category 4) yarn in three colors: Beige (for the head and upper body), Grey (for the lower body), and Yellow/Orange (for the beak and legs).
- Crochet Hook: 3.25mm (D) or 3.5mm (E) hook to keep stitches tight.
- Safety Eyes: 8mm or 10mm black safety eyes.
- Stuffing: High-quality polyester fiberfill.
- Tools: Yarn needle, stitch markers, and scissors.
- Extra: a few scraps of yellow yarn for the hair tuft.
Abbreviations (US Terms)
- MR: Magic Ring
- sc: Single crochet
- inc: Increase (two sc in one stitch)
- dec: Decrease (sc two stitches together)
- ch: Chain
- st(s): Stitch(es)
- ( ) * X: Repeat the instructions inside the parentheses X times
Step-by-Step Instructions
The Head
We begin with the head, working from the top down. This creates a rounded, plump shape.
- Round 1: 6 sc in MR (6)
- Round 2: inc in each st around (12)
- Round 3: (1 sc, inc) * 6 (18)
- Round 4: (2 sc, inc) * 6 (24)
- Round 5: (3 sc, inc) * 6 (30)
- Round 6: (4 sc, inc) * 6 (36)
- Round 7: sc in each st around (36)
- Round 8: (5 sc, inc) * 6 (42)
- Round 9: (6 sc, inc) * 6 (48)
- Round 10: sc in each st around (48). Tip: This is the ideal time to place your safety eyes between rounds 10 and 11.
- Round 11: (7 sc, inc) * 6 (54)
- Rounds 12-17: sc in each st around (54)
- Round 18: (4 sc, dec) * 9 (45)
- Round 19: (3 sc, dec) * 9 (36)
- Round 20: (2 sc, dec) * 9 (27)
- Round 21: (1 sc, dec) * 9 (18)
- Round 22: dec * 9 (9). Fasten off and weave in the end. Stuff the head firmly.
The Beak (Oval Shape)
The beak is worked as an oval and is not stuffed to keep it flat against the face.
- Round 1: Ch 12. Starting in the 2nd ch from hook: 10 sc, 3 sc in the last ch. Turn to work along the opposite side of the chain: 9 sc, inc (24)
- Rounds 2-4: sc in each st around (24)
- Round 5: (inc * 2, 9 sc, inc * 3, 9 sc, inc) (30)
Fasten off, leaving a long tail for sewing.
The Body
The body uses a color change to give the duckling a cute two-tone look. Start with the Grey yarn.
- Round 1: 6 sc in MR (6)
- Round 2: inc in each st around (12)
- Round 3: (1 sc, inc) * 6 (18)
- Round 4: (2 sc, inc) * 6 (24)
- Round 5: (3 sc, inc) * 6 (30)
- Round 6: (4 sc, inc) * 6 (36)
- Round 7: (5 sc, inc) * 6 (42)
- Round 8: (6 sc, inc) * 6 (48)
- Round 9: (7 sc, inc) * 6 (54)
- Rounds 10-14: sc in each st around (54). At the end of Round 14, change color to Beige.
- Round 15: (7 sc, dec) * 6 (48)
- Round 16: sc in each st around (48)
- Round 17: (6 sc, dec) * 6 (42)
- Round 18: sc in each st around (42)
- Round 19: (5 sc, dec) * 6 (36)
- Round 20: sc in each st around (36)
- Round 21: (4 sc, dec) * 6 (30)
- Round 22: sc in each st around (30)
- Round 23: (3 sc, dec) * 6 (24)
- Round 24: sc in each st around (24)
- Round 25: (2 sc, dec) * 6 (18)
- Round 26: sc in each st around (18)
Fasten off, leaving a long tail for sewing. Stuff the body firmly.
The Legs (Make 2)
- Round 1: Ch 10. Starting in the 2nd ch from hook: 8 sc, 3 sc in the last ch. Turn and work along the opposite side: 7 sc, inc (20)
- Round 2: inc, 7 sc, (inc * 3), 7 sc, (inc * 2) (26)
- Rounds 3-5: sc in each st around (26)
- Round 6: dec, 11 sc, dec, 11 sc (24)
- Round 7: sc in each st around (24)
- Round 8: (2 sc, dec) * 6 (18)
- Rounds 9-10: sc in each st around (18)
- Round 11: (1 sc, dec) * 6 (12)
Fasten off, leaving a tail for sewing.
The Wings (Make 2)
- Round 1: 6 sc in MR (6)
- Round 2: (1 sc, inc) * 3 (9)
- Round 3: (2 sc, inc) * 3 (12)
- Round 4: (3 sc, inc) * 3 (15)
- Round 5: sc in each st around (15)
- Round 6: (3 sc, dec) * 3 (12)
Fasten off, leaving a tail for sewing.
The Tail
- Round 1: 6 sc in MR (6)
- Round 2: (1 sc, inc) * 3 (9)
- Round 3: (2 sc, inc) * 3 (12)
- Round 4: sc in each st around (12)
- Round 5: (3 sc, inc) * 3 (15)
Fasten off, leaving a tail for sewing.
Finishing & Assembly
Now comes the fun part—bringing your duckling to life! Use your yarn needle and a sewing stitch for a secure hold.
Assembling the Face and Head
Position the Beak on the face of the head, centering it between rounds 12 and 15. Sew it firmly in place. For the hair, take a few strands of yellow yarn, loop them through the top of the head, and tie a small knot to create a cute little tuft.
Assembling the Body
Sew the Head securely to the top of the Body. Ensure it is centered and doesn’t wobble.
Adding the Limbs
- Legs: Position the legs so they start between rounds 13 and 14 of the body and end between rounds 18 and 19. This gives the duckling a sturdy base.
- Wings: Attach the wings on the sides of the body between rounds 19 and 20, extending down toward rounds 25 and 26.
- Tail: Sew the tail to the center back of the body, ensuring it sits upright.
Tips for Success
To make your crochet duckling look as professional as possible, keep these helpful tips in mind:
- Tension is Key: When making amigurumi, use a hook slightly smaller than what the yarn label suggests. This prevents the stuffing from peeking through the stitches.
- Invisible Decreases: To avoid bumps in your work, use the “invisible decrease” method. Instead of a standard sc2tog, insert your hook into the front loop only of the first stitch, then the front loop only of the second stitch, and complete the crochet.
- Stuffing Technique: Stuff your pieces in small increments. It is much easier to add more stuffing than to try and remove it once the piece is nearly closed.
- Color Changes: When changing colors on the body, do the last pull-through of the previous color with the new color yarn for a clean, sharp line.