Adorable Crochet Cupid Pattern: A Step-by-Step Amigurumi Tutorial
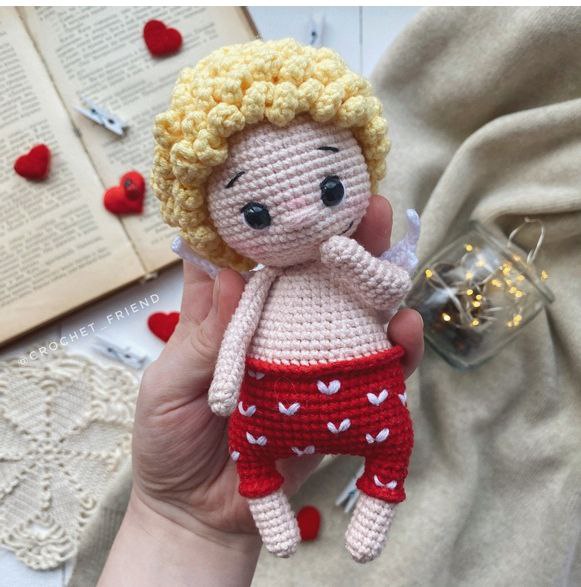
Looking for the perfect project to celebrate love or create a heartwarming gift for Valentine’s Day? Look no further than this adorable crochet Cupid! This little amigurumi angel is the ultimate blend of sweetness and charm, featuring curly golden hair, tiny angel wings, and a pair of festive heart-covered pants.
While this pattern is designed for those who have a handle on basic crochet skills, the instructions are detailed enough to guide you through every stitch. Whether you are making this for a loved one or adding to your collection of plushies, this little Cupid is sure to bring a smile to anyone’s face. Let’s grab our hooks and get started!
Materials & Abbreviations
To get that perfect, tight amigurumi look, choosing the right yarn and hook size is key. For this project, a cotton blend is recommended as it provides great stitch definition and keeps the toy from becoming too “fuzzy.”
Materials Needed:
- Yarn: A cotton/acrylic blend (approximately 174 yards per 1.76 oz skein) in the following colors:
- Beige (for the skin)
- Yellow (for the hair)
- White (for the wings and heart details)
- Red (for the pants)
- Crochet Hook: 1.75 mm or 2.0 mm (choose the size that gives you a tight fabric so the stuffing doesn’t show through).
- Safety Eyes: 8 mm black safety eyes.
- Filling: High-quality polyester fiberfill.
- Extras: Tapestry needle, scissors, black sewing thread for facial details, white embroidery thread, and a bit of dry pink pastel or blush for the cheeks.
Abbreviations (US Terms):
- Rnd: Round
- MR: Magic Ring
- St: Stitch
- Ch: Chain
- Sc: Single crochet
- Inc: Increase (two single crochets in one stitch)
- Dec: Decrease (single crochet two stitches together)
- Sl St: Slip stitch
- FLO: Front loops only
- BLO: Back loops only
Step-by-Step Instructions
The Hands (Make 2)
The hands are worked as small tubes. Please note that the hands should not be stuffed, as they need to remain flat to look natural against the body.
Using beige yarn:
- Rnd 1: 6 sc in MR.
- Rnd 2: (1 sc, inc) * 3 (9 sts).
- Rnd 3-19: 9 sc (17 rounds total).
To finish, fold the hand in half and crochet 4 sc through both layers to close the tip. Cut the yarn and fasten off, leaving a tail for sewing.
The Legs and Body
This part is the foundation of your Cupid. We will start with the legs and then join them together to create the torso. Stuff as you go!
First Leg: Use beige yarn.
- Rnd 1: 5 sc in MR.
- Rnd 2: 5 inc (10 sts).
- Rnd 3-9: 10 sc (7 rounds).
Switch to red yarn. Fasten off and cut the beige yarn.
- Rnd 10: 10 sc.
- Rnd 11: BLO 10 sc.
- Rnd 12: 10 sc.
Fasten off and cut the yarn.
Second Leg: Repeat the steps for the first leg exactly, but do not cut the red yarn after Round 12. We will use this tail to join the legs.
Joining the Legs: While still attached to the second leg, chain 10. Connect these chains to the first leg with a slip stitch.
- Rnd 13: 10 sc on the first leg, 10 sc along the chain, 10 sc on the second leg, 10 sc along the other side of the chain (40 sts total).
- Rnd 14: (4 sc, inc) * 8 (48 sts).
- Rnd 15-24: 48 sc (10 rounds).
Switch back to beige yarn, but keep the red yarn tail tucked outside for now (we will use this for the waistband later).
- Rnd 25: BLO 48 sc.
- Rnd 26: (6 sc, dec) * 6 (42 sts).
- Rnd 27-28: 42 sc (2 rounds).
- Rnd 29: (5 sc, dec) * 6 (36 sts).
- Rnd 30-31: 36 sc (2 rounds).
- Rnd 32: (4 sc, dec) * 6 (30 sts).
- Rnd 33: 30 sc.
- Rnd 34: (3 sc, dec) * 6 (24 sts).
Attaching the Arms: Now we integrate the hands into the body in a single round.
- Rnd 35: 2 sc, 4 sc joined with the first hand and body, 8 sc, 4 sc joined with the second hand and body, 6 sc (24 sts).
- Rnd 36: (2 sc, dec) * 6 (18 sts).
- Rnd 37: (1 sc, dec) * 6 (12 sts).
Fasten off and cut the yarn.
The Head
Use beige yarn to create a soft, rounded head.
- Rnd 1: 6 sc in MR.
- Rnd 2: 6 inc (12 sts).
- Rnd 3: (1 sc, inc) * 6 (18 sts).
- Rnd 4: 1 sc, inc, (2 sc, inc) * 5, 1 sc (24 sts).
- Rnd 5: (3 sc, inc) * 6 (30 sts).
- Rnd 6: 2 sc, inc, (4 sc, inc) * 5, 2 sc (36 sts).
- Rnd 7: (5 sc, inc) * 6 (42 sts).
- Rnd 8: 3 sc, inc, (6 sc, inc) * 5, 3 sc (48 sts).
- Rnd 9: (7 sc, inc) * 6 (54 sts).
- Rnd 10-15: 54 sc (6 rounds).
Eye Placement: In the next round, we create small gaps for the safety eyes. If you prefer to sew beads on later, just crochet a normal round of 54 sc.
- Rnd 16: 22 sc, ch 1, skip 1 st, 8 sc, ch 1, skip 1 st, 22 sc (54 sts).
- Rnd 17-19: 54 sc (3 rounds).
Insert your 8mm safety eyes into the holes and begin stuffing the head firmly.
- Rnd 20: (7 sc, dec) * 6 (48 sts).
- Rnd 21: 3 sc, dec, (6 sc, dec) * 5, 3 sc (42 sts).
- Rnd 22: (5 sc, dec) * 6 (36 sts).
- Rnd 23: 2 sc, dec, (4 sc, dec) * 5, 2 sc (30 sts).
- Rnd 24: (3 sc, dec) * 6 (24 sts).
- Rnd 25: 1 sc, dec, (2 sc, dec) * 5, 1 sc (18 sts).
- Rnd 26: (1 sc, dec) * 6 (12 sts).
Fasten off, leaving a long tail for sewing the head to the body.
The Curly Hair
The hair is made in two parts: a base cap and the curls.
The Cap (Yellow Yarn):
- Rnd 1: 6 sc in MR.
- Rnd 2: BLO 6 inc (12 sts).
- Rnd 3: BLO (1 sc, inc) * 6 (18 sts).
- Rnd 4: BLO 1 sc, inc, (2 sc, inc) * 5, 1 sc (24 sts).
- Rnd 5: BLO (3 sc, inc) * 6 (30 sts).
- Rnd 6: BLO 2 sc, inc, (4 sc, inc) * 5, 2 sc (36 sts).
- Rnd 7: BLO (5 sc, inc) * 6 (42 sts).
- Rnd 8: BLO 3 sc, inc, (6 sc, inc) * 5, 3 sc (48 sts).
- Rnd 9: BLO (7 sc, inc) * 6 (54 sts).
- Rnd 10-15: BLO 54 sc (6 rounds).
Fasten off, leaving a long tail. Now, let’s create the curls! Attach yellow yarn to the top of the wig. To make a curl: Chain 8, work 7 sc back down the chain, then work 4 slip stitches into the front loops only (FLO) at the base to create a spiral. Repeat this all over the wig. Along the bottom edge, create smaller loops: chain 8, 7 sc, and 1 slip stitch to secure. Repeat to the end of the row.
The Angel Wings (Make 2)
Use white yarn. These are worked in rows rather than rounds.
- Row 1: Ch 6, starting from the second chain from the hook, 5 sc, ch 1, turn.
- Row 2: 5 sc, ch 2, turn.
- Row 3: Starting from the second chain from hook, 6 sc, ch 1, turn.
- Row 4: 6 sc, ch 5, turn.
- Row 5: Starting from the second chain from hook, 10 sc, ch 1, turn.
- Row 6: 10 sc, ch 5, turn.
- Row 7: Starting from the second chain from hook, 14 sc.
To finish the wing, crochet a row of single crochet all the way around the outer edge to smooth it out. Fasten off.
Finishing Touches
Assembly
Sew the head securely to the body. Place the hair cap on the head so the edge sits approximately 7 rounds above the eyes. Sew the cap firmly around the edge. Attach the wings to the back of the torso.
Facial Sculpting & Embroidery
Eye Tightening: To give Cupid a more expressive look, we will sculpt the eye sockets. Using a long needle and beige yarn, enter the head from the bottom, coming up between the eyes. Bring the needle up at the inner corner of the eye, dive back down at the outer corner, and pull tight. Repeat for the other eye, and then do a horizontal stitch across the bridge of the nose to pull the eyes slightly inward. Be careful not to pull too tight, or the eyes will “sink” too far into the head.
Face Details:
- Nose: Embroider a small “spout” between the eyes with 3-4 small beige stitches.
- Eyebrows: Use black yarn to sew two small, arched eyebrows.
- Eyes: Add a tiny stitch of white thread in the corner of the safety eyes for a “highlight,” and add thin black eyelashes.
- Cheeks: Gently rub a bit of dry pink pastel or blush onto the cheeks for a rosy glow.
Final Details: The Pants
Return to the front loops (FLO) of Round 25 (waist) and Round 11 (legs) with red yarn. Crochet a row of 48 sc around the waist and 10 sc around each leg cuff to create a clean, finished edge. Finally, use white yarn to embroider small V-shaped hearts all over the red pants.
Tips for Success
- Tension is Everything: If you see stuffing peeking through, try dropping down a hook size. Tight stitches make amigurumi look professional.
- The “Invisible” Decrease: To avoid bumps in your rounds, use the invisible decrease method (working into the front loops only of the two stitches being decreased).
- Stuffing: Stuff the body and head firmly, especially the neck area, to ensure the head doesn’t flop over.
- Symmetry: When sewing the wings and hair, use pins to mark the placement before sewing to make sure everything is perfectly centered.