How to Crochet a Cute Amigurumi Goose: Step-by-Step Tutorial
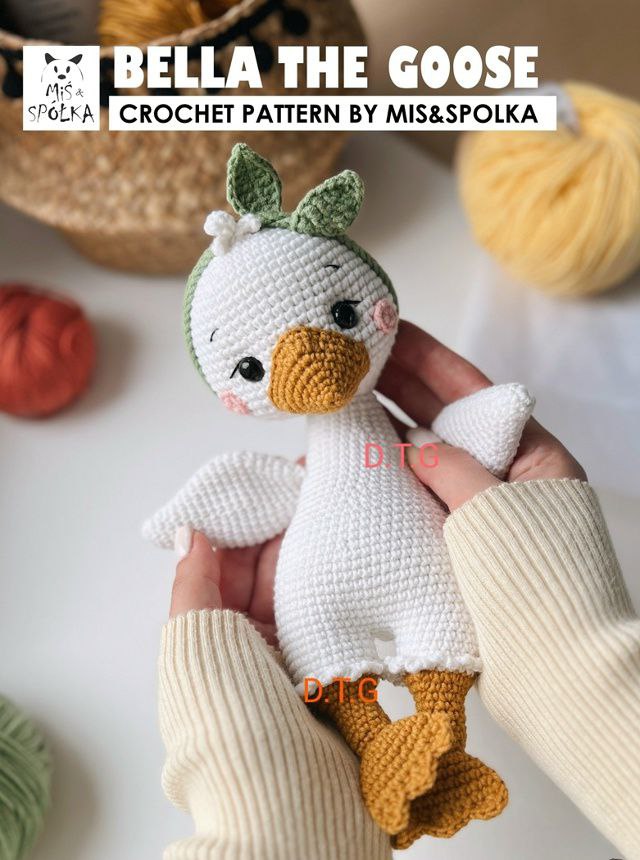
There is something incredibly charming about a little crochet goose! Whether you are looking to make a unique gift for a loved one or simply want to add a whimsical touch to your own home decor, this amigurumi goose is the perfect project. With its sweet expression, tiny headband, and plump body, this little bird is sure to bring a smile to anyone’s face.
This pattern is designed to be accessible for intermediate beginners. If you know the basics of working in a spiral and how to use a magic circle, you are all set to create your own feathered friend. The finished goose stands approximately 10 inches tall, depending on your tension and the yarn used.
Materials & Abbreviations
To get started, gather the following supplies. For the best results, a cotton or cotton-blend yarn is recommended as it provides great stitch definition for amigurumi.
Materials Needed:
- Yarn: Medium weight (approx. 4-ply) cotton yarn in White, Mustard Yellow, Light Pink, and Sage Green.
- Crochet Hook: 2.2 mm (or a size that prevents stuffing from showing through).
- Safety Eyes: 10 mm black safety eyes.
- Stuffing: High-quality polyester fiberfill.
- Tools: Stitch markers, scissors, and a yarn needle for sewing.
- Embroidery: Black embroidery thread for facial details.
Abbreviations (US Terms):
- ch: chain
- st: stitch
- sc: single crochet
- inc: increase (2 sc in one stitch)
- dec: decrease (sc 2 stitches together)
- hdc: half double crochet
- hdc inc: half double crochet increase
- dc: double crochet
- tr: treble crochet
- sl st: slip stitch
- blo: back loop only
- flo: front loop only
- R: round
Pro Note: This project is worked in a continuous spiral. Do not join your rounds with a slip stitch unless specifically mentioned. Use a stitch marker to keep track of the start of each round.
Step-by-Step Instructions
The Head
Using white yarn, start with a magic circle.
- R1: 6 sc in magic circle (6)
- R2: inc in each st around (12)
- R3: (1 sc, inc) x6 (18)
- R4: (2 sc, inc) x6 (24)
- R5: (3 sc, inc) x6 (30)
- R6: (4 sc, inc) x6 (36)
- R7: (5 sc, inc) x6 (42)
- R8: (6 sc, inc) x6 (48)
- R9: (7 sc, inc) x6 (54)
- R10-15: sc in each st around (54)
- R16: (8 sc, inc) x6 (60)
- R17-22: sc in each st around (60)
Eyes: Place the 10 mm safety eyes between rounds 18 and 19, leaving 9 stitches between them.
- R23: (8 sc, dec) x6 (54)
- R24: (7 sc, dec) x6 (48)
- R25: (6 sc, dec) x6 (42)
- R26: (5 sc, dec) x6 (36)
- R27: (4 sc, dec) x6 (30)
- R28: (3 sc, dec) x6 (24)
- R29: (2 sc, dec) x6 (18)
Fasten off and leave a long tail for sewing. Stuff the head firmly with fiberfill.
The Beak
Using mustard yellow yarn:
- R1: 4 sc in magic circle (4)
- R2: (inc, 1 sc) x2 (6)
- R3: (inc, 1 sc) x3 (9)
- R4: 1 sc, 2 inc, 1 sc, inc, 1 sc, 2 inc, 1 sc (14)
- R5: 3 sc, 2 inc, 2 sc, inc, 2 sc, 2 inc, 2 sc (19)
- R6: 4 sc, 2 inc, 4 sc, inc, 4 sc, 2 inc, 2 sc (24)
- R7: 6 sc, hdc inc, 5 sc, hdc inc, hdc inc, 5 sc, hdc inc, 4 sc (28)
- R8: sc in each st around (28)
Fasten off, leaving a long tail. Shape the beak into a triangle, stuff lightly, and sew it to the head between rounds 18 and 24.
Facial Details & Hair
Cheeks: Using pink yarn, make two small patches. R1: 9 sc in a magic circle. Join with a sl st to the first stitch. Sew these on rounds 20-22, about 3 stitches away from the beak.
Hair: Using white yarn, make three small pieces:
Piece 1: Ch 4, starting from 2nd ch from hook, 2 sc, sl st.
Piece 2: Ch 6, starting from 2nd ch from hook, 2 hdc, 2 sc, sl st.
Piece 3: Ch 4, starting from 2nd ch from hook, 2 sc, sl st.
Sew the hair to the center of the head around rounds 5-6.
The Legs and Body
Using mustard yellow yarn for the legs:
- Start: Ch 10, join into a ring with a sl st (10)
- R1-6: sc in each st around (10)
- R7: (1 sc, inc) x5 (15)
- R8: (4 sc, inc) x3 (18)
- R9: (2 sc, inc) x6 (24)
Change to white yarn for the top of the leg:
- R10: sc in each st around (24)
- R11: blo sc in each st around (24)
- R12-13: sc in each st around (24)
Fasten off the first leg and stuff it firmly. Make a second leg, but do not cut the yarn.
Joining the Legs:
R14: sc in 12 sts of the second leg, ch 3, join to the first leg, work 24 sc around the first leg, ch 3, and finish with 12 sc on the second leg (54).
The Body:
R15-23: sc in each st around (54)
R24: (7 sc, dec) x6 (48)
R25-28: sc in each st around (48)
R29: (6 sc, dec) x6 (42)
R30-31: sc in each st around (42)
R32: (5 sc, dec) x6 (36)
R33-34: sc in each st around (36)
R35: (dec, 16 sc) x2 (34)
R36: sc in each st around (34)
R37: (dec, 15 sc) x2 (32)
R38: sc in each st around (32)
R39: (dec, 14 sc) x2 (30)
R40: sc in each st around (30)
R41: (3 sc, dec) x6 (24)
R42-44: sc in each st around (24)
R45: (2 sc, dec) x6 (18)
Fasten off and stuff the body firmly.
Leg Feathers, Feet, Wings, and Tail
Leg Feathers: Attach white yarn to the front loops (FLO) of round 11 on both legs. Work (3 ch, sl st in next st) 24 times around each leg to create a ruffled edge.
Feet (x2): Using mustard yarn:
R1: 6 sc in magic circle (6)
R2: 6 inc (12)
R3: sc around (12)
R4: (1 sc, inc) x6 (18)
R5: sc around (18)
R6: (8 sc, inc) x2 (20)
R7-8: sc around (20)
R9: sc through both sides (10).
Toes: Ch 2, turn: [(dc, hdc) in 1st st, 1 sc, 1 sl st, 1 sc, (hdc, dc, hdc) in 1 st, 1 sc, 1 sl st, 1 sc, (hdc, dc) in 1 st], ch 2, sl st in last st. Sew to the bottom of the legs.
Wings (x2): Using white yarn:
R1: 6 sc in magic circle (6)
R2: 3 inc, 3 sc (9)
R3: sc around (9)
R4: (1 sc, inc) x3, 3 sc (12)
R5: sc around (12)
R6: 1 sc, (1 sc, inc) x3, 5 sc (15)
R7: sc around (15)
R8: 3 sc, (inc, 1 sc) x3, 6 sc (18)
R9: sc around (18)
R10: (5 sc, inc) x3 (21)
R11: sc around (21)
R12: (6 sc, inc) x3 (24)
R13-16: sc around (24)
R17: (6 sc, dec) x3 (21)
R18: (5 sc, dec) x3 (18)
R19: (4 sc, dec) x3 (15)
R20: sc around (15)
R21: (3 sc, dec) x3 (12)
R22: sc through both sides to end (6).
Do not stuff. Sew to the body between rounds 37 and 38.
Tail: Using white yarn:
R1: 6 sc in magic circle (6)
R2: (1 sc, inc) x3 (9)
R3: sc around (9)
R4: (2 sc, inc) x3 (12)
R5: (3 sc, inc) x3 (15)
R6: (4 sc, inc) x3 (18)
R7: (5 sc, inc) x3 (21)
R8: (6 sc, inc) x3 (24).
Stuff lightly and sew to the body between rounds 20-25.
The Headband
Using green yarn, ch 90 + 1 turning chain.
R1: sl st, sc, hdc, dc, 2 tr, dc, hdc, sc, 72 sl st, sc, hdc, dc, 2 tr, dc, hdc, sc, sl st (90).
R2: Work on the opposite side of the foundation chain: sl st, sc, hdc, dc, 2 tr, dc, hdc, sc, 72 sl st, sc, hdc, dc, 2 tr, dc, hdc, sc, sl st (90).
Fasten off and wrap around the head, securing the decorative ends at the top.
Finishing Touches
Now that all the pieces are complete, it is time to assemble your goose. Sew the head to the body, adding extra stuffing to the neck area if you want the goose to stand up straighter.
Face Sculpting: To give your goose more character, you can “sculpt” the eyes. Use a long piece of white thread and a sharp needle. Insert the needle into the head behind the eye, pull it through to the opposite side of the face, and gently tug. This pulls the eyes inward and creates a cute, indented look. Finish by embroidering small eyelashes or eyebrows with black embroidery thread.
Tips for Success
- Tension is Key: Amigurumi requires tight stitches so the stuffing doesn’t leak. If you see gaps, try a smaller hook size.
- Consistent Stuffing: Stuff the pieces firmly but evenly. Use your crochet hook to push stuffing into the corners of the beak and feet.
- Invisible Decreases: For a smoother look, use the invisible decrease method (working in the front loops only of the two stitches being decreased).
- Tail Length: Always leave long tails when fastening off pieces that need to be sewn. It is much easier to sew a part on when you have plenty of yarn to work with.