Cozy Up Your Space: The Ultimate Beginner’s Guide to the Chonky Square Crochet Pillow
“`html
How to Crochet a Chonky Square Pillow: Step-by-Step Beginner Pattern
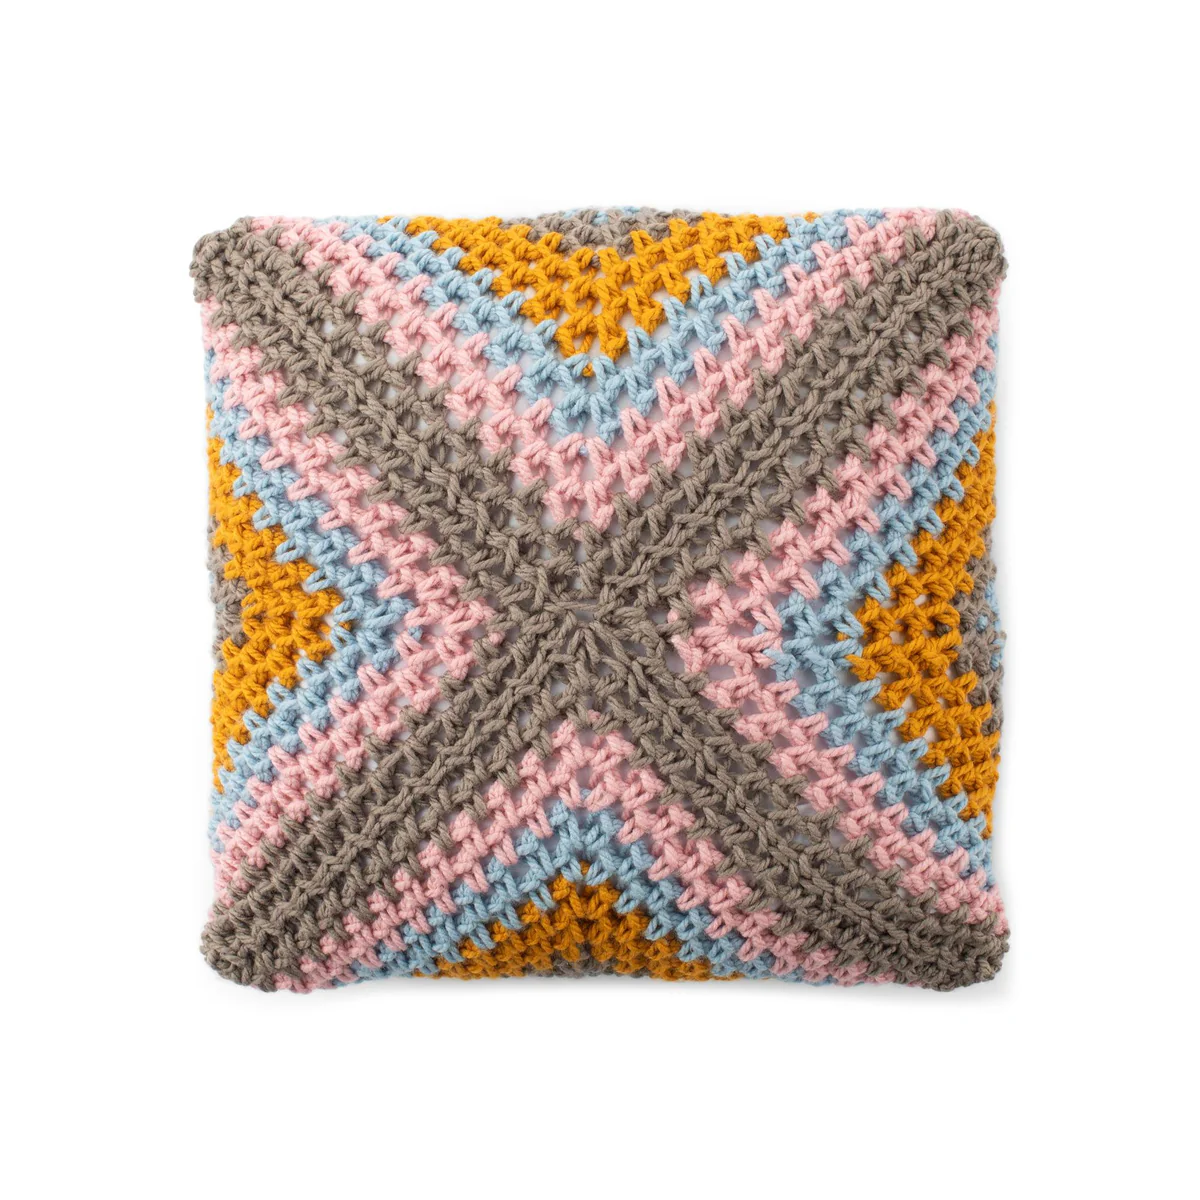
Looking for a cozy addition to your home decor? This Chonky Square Crochet Pillow is the perfect project for beginners. Using super bulky yarn, this pillow works up quickly and features a beautiful multi-colored stripe pattern. The unique construction starts from the center and expands outward, eventually folding into a perfect square.
Project Overview
This project is designed for beginners. It creates a large, textured cover that is assembled around a standard pillow form. The finished product is a chunky, modern accent piece that adds both comfort and style to any room.
Materials Needed
Yarn
You will need a Super Bulky (Weight 6) yarn. To achieve the look in the pattern, use the following colors:
- Color A (Taupe Gray): 1 ball (approx. 88 yards / 80 meters)
- Color B (Gray Rose): 1 ball (approx. 64 yards / 58 meters)
- Color C (Gray Blue): 1 ball (approx. 73 yards / 67 meters)
- Color D (Brass): 1 ball (approx. 79 yards / 72 meters)
Tools
- Crochet Hook: Size U.S. L/11 (8 mm) or size needed to obtain gauge.
- Yarn Needle: For sewing seams and weaving in ends.
- Pillow Form: 20″ [51 cm] square.
- Tape Measure: To ensure your dimensions are correct.
Pattern Basics
Gauge
The gauge for the first 4 rounds should be 4″ [10 cm] in pattern.
Measurements
- Before Assembly: Approximately 26½” [67.5 cm] square.
- After Assembly: 20″ [51 cm] square.
Abbreviations Used
- Approx: Approximately
- Beg: Beginning
- Ch: Chain(s)
- Cont: Continuity
- Pat: Pattern
- Rem: Remaining
- Rep: Repeat
- Rnd(s): Round(s)
- RS: Right side
- Sc: Single crochet
- Sl st: Slip stitch
- Sp(s): Space(s)
- St(s): Stitch(es)
- WS: Wrong side
- Yoh: Yarn over hook
The Stripe Pattern (Color Guide)
Follow this sequence for the 26 rounds to create the striped effect:
- Rounds 1 to 4: Color A
- Rounds 5 and 6: Color B
- Rounds 7 to 9: Color D
- Rounds 10 and 11: Color C
- Round 12: Color B
- Round 13: Color D
- Round 14: Color A
- Round 15: Color C
- Rounds 16 and 17: Color A
- Rounds 18 to 20: Color D
- Rounds 21 and 22: Color C
- Rounds 23 and 24: Color B
- Rounds 25 and 26: Color A
Step-by-Step Instructions
Starting the Pillow
Using Color A, make a slip knot and place it on your hook. Chain (Ch) 4. Join with a slip stitch (sl st) to the first chain to form a magic ring.
Round 1
Ch 1. Working into the ring, create 1 single crochet (sc) followed by Ch 2. Repeat this sequence 3 more times. Join with a slip stitch to the first sc.
Round 2
Sl st in the next ch-2 space (sp). Ch 1. Work (1 sc, Ch 2, 1 sc) all into the same ch-2 space as the slip stitch. Ch 1. Repeat (1 sc, Ch 2, 1 sc) in the next ch-2 space, followed by Ch 1. Repeat this process twice more. Join with a slip stitch.
Round 3
Sl st in the next ch-2 sp. Ch 1. Work (1 sc, Ch 2, 1 sc) all in the same ch-2 sp. *Ch 1, skip the next sc, work 1 sc in the next ch-1 sp, Ch 1, skip the next sc, and work (1 sc, Ch 2, 1 sc) all in the next ch-2 sp.* Repeat from * twice more. Ch 1, skip next sc, 1 sc in next ch-1 sp, Ch 1. Join.
Round 4
Sl st in the next ch-2 sp. Ch 1. Work (1 sc, Ch 2, 1 sc) all in the same ch-2 sp. *(Ch 1, skip next sc, 1 sc in next ch-1 sp) until you reach the next ch-2 sp. Ch 1, skip next sc, and work (1 sc, Ch 2, 1 sc) all in that ch-2 sp.* Repeat from * twice more, then repeat the sequence from * to the skip-sc step once more. Join.
Completing the Cover
Now that you have completed the first 4 rounds, you will repeat the instructions for Round 4 for all remaining rounds. Maintain the continuity of the pattern and change colors according to the Stripe Pattern guide provided above until you have completed 26 rounds total.
Tip for Changing Colors: To change colors, work to the end of the round and fasten off the current color. Join the new color with a slip stitch into any ch-2 space.
Assembly Instructions
Once your crochet piece is complete, it will look like a large diamond/circle. To turn it into a square pillow:
- Fold: Fold three of the corners inward to meet in the center, forming a square shape.
- Sew: Using Color A and your yarn needle, sew the seams together. Leave the fourth corner open.
- Insert: Slide your 20″ square pillow form through the open corner.
- Finish: Sew the remaining seam closed to secure the pillow form inside. Weave in any loose ends.
“`