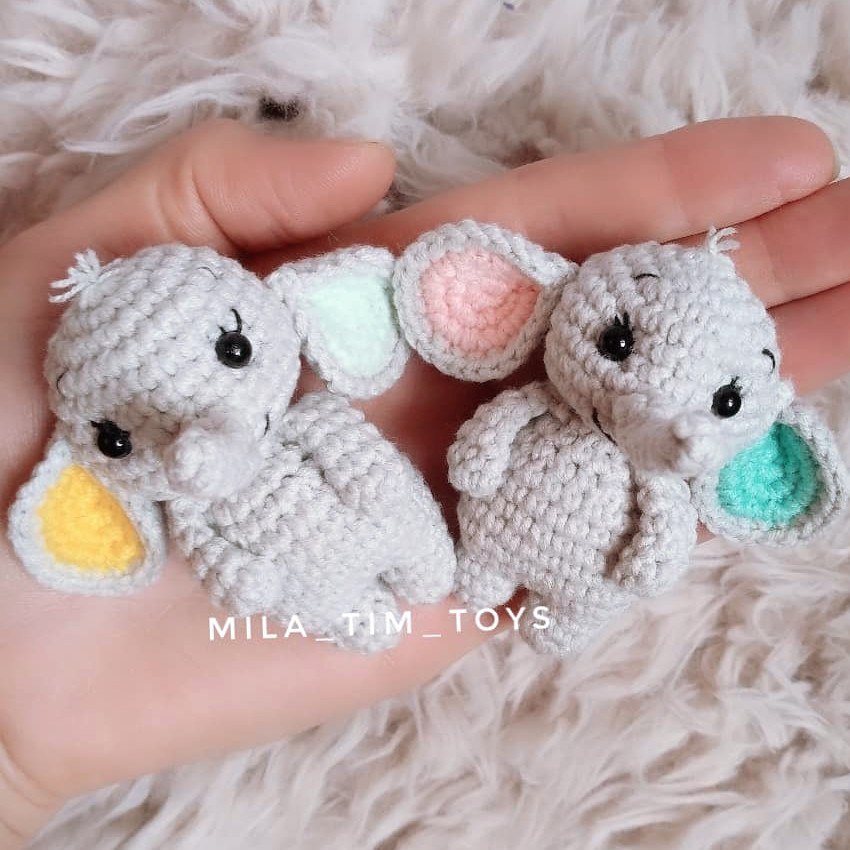
Tiny Stitches, Huge Cuteness: Crochet Your Own Mini Pocket Elephant
“`html
How to Crochet a Cute Mini Pocket Elephant: Step-by-Step Amigurumi Tutorial
Looking for a quick and adorable crochet project? This mini pocket elephant is the perfect size for a keychain, a desk companion, or a sweet gift. Whether you are a beginner or an experienced crocheter, this simple pattern will help you create a charming little elephant in no time.
Materials Needed
- Yarn: Gray cotton or acrylic yarn for the body (e.g., YarnArt Jeans) and small scraps of various colors for the inner ears.
- Crochet Hook: 1.75 mm.
- Stuffing: Fiberfill or polyester stuffing.
- Eyes: 3-5 mm safety eyes, half-beads, or black seed beads.
- Other tools: Yarn needle, scissors, and stitch markers.
Crochet Abbreviations (US Terms)
- MR: Magic Ring
- sc: Single crochet
- inc: Increase (2 sc in one stitch)
- dec: Decrease (sc 2 stitches together)
- ch: Chain
- sl st: Slip stitch
Pattern Instructions
Arms (Make 2)
Do not stuff the arms.
- Round 1: 6 sc in MR (6)
- Rounds 2-6: sc in each stitch around (6)
- Finishing: Fold the piece in half and sc 3 through both layers to close the end. Fasten off.
Trunk
Do not stuff the base of the trunk.
- Round 1: 4 sc in MR (4)
- Rounds 2-4: sc in each stitch around (4)
- Joining: Fold the piece in half and sc 3 through both layers.
- Round 5: inc, 3 sc (5)
- Round 6: inc, 4 sc (6)
- Finishing: Fasten off, leaving a long tail for sewing.
Legs
- Round 1: 6 sc in MR (6)
- Round 2: (2 sc, inc) * 2 (8)
- Rounds 3-4: sc in each stitch around (8)
- Finishing: Fasten off the first leg. Do not cut the yarn for the second leg, as you will continue to the body.
Body
Starting from the second leg:
- Setup: Chain 1 and join to the second leg at the point where you finished crocheting.
- Round 1: 8 sc around the first leg, 1 sc in the chain, 8 sc around the second leg, 1 sc in the chain (18)
- Round 2: (2 sc, inc) * 6 (24)
- Rounds 3-7: sc in each stitch around (24) [5 rounds total]
- Round 8: (2 sc, dec) * 6 (18)
- Round 9: sc in each stitch around (18)
- Round 10: (1 sc, dec) * 6 (12)
- Finishing: Stuff the body firmly. Fasten off, leaving a long tail for sewing.
Head
- Round 1: 7 sc in MR (7)
- Round 2: 7 inc (14)
- Round 3: (1 sc, inc) * 7 (21)
- Round 4: (2 sc, inc) * 7 (28)
- Rounds 5-10: sc in each stitch around (28) [6 rounds total]
- Round 11: (2 sc, dec) * 7 (21)
- Round 12: 10 dec, 1 sc (11)
- Finishing: Stuff the head. Fasten off and weave in the ends.
Ears (Make 2)
Each ear consists of two pieces joined together.
Inner Ear (Colored Yarn):
- Round 1: 6 sc in MR (6)
- Round 2: 6 inc (12)
- Round 3: (1 sc, inc) * 6 (18)
- Finishing: Fasten off and weave in the end.
Outer Ear (Body Color):
- Rounds 1-3: Repeat the same steps as the inner ear. Do not fasten off.
- Joining: Place the inner ear and outer ear together (wrong sides facing inward).
- Round 4: sc through both layers: (2 sc, inc) * 6 (24)
- Finishing: Fasten off, leaving a long tail for sewing.
Assembly and Finishing Touches
Step-by-Step Assembly
- Head and Body: Sew the head securely to the body.
- Trunk: Sew the trunk to the head between rounds 8 and 10.
- Eyes: Place the eyes between rounds 6 and 7 of the head, approximately 5-6 stitches apart.
- Face Shaping: For a more defined look, use a needle to pull a thread from the neck area to the eye point, create a small stitch, and return to the neck to create a slight indentation.
- Face Details: Embroider small eyelashes, eyebrows, and a tiny smile using black thread. Attach your safety eyes or beads.
- Ears: Fold the ears slightly to create a “shell” or cupped shape and secure them with a stitch. Sew them to the head at the level of the eyes. Use the remaining thread from the ears to create a small tuft of hair on the top of the head.
- Arms: Sew the arms to the sides of the body.
- Tail: After sewing the arms, bring the yarn to the back where the tail should be. Make one stitch and leave a short length of yarn. Tie a knot at the end to prevent fraying and trim the excess.
Your mini pocket elephant is now complete! This little friend is perfect for practicing your amigurumi skills or creating a set of colorful elephants for friends and family.
“`