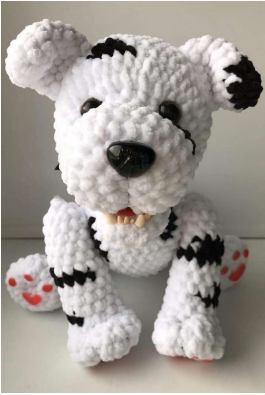
Spot-On Cuteness: Crochet Your Own Plush Dalmatian Puppy!
“`html
How to Crochet a Cute Dalmatian Puppy: Step-by-Step Pattern
Create your very own cuddly Dalmatian puppy with this detailed crochet guide. This project uses a chunky, soft yarn to create a plush toy that is perfect for kids or as a unique handmade gift. Whether you are an experienced crocheter or looking for a rewarding new project, this pattern will walk you through every stitch.
Materials You Will Need
- Yarn: YarnArt Dolce (or a similar chenille/velvet yarn). You will need one ball of white (main color) and about 1/3 of a ball of black for the spots.
- Crochet Hook: 4mm hook.
- Stuffing: Polyester fiberfill.
- Eyes: 1.3cm safety eyes.
- Nose: Safety nose.
- Joints: Plastic joint connectors (3cm for front legs, 4cm for back legs) if you want the limbs to be movable.
- Sewing Materials: Yarn needle and thread matching the yarn color.
- Detailing: Polymer clay (white, pink, and red) for the teeth, tongue, and paw pads. (Alternatively, you can use felt).
Crochet Abbreviations (US Terms)
- MR: Magic Ring
- sc: Single Crochet
- inc: Increase (2 sc in one stitch)
- dec: Decrease (sc 2 together)
- ch: Chain
- sl st: Slip Stitch
- dc: Double Crochet
The Pattern
Head
Row 1: 6 sc in MR (6)
Row 2: 6 inc (12)
Row 3: (1 sc, inc) x 6 (18)
Row 4: (2 sc, inc) x 6 (24)
Rows 5-8: 24 sc (24)
Row 9: (3 sc, inc) x 6 (30)
Row 10: 10 inc, 20 sc (40)
Row 11: 20 dc, 20 sc (40)
Rows 12-15: 40 sc (40)
Row 16: (6 sc, dec) x 5 (35)
Row 17: 35 sc (35)
Installation: Insert safety eyes between rows 8 and 9. Place the nose in the center between rows 2 and 3.
Row 18: (3 sc, dec) x 7 (28)
Row 19: (2 sc, dec) x 7 (22)
Row 20: (1 sc, dec) x 7 (14)
Row 21: 7 dec. Fasten off and weave in the ends.
Ears (Make 2)
Do not stuff the ears.
Row 1: 5 sc in MR (5)
Row 2: 5 inc (10)
Row 3: (4 sc, inc) x 2 (12)
Rows 4-5: 12 sc (12)
Row 6: (5 sc, inc) x 2 (14)
Rows 7-10: 14 sc (14)
Neck
Row 1: Ch 23, join with a sl st to form a ring.
Rows 2-4: 22 sc around.
Mouth
Do not stuff.
Row 1: 6 sc in MR (6)
Row 2: 6 inc (12)
Rows 3-7: 12 sc (12)
Flatten the piece, sew the two edges together, and fasten off.
Body
Row 1: 6 sc in MR (6)
Row 2: 6 inc (12)
Row 3: (1 sc, inc) x 6 (18)
Row 4: (2 sc, inc) x 6 (24)
Row 5: (3 sc, inc) x 6 (30)
Row 6: (4 sc, inc) x 6 (36)
Rows 7-11: 36 sc (36)
Row 12: (4 sc, dec) x 6 (30)
Rows 13-15: 30 sc (30)
Row 16: (3 sc, dec) x 6 (24)
Rows 17-20: 24 sc (24)
Stop here to install the joint connectors for the legs.
Row 21: (2 sc, dec) x 6 (18)
Row 22: 18 sc (18)
Row 23: (1 sc, dec) x 6 (12)
Row 24: 6 dec. Stuff the body firmly and close.
Front Legs (Make 2)
Row 1: 6 sc in MR (6)
Row 2: 6 inc (12)
Row 3: (1 sc, inc) x 6 (18)
Rows 4-5: 18 sc (18)
Row 6: 3 dec, 12 sc (15)
Row 7: 2 dec, 11 sc (13)
Rows 8-16: 13 sc (13)
Stuff the leg. Insert the joint connector between rows 16 and 17.
Row 17: 1 dec, 11 sc (12)
Row 18: 6 dec (6)
Row 19: 3 dec. Fasten off.
Back Legs (Make 2)
Row 1: 6 sc in MR (6)
Row 2: 6 inc (12)
Row 3: (1 sc, inc) x 6 (18)
Rows 4-5: 18 sc (18)
Row 6: 3 dec, 12 sc (14)
Row 7: 2 dec, 11 sc (13)
Rows 8-11: 13 sc (13)
Row 12: 5 inc, 2 sc, 2 dec, 2 sc (16)
Row 13: 3 sc, 4 inc, 3 sc, 3 dec (17)
Row 14: 6 sc, 1 inc, 10 sc (18)
Rows 15-16: 18 sc (18)
Row 17: (1 sc, dec) x 6 (12)
Insert the joint connector between rows 17 and 18.
Row 18: 12 sc (12)
Row 19: (1 sc, dec) x 2, 3 sc? (6)
Row 20: 3 dec. Fasten off.
Tail
Row 1: 6 sc in MR (6)
Row 2: 6 sc (6)
Row 3: (1 sc, inc) x 3 (9)
Rows 4-5: 9 sc (9)
Row 6: 1 dec, 2 sc, 2 inc, 2 sc (10)
Row 7: 1 dec, 3 sc, 1 inc, 3 sc (9)
Rows 8-10: 9 sc (9)
Row 11: (1 sc, dec) x 3 (6)
Row 12: 3 dec. Fasten off.
Assembly Guide
Attaching Limbs and Neck
- Front Legs: Attach between rows 7 and 8 of the body, spaced 15 stitches apart.
- Back Legs: Attach between rows 19 and 20 of the body, spaced 12 stitches apart.
- Neck: Center the neck ring between rows 2 and 9 of the body and sew securely.
Finishing the Head
- Ears: Sew the ears between rows 14 and 15 of the head, spaced 6 stitches apart. You can bend them slightly for a more natural look.
- Head: Sew the head to the neck ring.
Face Shaping and Final Details
Sculpting the Muzzle
To give the puppy a realistic snout, use a sewing needle and thread to create “pulls” (sculpting):
- Find Row 7 at the bottom of the head. Insert the needle in the center.
- Bring the needle up to the bottom corner of the right eye, then across to the bottom corner of the left eye.
- Pull the thread back down to Row 7 and tighten gently to create a dip. Repeat as needed.
- Using black thread, sew a line from Row 7 up to the center of the nose to define the bridge of the muzzle.
The Mouth and Paws
Use polymer clay (or felt) to add the final cute touches:
- Mouth: Model small white teeth and a pink tongue from polymer clay. Glue them into the mouth area. Sew the tongue into the head between rows 11 and 12.
- Paws: Create small heart-shaped and round pads from pink polymer clay and glue them to the bottom of the legs.
Your chunky Dalmatian puppy is now complete!
“`