Adorable Crochet Bunny Pattern: Step-by-Step Amigurumi Tutorial
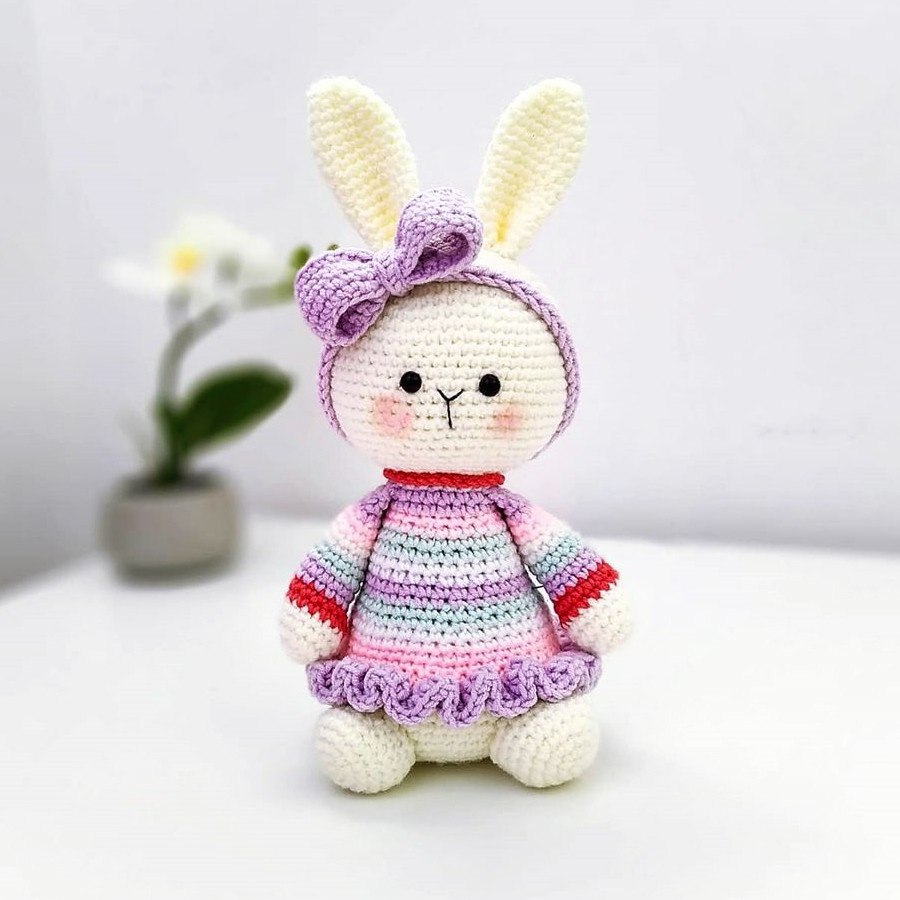
If you are looking for a charming, huggable project to add to your crochet collection, this adorable amigurumi bunny is the perfect choice. With her sweet expression and colorful little dress, she makes a wonderful gift for a newborn, a delightful toy for a child, or a cute addition to any nursery shelf. This pattern is designed to be beginner-friendly, guiding you through the process of creating each piece before assembling your new fluffy friend.
Whether you are a seasoned pro or just picking up a crochet hook for the first time, this tutorial will walk you through every stitch. We will be using standard US crochet terms and imperial measurements to ensure your bunny turns out perfectly!
Materials & Abbreviations
To get started, gather the following materials. While the pattern can be adapted to various yarn weights, we recommend a medium-weight (worsted) yarn and a hook size that prevents stuffing from showing through.
Materials Needed
- Yarn: Medium-weight (Size 4) acrylic or cotton yarn in cream (for the body), a multi-colored yarn (for the dress and arms), and a contrasting color (for the bow).
- Crochet Hook: 3.25mm (D) or 3.5mm (E) hook.
- Safety Eyes: 8mm or 10mm plastic safety eyes.
- Stuffing: High-quality polyester fiberfill.
- Other Tools: Yarn needle, scissors, and stitch markers.
Abbreviations (US Terms)
- ch: chain
- sc: single crochet
- inc: increase (2 sc in the same stitch)
- dec: decrease (sc 2 stitches together)
- hdc: half double crochet
- dc: double crochet
- MR: magic ring
- BLO: back loop only
- st(s): stitch(es)
- […] x6: repeat the sequence inside the brackets 6 times
Step-by-Step Instructions
The Head
The head is worked in a continuous spiral. Do not join rounds with a slip stitch; instead, use a stitch marker to keep track of your start.
- Round 1: 6 sc in MR (6)
- Round 2: [inc] x6 (12)
- Round 3: [1 sc, inc] x6 (18)
- Round 4: [2 sc, inc] x6 (24)
- Round 5: [3 sc, inc] x6 (30)
- Round 6: [4 sc, inc] x6 (36)
- Round 7: [5 sc, inc] x6 (42)
- Round 8: [6 sc, inc] x6 (48)
- Round 9: [7 sc, inc] x6 (54)
- Round 10: [8 sc, inc] x6 (60)
- Rounds 11-20: sc in each st around (60) — 10 rounds total
- Round 21: [8 sc, dec] x6 (54)
- Round 22: [7 sc, dec] x6 (48)
- Round 23: [6 sc, dec] x6 (42)
- Round 24: [5 sc, dec] x6 (36)
- Round 25: [4 sc, dec] x6 (30)
- Round 26: [3 sc, dec] x6 (24)
- Round 27: [2 sc, dec] x6 (18)
Fasten off, leaving a long tail for sewing the head to the body.
The Ears (Make 2)
- Round 1: 6 sc in MR (6)
- Round 2: [1 sc, inc] x3 (9)
- Round 3: [2 sc, inc] x3 (12)
- Round 4: [3 sc, inc] x3 (15)
- Rounds 5-13: sc in each st around (15) — 9 rounds total
- Round 14: 8 sc working in the BLO (back loops only)
- Round 15: Fold the piece in half and sc 4 across the edges to close the ear.
The Arms (Make 2)
Use your multi-colored yarn for a cute striped effect!
- Round 1: 6 sc in MR (6)
- Round 2: [inc] x6 (12)
- Round 3: [1 sc, inc] x6 (18)
- Rounds 4-6: sc in each st around (18) — 3 rounds total
- Round 7: [dec] x2, 14 sc (16)
- Rounds 8-17: sc in each st around (16) — 10 rounds total
- Round 18: 8 sc working in the BLO
Fasten off and weave in your ends.
The Legs (Make 2)
- Round 1: 6 sc in MR (6)
- Round 2: [inc] x6 (12)
- Round 3: [1 sc, inc] x6 (18)
- Round 4: [2 sc, inc] x6 (24)
- Rounds 5-6: sc in each st around (24) — 2 rounds total
- Round 7: [dec] x2, 20 sc (22)
- Round 8: sc in each st around (22)
Fasten off, leaving a long tail for sewing.
The Tail
- Round 1: 8 sc in MR (8)
- Round 2: [1 sc, inc] x4 (12)
- Rounds 3-4: sc in each st around (12) — 2 rounds total
Fasten off and leave a tail for sewing.
The Body
- Round 1: 6 sc in MR (6)
- Round 2: [inc] x6 (12)
- Round 3: [1 sc, inc] x6 (18)
- Round 4: [2 sc, inc] x6 (24)
- Round 5: [3 sc, inc] x6 (30)
- Round 6: [4 sc, inc] x6 (36)
- Round 7: [5 sc, inc] x6 (42)
- Round 8: [6 sc, inc] x6 (48)
- Round 9: [7 sc, inc] x6 (54)
- Rounds 10-12: sc in each st around (54) — 3 rounds total
Switch to the dress color yarn here:
- Round 13: sc in each st around (54)
- Round 14: sc in each st working in the BLO (54)
- Round 15: [7 sc, dec] x6 (48)
- Round 16: sc in each st around (48)
- Round 17: [6 sc, dec] x6 (42)
- Round 18: sc in each st around (42)
- Round 19: [5 sc, dec] x6 (36)
- Round 20: sc in each st around (36)
- Round 21: [4 sc, dec] x6 (30)
- Rounds 22-27: sc in each st around (30) — 6 rounds total
- Round 28: [3 sc, dec] x6 (24)
- Round 30: sc in each st around (24). Note: As you work this round, crochet the arms into the body to secure them.
- Rounds 31-32: sc in each st around (24) — 2 rounds total
Fasten off and weave in ends.
The Skirt, Collar, and Bow
The Skirt
Join your dress color yarn to the front loops left over from Round 14 of the body. Work 3 dc into every single stitch around the circumference. Fasten off and weave in your ends.
The Collar
Chain 28 to 30. Fasten off and sew the chain around the neck area of the bunny.
The Bow
- Row 1: Ch 30.
- Rows 2-5: sc in each st across (30) — 4 rows total.
Join the ends to create a loop or sew the edges together to form a rectangle and then pinch the middle to create a bow shape.
The Bow Strap & Headband
Strap: Ch 8, sc in 2nd ch from hook and each remaining ch (6 sc). Fasten off.
Headband: Ch approximately 50 (or enough to fit around the bunny’s head). Work 50 hdc across the chain. Join and sew the headband to the bunny, attaching the bow to the front.
Finishing
Now it is time to bring your bunny to life!
- Stuffing: Firmly stuff the head, body, arms, and legs with fiberfill. Be careful not to overstuff the neck, or the head may wobble.
- Eyes: Place the safety eyes between rounds 15 and 16 of the head, centered and approximately 10 stitches apart.
- Assembly: Using a yarn needle and the long tails left over, sew the head to the body. Attach the ears to the top of the head, the legs to the bottom of the body, and the tail to the back.
- Final Details: Sew on the collar and the headband with the bow. You can use a small amount of pink yarn or blush to add little cheeks to your bunny for extra cuteness!
Tips for Success
- Maintain Consistent Tension: Amigurumi requires a tight stitch to keep the stuffing from peeking through. If you see holes, try dropping down a hook size.
- Use a Stitch Marker: Since we are working in spirals, it is very easy to lose your place. A simple piece of scrap yarn or a plastic marker at the start of each round is a lifesaver.
- The Magic Ring: If you struggle with the magic ring, you can chain 2 and work your first round of stitches into the first chain.
- Customization: Feel free to experiment with colors! You can make a seasonal bunny by changing the dress color to orange for autumn or red for winter.