How to Crochet a Royal Autumn Swan: Free Amigurumi Pattern
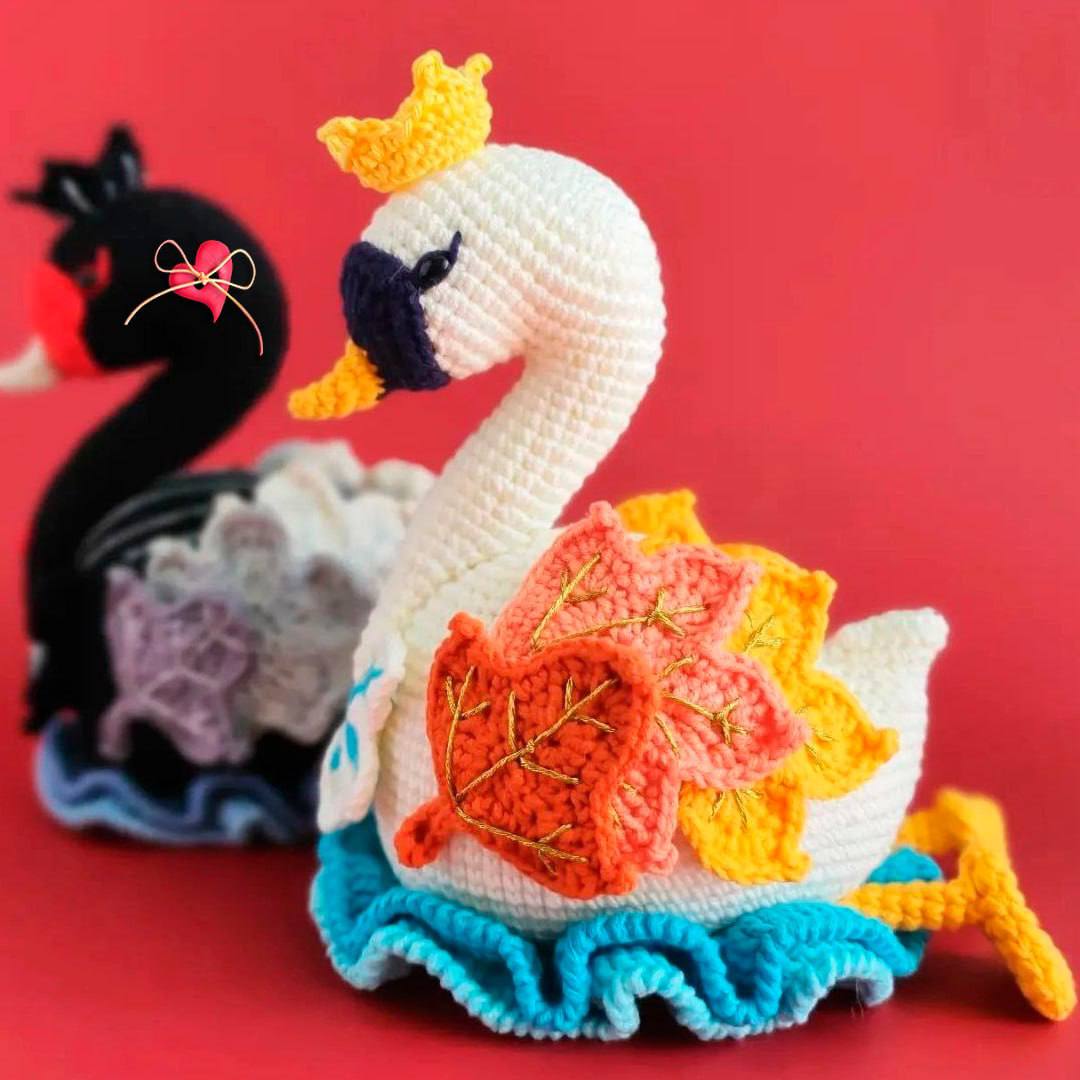
Bring a touch of elegance and seasonal charm to your home with this stunning Royal Autumn Swan crochet project. This amigurumi swan combines a classic, graceful silhouette with vibrant autumn-inspired leaf wings and a regal little crown. Whether you are looking for a unique centerpiece for your fall decor or a sophisticated handmade gift, this pattern is a delightful project for any crochet enthusiast.
This tutorial is designed to be beginner-friendly, though it does incorporate some decorative stitching and shaping. By the end of this guide, you will have a beautiful, handcrafted swan standing approximately 7 inches tall.
Materials & Abbreviations
To create your royal swan, you will need the following materials. We recommend using a cotton-acrylic blend for the best balance of stitch definition and softness.
Supplies Needed
- Yarn: Medium weight cotton/acrylic blend (approx. 185-200 yards per 50g skein) in White, Light Blue, Dark Blue, Yellow, Orange, and Red.
- Crochet Hook: 2.0mm (or a size that ensures tight stitches so stuffing doesn’t show).
- Safety Eyes: 2x5mm black eyes.
- Stuffing: High-quality polyester fiberfill.
- Tools: Sewing needle, sewing pins, scissors, and stitch markers.
- Embroidery Thread: Gold, Light Blue, and Black for final details.
US Crochet Terms & Abbreviations
- MR: Magic Ring
- ch: Chain
- sl st: Slip stitch
- sc: Single crochet
- hdc: Half double crochet
- dc: Double crochet
- tr: Treble crochet
- inc: Increase (2 sc in one stitch)
- dec: Decrease (sc 2 together)
- FLO: Front loop only
- BLO: Back loop only
- Picot: Chain 3, slip stitch into the first chain.
- Crab Stitch: Reverse single crochet.
Step-by-Step Instructions
The Head and Neck
Use White yarn for this section. The head and neck are worked as one continuous piece with a gap created to allow the neck to be attached properly.
Head:
Row 1: 6 sc in MR [6]
Row 2: 6 inc [12]
Row 3: (1 sc, inc) x 6 [18]
Row 4: 1 sc, (inc, 2 sc) x 5, inc, 1 sc [24]
Row 5: (3 sc, inc) x 6 [30]
Row 6: 2 sc, (inc, 4 sc) x 5, inc, 2 sc [36]
Row 7-8: 36 sc [36]
Row 9: (5 sc, inc) x 6 [42]
Row 10-13: 42 sc [42]
Row 14: 2 inc, 22 sc, 2 inc, skip 16 stitches [30]
Row 15: 30 sc [30]
Row 16: (3 sc, dec) x 6 [24]
Tip: Insert safety eyes between rows 13 and 14, spaced 12-13 stitches apart. Stuff the head firmly now.
Row 17: 1 sc, (dec, 2 sc) x 5, dec, 1 sc [18]
Row 18: (1 sc, dec) x 6 [12]
Row 19: 6 dec [6]
Fasten off and sew the hole closed. Add final stuffing.
Neck:
Attach white yarn to the gap created in row 13 of the head. Leave a long tail for sewing. Stuff the neck as you go, but leave rows 13-24 unstuffed for better flexibility.
Row 1: inc, 4 sc, dec, 2 sc, dec, 4 sc, inc [16]
Row 2-3: 16 sc [16]
Row 4: inc, 4 sc, dec, 2 sc, dec, 4 sc, inc [16]
Row 5-6: 16 sc [16]
Row 7: inc, 4 sc, dec, 2 sc, dec, 4 sc, inc [16]
Row 8-9: 16 sc [16]
Row 10: inc, 4 sc, dec, 2 sc, dec, 4 sc, inc [16]
Row 11-12: 16 sc [16]
Row 13: inc, 4 sc, dec, 2 sc, dec, 4 sc, inc [16]
Row 14-15: 16 sc [16]
Row 16: inc, 4 sc, dec, 2 sc, dec, 4 sc, inc [16]
Row 17-18: 16 sc [16]
Row 19: inc, 4 sc, dec, 2 sc, dec, 4 sc, inc [16]
Row 20-24: 16 sc [16]
Fasten off, leaving a long tail. Use the initial tail to sew the neck opening to the head.
The Neck Decoration
Using White yarn, create a decorative collar:
Row 1: ch 18, sl st in first ch. (ch 8, starting from 2nd ch from hook: 7 sl st, 2 sl st along the base chain) x 6, 6 sl st along the base chain.
Now, work around each petal:
Row 2: (1 sc, 1 hdc, 4 dc, 1 hdc, 3 sc in the tip, BLO: 1 hdc, 4 dc, 1 hdc, 1 sc, skip 2 sts) x 6, 6 sl st.
Fasten off and leave a long tail for attachment.
The Body and Tail
Use White yarn. This part is worked as an oval.
Row 1: ch 15. Starting from 2nd ch from hook: inc, 12 sc, 4 sc in last ch. Work along the other side of chain: 12 sc, inc [32]
Row 2: 2 inc, 12 sc, 4 inc, 12 sc, 2 inc [40]
Row 3: (1 sc, inc) x 2, 12 sc, (1 sc, inc) x 4, 12 sc, (1 sc, inc) x 2 [48]
Row 4: (7 sc, inc) x 6 [54]
Row 5: 4 sc, (inc, 8 sc) x 5, inc, 4 sc [60]
Row 6: (5 sc, inc) x 10 [70]
Row 7: 70 sc [70]
Row 8: BLO 70 sc [70]
Row 9-10: 70 sc [70]
Row 11: (1 sc, inc) x 4, 54 sc, (1 sc, inc) x 4 [78]
Row 12-21: 78 sc [78]
Row 22: 7 sc [7], do not work into remaining stitches.
Place a marker. This is now the start of your row.
Row 23: 8 sc, dec, (9 sc, dec) x 5, skip 12 stitches, 1 sc [60]. (This creates the tail hole).
Row 24: 60 sc [60]
Begin stuffing the body.
Row 25: 4 sc, (dec, 8 sc) x 5, dec, 4 sc [54]
Row 26: 54 sc [54]
Row 27: (7 sc, dec) x 6 [48]
Row 28: 3 sc, (dec, 6 sc) x 5, dec, 3 sc [42]
Row 29: (5 sc, dec) x 6 [36]
Row 30: 36 sc [36]
Row 31: 2 sc, (dec, 4 sc) x 5, dec, 2 sc [30]
Row 32: (3 sc, dec) x 6 [24]
Row 33: 1 sc, (dec, 2 sc) x 5, dec, 1 sc [18]
Row 34: (1 sc, dec) x 6 [12]
Row 35: 6 dec [6]
Fasten off and weave in ends.
Tail: Attach white yarn to the hole in row 23. Do not stuff.
Row 1: 4 sc, inc, 2 sc, inc, 4 sc [14]
Row 2: 5 sc, inc, 2 sc, inc, 5 sc [16]
Fasten off and sew the tail to the body.
The Water Ruffle
Attach Light Blue yarn to the FLO of row 8 of the body.
Row 1: 70 sc [70]
Row 2: FLO, 70 inc-dc (increase in every stitch) [140]
Row 3: 138 dc, 1 sc, sl st [140]
Row 4: ch 1, 140 Crab Stitches [140]
Fasten off. Now, attach light blue yarn to the BLO of Row 1 of the ruffle:
Row 1: ch 2, 70 inc-dc [140]
Row 2: 138 dc, 1 sc, sl st [140]
Row 3: ch 1, 140 sc [140]
Fasten off and weave in ends.
Feet, Beak, and Accessories
Feet (Make 2): Use Yellow yarn.
Row 1: ch 7. From 2nd ch: inc, 4 sc, 3 sc in last ch. Work other side of chain: 5 sc [14]
Row 2-3: 14 sc [14]
Row 4: (dec, 5 sc) x 2 [12]
Row 5: 12 sc [12]
Row 6: (dec, 5 sc) x 2 [10]
Row 7: 10 sc [10]
Row 8: 5 dec [5]. Fasten off. Do not stuff.
Legs (Make 2): Use Yellow yarn.
Row 1: 6 sc in MR [6]
Row 2: BLO 6 sc [6]
Row 3-8: 6 sc [6]. Fasten off. Sew legs to feet and then to the body between rows 8-11.
Beak: Use Yellow yarn.
Row 1: 4 sc in MR [4]
Row 2: 1 sc, 2 inc, 1 sc [6]
Row 3: 2 sc, 2 inc, 2 sc [8]
Row 4: 2 sc, 4 inc, 1 sc [12]
Row 5: dec, 3 sc, 2 inc, 3 sc, dec [12]
Switch to Dark Blue yarn.
Row 6: dec, 3 sc, 2 inc, 3 sc, dec [12]
Row 7: 12 inc [24]
Row 8: 9 sc, 1 hdc, (3 dc in one st), 2 dc, 1 hdc, 2 sc, 1 hdc, (2 dc, 3 dc in one st), 1 hdc, 3 sc [28]
Row 9: 11 sc, (3 hdc in one st), 10 sc, (3 hdc in one st), 5 sc [32]. Fasten off and sew to the head.
Hat: Use Light Blue yarn.
Row 1: 6 sc in MR [6]
Row 2: 6 inc [12]
Row 3: (1 sc, inc) x 6 [18]
Row 4: 18 sc [18]
Row 5: (4 sc, dec) x 3 [15]
Row 6: 15 sc [15]
Row 7: (3 sc, dec) x 3 [12]
Row 8: 6 inc [12]
Row 9: FLO, 12 inc [24]
Row 10: FLO, 12 inc into the BLO of row 8 [24]. Stuff lightly and sew to the head.
Crown: Use Yellow yarn.
ch 20, sl st in first ch. Row 1-2: 20 sc [20]. Row 3: (1 sc, [1 dc, picot, 1 dc] in one st, 1 sc, sl st) x 5. Fasten off and sew to the hat.
Autumn Leaf Wings (Make 2 Wings)
Each wing consists of three leaves: one Yellow, one Red, and one Orange.
Leaf 1 & 2 (Yellow/Red):
Row 1: 6 sc in MR [6]
Row 2: 6 inc [12]
Row 3: 12 inc-dc [24]
Row 4: (1 sc, [1 hdc, 5 dc, 1 hdc] in one st, 1 sc, skip 1 st) x 5, 4 sc.
Row 5: Work the petal edges:
Part 1: skip 1, 3 sc, inc-hdc, (2 hdc, picot, 1 hdc) in one st, 2 sc.
Part 2: skip 1, 2 sc, 1 hdc, inc-dc, (2 dc, picot, 1 dc) in one st, 1 hdc, 2 sc.
Part 3: skip 1, 2 sc, 1 hdc, inc-dc, (1 dc, 1 tr, picot, 1 tr, 1 dc) in one st, inc-dc, 1 hdc, 2 sc.
Part 4: skip 1, 2 sc, 1 hdc, (1 dc, picot, inc-dc) in one st, inc-dc, 1 hdc, 2 sc.
Part 5: skip 1, 2 sc, (1 hdc, picot, inc-hdc) in one st, inc-hdc, 3 sc, skip 1, 3 sc, sl st.
Leaf 3 (Orange):
Row 1: 4 sc in MR [4]
Row 2: 4 inc [8]
Row 3: 8 inc-hdc [16]
Row 4: (1 sc, [1 hdc, 5 dc, 1 hdc] in one st, 1 sc, skip 1 st) x 3, 4 sc.
Row 5: Follow the same petal patterns as above, but for Part 3, add a stem: 7 ch, starting from 2nd ch from hook: inc-hdc, 1 hdc, 1 sc, 3 sl st, 1 sc into row 4, sl st. Fasten off.
Finishing
Now it is time to bring your Royal Swan to life with final assembly and embroidery!
- Wing Placement: Pin the leaves symmetrically to the sides of the body, layering the orange leaf over the red and yellow ones. Sew them securely in place.
- Neck Attachment: Sew the neck to the body and attach the lace collar.
- Detailing:
- Use Light Blue thread to embroider delicate patterns onto the lace collar.
- Use Gold thread to stitch the veins into the autumn leaves for a realistic look.
- Use Black thread to add a few dainty eyelashes above the safety eyes for a royal expression.
Tips for Success
- Tight Tension: Amigurumi requires tight stitches. If you see stuffing poking through, try dropping down a hook size (e.g., from 2.0mm to 1.75mm).
- Stitch Markers: Because this pattern uses many rounds and specific increases, always use a stitch marker in the first stitch of each row to avoid losing your place.
- Stuffing Technique: Use a chopstick or a long crochet hook to push stuffing into the narrow parts of the neck to ensure it stays upright and firm.
- Customization: While this is an autumn swan, you can easily change the leaf colors to pinks and purples for a spring theme or deep greens for a winter forest look!