Mini Plush Bunny Crochet Pattern: Easy Step-by-Step Amigurumi Tutorial
Adorable Mini Plush Crochet Bunny Pattern: Step-by-Step Tutorial
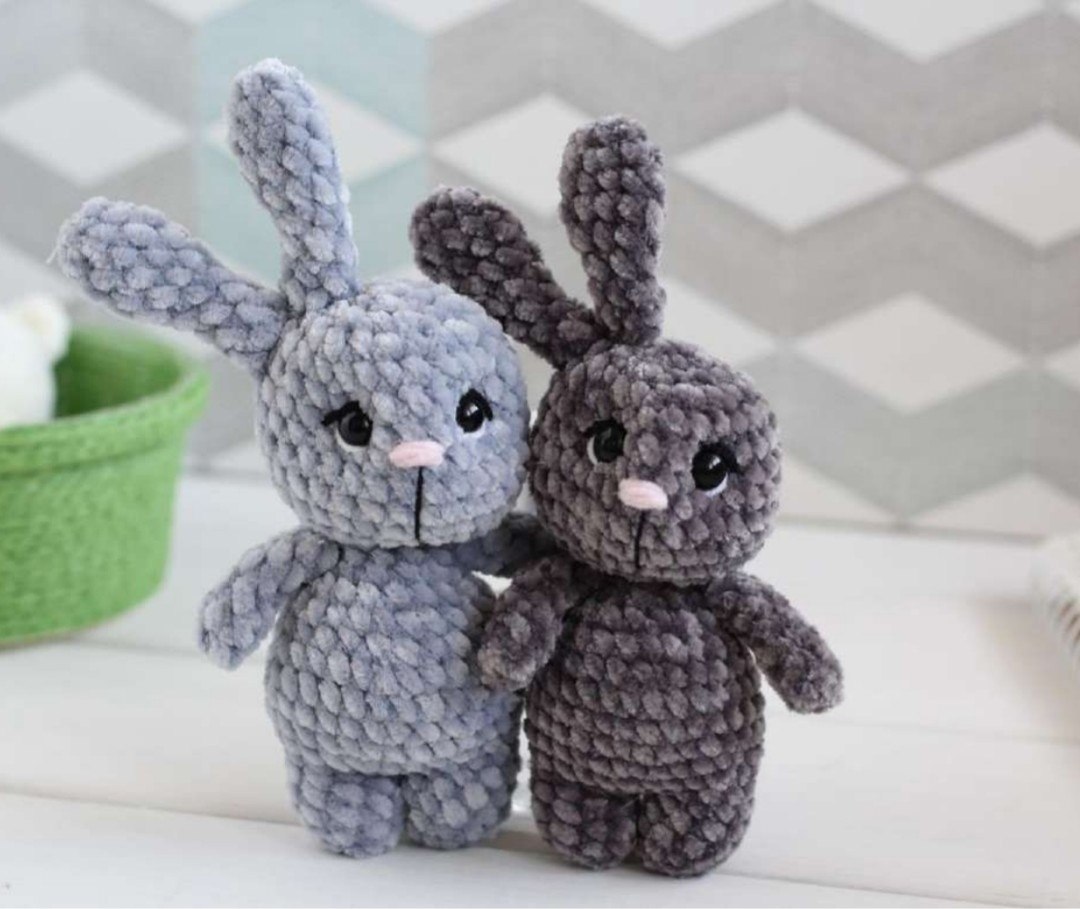
Looking for a quick and cozy project to brighten up your day? This mini plush bunny is the perfect addition to any amigurumi collection. Measuring approximately 4 to 4.7 inches tall, this little fellow is designed to be worked with velvet or chenille yarn, giving it an incredibly soft, huggable texture that is irresistible to kids and adults alike.
Whether you are looking for a handmade gift, a seasonal Easter decoration, or just a relaxing weekend project, this pattern is designed to be beginner-friendly. Because we are using a plush yarn, the stitches work up quickly, meaning you can finish this entire bunny in just a few hours. Let’s dive into the details and start crafting!
Materials & Abbreviations
To achieve the look seen in the photos, you will need a combination of plush yarn for the body and thinner cotton yarn for the delicate facial details. Using a smaller hook than the yarn label suggests helps ensure the stuffing doesn’t peek through the stitches.
Supplies Needed
- Main Yarn: Approximately 50-70 yards of plush chenille or velvet yarn (e.g., YarnArt Velour or similar).
- Embroidery Yarn: Small amounts of cotton yarn or embroidery floss in white, black, and pink for the face.
- Sewing Thread: Strong cotton thread in a color matching your main yarn for assembly and sculpting.
- Crochet Hook: 2.0mm or 2.5mm (use 2.5mm if you crochet tightly, 2.0mm if you crochet loosely).
- Safety Eyes: 8mm screw-in safety eyes.
- Stuffing: High-quality polyester fiberfill.
- Tools: A yarn needle, scissors, and stitch markers.
Abbreviations (US Terms)
- ch: chain
- sc: single crochet
- inc: increase (2 sc in the same stitch)
- dec: decrease (sc 2 together, preferably using the invisible decrease method)
- sl st: slip stitch
- FLO: front loop only
- (…) * n: repeat the instructions inside the parentheses n times
- (x): the total number of stitches at the end of the round
Step-by-Step Instructions
This bunny is worked in continuous rounds. I highly recommend using a stitch marker to keep track of the beginning of each row.
The Ears (Make 2)
Note: Do not stuff the ears.
- Round 1: Ch 2. Work 6 sc in the second chain from the hook. (6)
- Round 2: (1 sc, inc) * 3. (9)
- Rounds 3-5: sc in each stitch around. (9)
- Round 6: (1 sc, dec) * 3. (6)
- Rounds 7-9: sc in each stitch around. (6)
Fasten off and weave in the ends. Leave the edges open; do not sew them shut.
The Arms (Make 2)
Note: Do not stuff the arms.
- Round 1: Ch 2. Work 6 sc in the second chain from the hook. (6)
- Rounds 2-6: sc in each stitch around. (6)
To finish the arm, sew the flat edges together using 3 single crochet stitches to close the tube. Fasten off and weave in the ends.
The Tail
- Round 1: Ch 2. Work 6 sc in the second chain from the hook. (6)
Fasten off. When finishing, pull the yarn through the last stitch so that both yarn tails are on the same side of the piece for easier sewing.
The Body and Legs
We start by making the legs and then joining them to create the body. Stuff as you go.
Part 1: The Legs
- Round 1: Ch 2. Work 5 sc in the second chain from the hook. (5)
- Round 2: inc in each stitch around. (10)
- Rounds 3-4: sc in each stitch around. (10)
- First Leg: Round 5: sc in each stitch around. (10). Fasten off and weave in the end.
- Second Leg: Round 5: sc in each stitch around. (10). Do not fasten off. Chain 1 to create a bridge to the first leg.
Part 2: The Body
- Round 6: Work 10 sc around the first leg, inc in the chain space, 10 sc around the second leg, inc in the chain space. (24)
- Round 7: sc in each stitch around. (24)
- Round 8: (3 sc, inc) * 6. (30)
- Rounds 9-12: sc in each stitch around. (30)
- Round 13: (3 sc, dec) * 6. (24)
- Round 14: sc in each stitch around. (24)
- Round 15: (2 sc, dec) * 6. (18)
- Round 16: (1 sc, dec) * 6. (12)
- Round 17: sc in each stitch around. In this round, attach the arms by working 3 sc across the base of each arm on the sides. (12)
- Round 18: sc in each stitch around. (12)
Part 3: The Head
Continue from the body without cutting the yarn.
- Round 19: Work 12 inc in the FLO. (24)
- Round 20: (3 sc, inc) * 6. (30)
- Rounds 21-26: sc in each stitch around. (30)
- Eye Placement: Between rounds 25 and 26, insert the 8mm safety eyes, leaving 5 stitches of space between them.
- Round 27: (3 sc, dec) * 6. (24)
- Round 28: (2 sc, dec) * 6. (18)
- Round 29: (1 sc, dec) * 6. (12)
- Round 30: dec 6 times. (6)
Fasten off and weave in the yarn tail securely.
Finishing & Details
The magic of amigurumi is in the finishing touches. This is where your bunny gets its personality!
The Face
- The Nose: Use pink yarn to embroider a small nose between rounds 24 and 25.
- Eye Highlights: Using white thread, make a small horizontal stitch at the bottom of each safety eye to create a “glint.”
- Eyelids: Use black thread to create the upper eyelid. On the side closest to the nose, the stitch should be very close to the eye. On the outer side, leave a gap of about 1 stitch.
Sculpting the Face
To give the bunny a cute, defined shape, we will use a technique called “sculpting” or “pulling.” Use a long needle and matching cotton thread:
- Insert the needle between rounds 18 and 19 (under the chin).
- Bring the needle out near the eye between rounds 25 and 26.
- Pull the thread tight and anchor it.
- Repeat this process by creating a few more anchor points across the face to pull the cheeks inward and create a cute snout.
- Tie off and hide the thread inside the head.
Final Assembly
- The Tail: Sew the tail to the back of the body between rounds 10 and 11.
- The Ears: Sew the ears to the top of the head, slightly to the sides of the crown for a natural look.
Tips for Success
- Working with Velvet Yarn: Plush yarns can hide your stitches. Use a stitch marker and feel for the gaps with your finger if you can’t see the “V” of the stitch.
- Avoid Overstuffing: While you want a firm bunny, overstuffing can cause the velvet yarn to stretch, revealing the white stuffing inside. Stuff firmly but evenly.
- The Invisible Decrease: For a professional look, always use the invisible decrease (insert hook into front loops of next two stitches) to prevent gaps in the plush fabric.