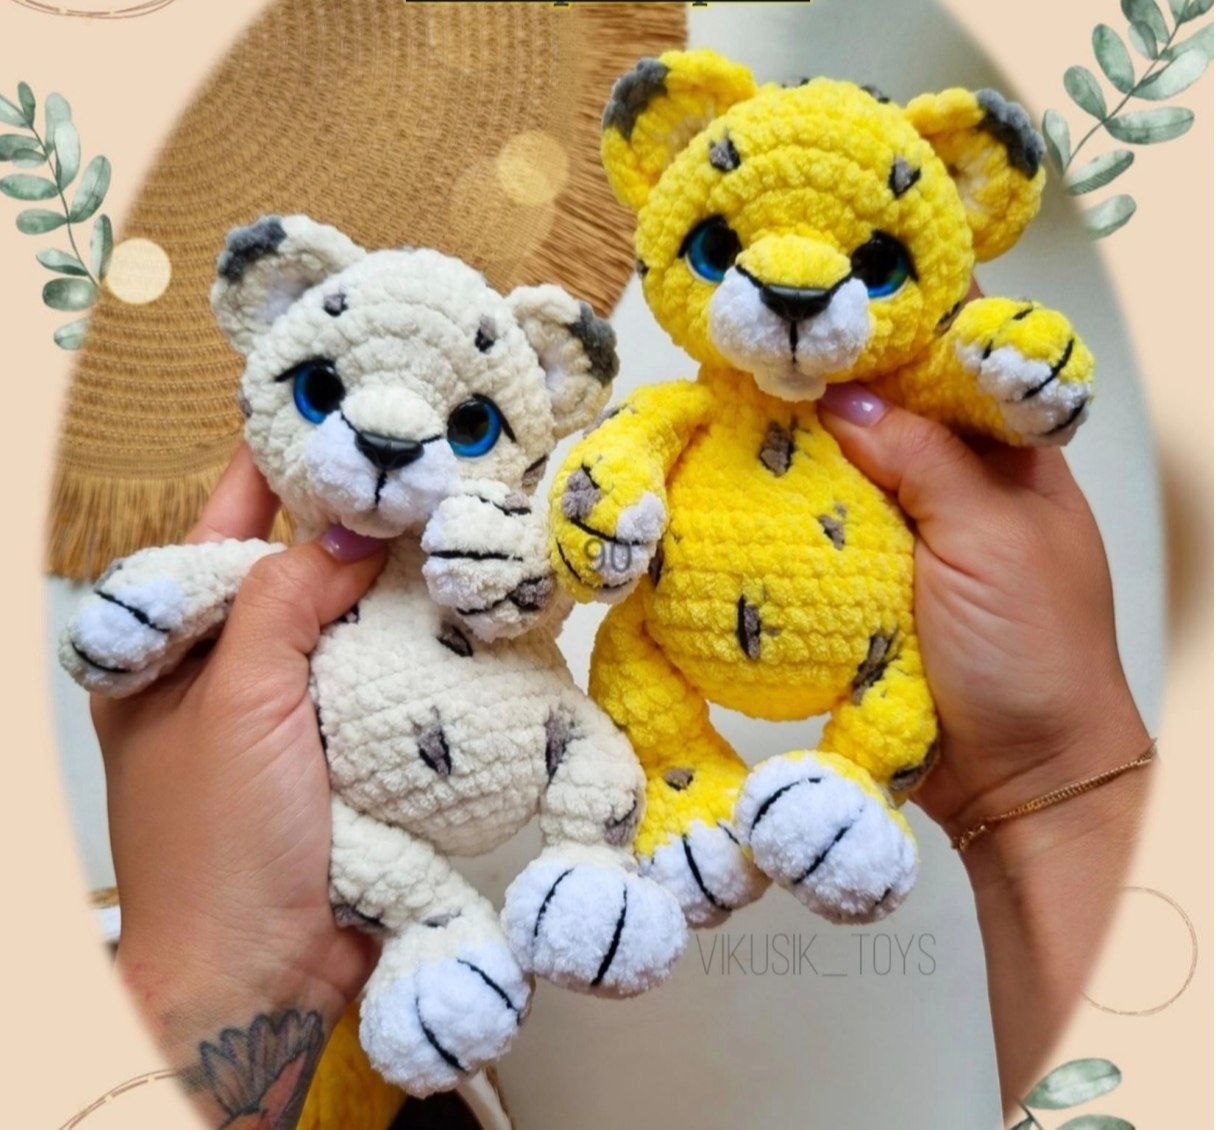
Wildly Adorable: The Ultimate Leopard & Snow Leopard Amigurumi Pattern
“`html
Adorable Crochet Leopard and Snow Leopard Amigurumi Pattern
Create your own cuddly wild cat with this detailed step-by-step crochet guide. Whether you want a classic golden leopard or a majestic snow leopard, this pattern will walk you through every stitch to create a professional-looking plushie.
Materials and Tools Needed
To achieve the best results and a size of approximately 20cm (8 inches), we recommend using the following materials:
- Hook: 3.75mm to 4mm crochet hook.
- Main Yarn: Plush yarn (approximately 120m/100g), such as Himalaya Dolphin Baby, YarnArt Dolce, or a similar chenille yarn. You will need about 50g of the main body color.
- Accent Colors: Small amounts of white and grey plush yarn for the muzzle, paws, ears, and spots.
- Embroidery Yarn: Thin black and white yarn (e.g., YarnArt Jeans) for eye and muzzle detailing.
- Safety Eyes: 14mm or 16mm safety eyes.
- Nose: 15x7mm plastic safety nose.
- Accessories: B7000 glue (for the nose), fiberfill stuffing, stitch markers, sewing needles, pins, and scissors.
Crochet Abbreviations (US Terms)
- MR: Magic Ring
- sc: Single Crochet
- inc: Increase (two single crochets in one stitch)
- dec: Decrease (two single crochets joined together)
- ch: Chain
- sl st: Slip Stitch
- BLO: Back Loop Only
- […]: Work these stitches in the secondary accent color (spots)
- [[…]]: Work these stitches in white yarn (paws)
Step-by-Step Pattern
Arms (Make 2)
Work with three colors: main, secondary, and white. Use a marker at the back of the arm.
- 5 sc in MR.
- 1 inc, [[2 inc]], 2 inc (10).
- 1 sc, inc, [[inc, 2 sc, inc]], 1 sc, [inc], inc, 1 sc (15).
- [1 sc], 2 sc, [[6 sc]], 2 sc, [1 sc], 3 sc (15).
- [1 sc], 2 sc, BLO 6 sc, 6 sc (15).
- Cut white yarn. dec, 1 sc, dec, dec over 3 stitches, (dec, 1 sc) x 2, 1 sc (9).
- 7-8. 7 sc, [1 sc], 1 sc (9) – 2 rounds.
- Cut secondary yarn. Stuff the arm lightly up to round 5.
- 9-11. 9 sc (3 rounds).
- 12. Work a few extra sc (e.g., +2 sc) so that round 12 runs parallel to the paw. Fold the piece in half and sc 4 times through both layers. Fasten off.
Left Foot
Start with white yarn.
- ch 5, starting from 2nd ch from hook: inc, 2 sc, 2 inc in last ch, 2 sc, inc (12).
- (inc, 1 sc, (1 sc, inc) x 2) x 2 (18).
- inc, 7 sc, inc, 5 sc, change to main body color, 4 sc (20).
- Cut white yarn. dec, 7 sc, dec, 9 sc (18).
- dec, 1 sc, [1 sc], 1 sc, (dec, 3 sc) x 2, 3 sc (15).
- dec, [1 sc], 3 sc, 2 dec, 3 sc, dec (11).
- Cut secondary yarn. Stuff with medium-density fiberfill.
- 7-9. 11 sc (3 rounds).
- 10. 5 dec. Fasten off.
Left Leg
Work with main body color. Place marker at the center back of the paw.
- Count 9 rows from the start of the foot, place a pin. Place another pin between rows 6 and 7. Work 10 sc in a circle around the 3 resulting rows (10).
- 10 sc.
- 3 sc, 1 inc, [1 inc], 3 inc, 2 sc (15).
- [1 sc], 4 sc, [1 sc], 9 sc (15).
- [1 sc], 9 sc, [1 sc], 4 sc (15).
- 4 sc, 3 dec, [1 dec], 3 sc (11).
- 5 sc, dec, 4 sc (10).
- Work a few extra sc so round 8 runs parallel to the foot. Fold in half, sc 5 times through both layers. Fasten off.
Right Foot and Leg
Repeat the instructions for the left foot and leg, mirroring the placements of the spots.
Ears (Make 2)
Ears are worked in rows. End each row with a ch 1 and turn.
Inner Ear:
- White yarn: ch 2, starting from 2nd ch: 4 sc.
- 1 sc, 2 inc, 1 sc (6).
- Main color: 1 sc, inc, 2 sc, inc, 1 sc (8). Fasten off.
Outer Ear:
- Main color: ch 2, starting from 2nd ch: 4 sc.
- 1 sc, 2 inc, 1 sc (6).
- 1 sc, inc, 2 sc, inc, 1 sc (8). Do not fasten off.
Joining: Place inner and outer ear pieces together. Sc through both layers using main and secondary colors. Round 4: 3 sc (main), 3 sc (secondary), 3 sc (main) (9). Fasten off.
Tail
Work with main and secondary colors. Do not stuff.
- 5 sc in MR.
- Work in a spiral without a marker: 7 sc, [1 sc], 6 sc, [1 sc], 13 sc, [1 sc], 2 sc, [1 sc], 14 sc, [1 sc], 7 sc, [1 sc], 4 sc, [1 sc], 6 sc.
- Cut secondary yarn. Fold in half, sc 2 times through both layers. Fasten off.
Body
Work with main body color. Marker is at the center back.
- 6 sc in MR.
- 6 inc (12).
- (1 sc, inc) x 6 (18).
- (2 sc, inc) x 6 (24).
- (3 sc, inc) x 6 (30).
- 6. 1 sc, [2 sc], 4 sc, inc, 2 sc, [inc], (2 sc, inc) x 4, 6 sc, sc together with tail (36).
- 7. 1 sc together with tail, [1 sc], 10 sc, [1 sc], 5 sc, [1 sc], 17 sc (36).
- 8. Attach legs: 7 sc, 5 sc together with leg, 6 sc, [1 sc], 5 sc, 5 sc together with leg, 2 sc, [1 sc], 4 sc (36).
- 9. 4 sc, [1 sc], 4 sc, [1 sc], 13 sc, [1 sc], 7 sc, [1 sc], 4 sc (36).
- 10. 4 sc, [1 sc], 4 sc, [1 sc], 13 sc, [1 sc], 12 sc (36).
- 11. 16 sc, [1 sc], 19 sc (36).
- 12. 9 sc, (1 sc, dec) x 6, 9 sc (30).
- 13. 1 sc, [1 sc], 22 sc, [1 sc], 5 sc (30).
- 14. 1 sc, [1 sc], 1 sc, (dec, 3 sc) x 2, dec, 2 sc, [1 sc], dec, 2 sc, dec, [1 sc], 3 sc, dec (24).
- 15. 5 sc, dec, 7 sc, [1 sc], 4 sc, dec, 3 sc (22).
- 16. Attach arms: 4 sc, 4 sc together with arm, 6 sc, 4 sc together with arm, 4 sc (22).
- 17. 7 sc, dec, 4 sc, dec, 7 sc (20).
- 18. 20 sc + 4 extra sc, sl st. Fasten off.
Head
Start with white yarn. Marker is at the side center.
- ch 4, starting from 2nd ch: 2 inc, 2 inc in last ch, 2 inc (12).
- 2-3. 12 sc (2 rounds).
- Change to main body color.
- 4. 6 sc, inc, 1 sc, 2 inc, 1 sc, inc (16).
- 5. 8 inc, 7 sc, inc (25).
- 6. (Place markers for eyes): inc, 1 sc, Marker, (1 sc, inc) x 2, (inc, 1 sc) x 2, Marker, 1 sc, 2 inc, 11 sc, inc (33).
- 7. inc, 4 sc, (1 sc, inc) x 2, (inc, 1 sc) x 2, 4 sc, inc, 15 sc (39).
- 8. 8 sc, [1 sc], 7 sc, [1 sc], 22 sc (39).
- 9-10. 1 sc, [1 sc], 21 sc, [1 sc], 15 sc (39) – 2 rounds.
- 11. 10 sc, [1 sc], 2 sc, [1 sc], 25 sc (39).
- 12. 2 dec, 6 sc, [1 sc], 3 sc, [1 sc], 5 sc, 2 dec, 15 sc (35).
- 13. 2 sc, dec, 3 sc, (dec, 2 sc) x 2, 1 sc, (dec, 2 sc) x 2, 9 sc, dec (29).
Muzzle and Nose: Insert eyes between rows 6 and 7, 8 sc apart. Place the nose between rows 1 and 2. Embroider the muzzle using main color yarn, then use thin black yarn to add detail. Glue the nose in place.
- (dec, 3 sc) x 5, 2 sc, dec (23).
- 1 sc, [1 sc], dec, 2 sc, dec, 1 sc, [1 sc], (dec, 2 sc) x 3, 1 sc (18).
- (1 sc, dec) x 6 (12).
- 6 dec. Fasten off and sew closed.
Mouth
White yarn: ch 2, starting from 2nd ch: 3 sc. Fasten off, leaving a tail.
Final Assembly and Finishing
Face Sculpting
To give the head a professional look, use a long needle and thin yarn to create “tugs” (sculpting). Pull a thread from the center of the head to the outer corner of the eye, then to the inner corner, and back down to the bottom of the head. Repeat for both eyes and pull tight to create eye sockets. Do the same under the nose to define the muzzle.
Embroidery and Detailing
- Eyes: Use thin white yarn to add small highlights to the eyes. Use black yarn to create “eyeliner” and a focused gaze.
- Spots: Embroider small black spots on the body, arms, and legs.
- Claws: Use thin black yarn to embroider three small claws on each paw.
Final Sewing
- Mouth: Sew the mouth under the muzzle between rows 4 and 5.
- Ears: Sew the ears between the 3rd and 4th rows from the eyes, 6 sc apart.
- Head: Ensure the neck is stuffed firmly so the head doesn’t wobble. Sew the head to the body, ensuring the face sculpting is slightly away from the neck line.
Your adorable Leopard/Snow Leopard is now complete!
“`