DIY Crochet Curtain Cat Pattern: Cute Amigurumi Curtain Tie-Back
Adorable Crochet Curtain Cat Pattern: DIY Amigurumi Tie-Back
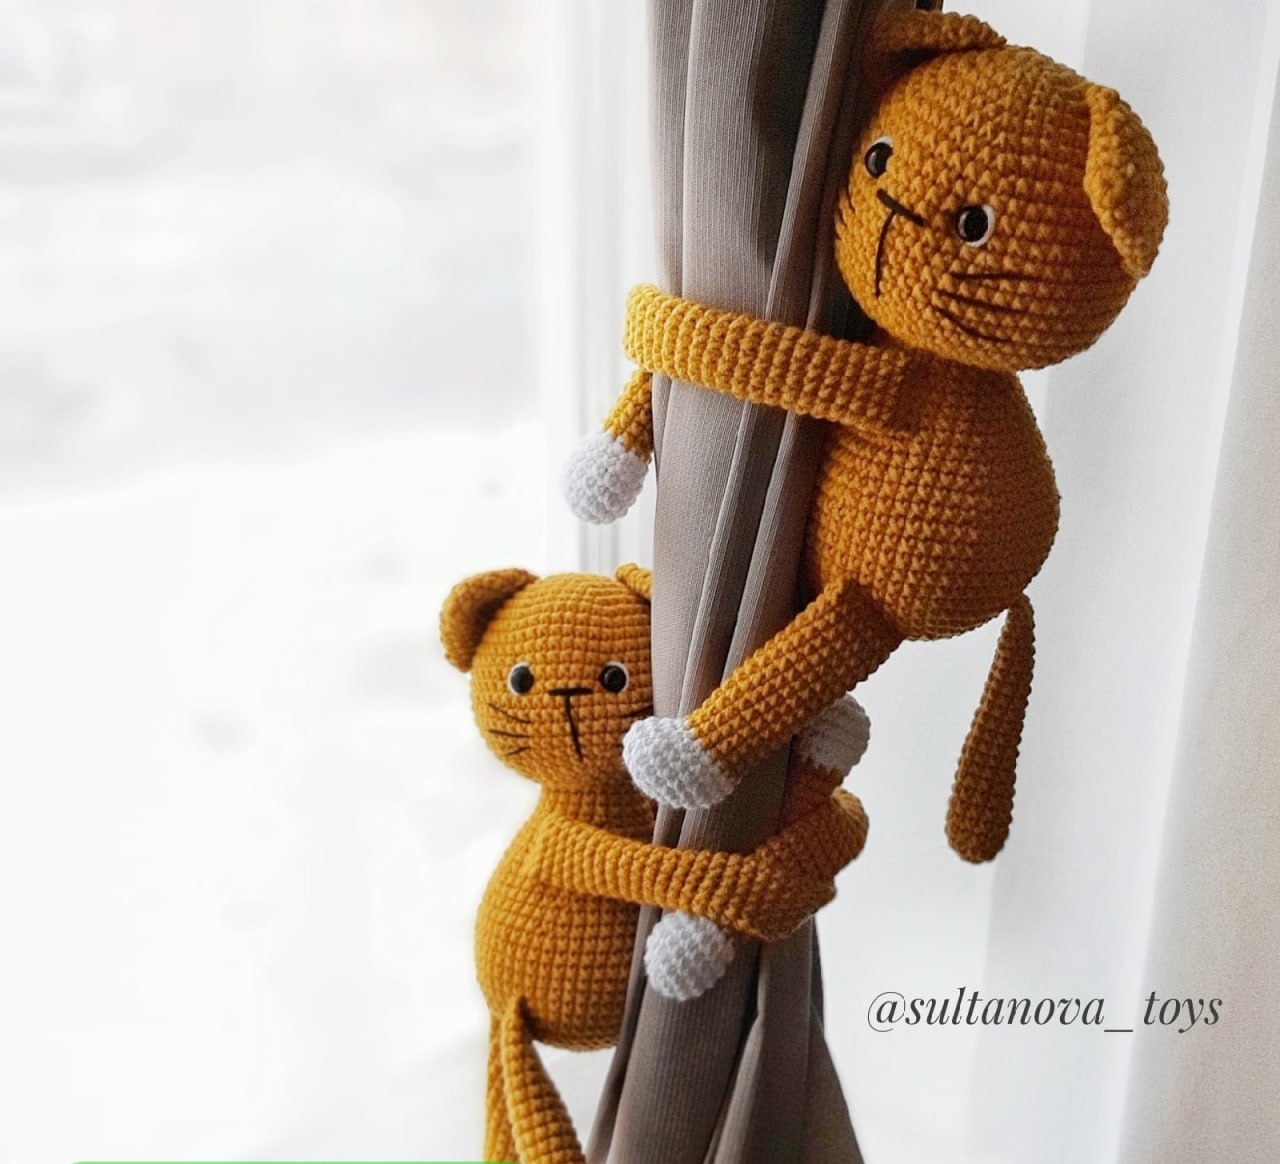
Looking for a whimsical way to brighten up your home decor? This crochet curtain cat is the perfect project for any amigurumi lover. Unlike a standard plushie, this cute kitty is specifically designed to “hug” your curtains, acting as a functional and charming tie-back. Whether you’re decorating a nursery, a cozy bedroom, or just want to add a touch of handmade magic to your living room, this pattern is a wonderful choice.
This project is beginner-friendly but provides a great opportunity to practice essential amigurumi skills, including working in the round, changing colors, and basic facial sculpting. By the end of this tutorial, you’ll have a sweet ginger cat that keeps your curtains tidy and your guests smiling.
Materials & Abbreviations
To get the best results, we recommend using a tight tension to ensure the stuffing doesn’t peek through the stitches. Here is everything you will need to complete this project:
Materials
- Yarn: Medium weight (Worsted) yarn in Ginger/Orange (main color) and White (for paws).
- Crochet Hook: 2.5mm or 3.0mm (choose a size that keeps your stitches tight).
- Eyes: 8mm safety eyes.
- Stuffing: High-quality polyester fiberfill.
- Embroidery: Black embroidery floss or thin yarn for the nose, muzzle, and whiskers. White embroidery floss for eye highlights.
- Tools: Yarn needle, scissors, and stitch markers.
Abbreviations (US Terms)
- MR: Magic Ring
- sc: Single crochet
- inc: Increase (two sc in the same stitch)
- dec: Decrease (sc two stitches together)
- st(s): Stitch(es)
- rd: Round
Step-by-Step Instructions
The Body
The body is worked from the bottom up. Start with your main ginger color.
- Rd 1: 6 sc in MR (6)
- Rd 2: inc in each st around (12)
- Rd 3: (1 sc, inc) * 6 (18)
- Rd 4: (2 sc, inc) * 6 (24)
- Rd 5: (3 sc, inc) * 6 (30)
- Rd 6: (4 sc, inc) * 6 (36)
- Rd 7: (5 sc, inc) * 6 (42)
- Rd 8: (6 sc, inc) * 6 (48)
- Rd 9: (7 sc, inc) * 6 (54)
- Rd 10-16: sc in each st around (54) for 7 rounds
- Rd 17: (7 sc, dec) * 6 (48)
- Rd 18: sc in each st around (48)
- Rd 19: (6 sc, dec) * 6 (42)
- Rd 20: sc in each st around (42)
- Rd 21: (5 sc, dec) * 6 (36)
- Rd 22: sc in each st around (36)
- Rd 23: (4 sc, dec) * 6 (30)
- Rd 24-25: sc in each st around (30) for 2 rounds
- Rd 26: (3 sc, dec) * 6 (24)
- Rd 27-28: sc in each st around (24) for 2 rounds
Fasten off, leaving a long tail for sewing the head to the body.
The Head
The head is a sphere that we will later sculpt to give the cat character. Use the main ginger color.
- Rd 1: 6 sc in MR (6)
- Rd 2: inc in each st around (12)
- Rd 3: (1 sc, inc) * 6 (18)
- Rd 4: (2 sc, inc) * 6 (24)
- Rd 5: (3 sc, inc) * 6 (30)
- Rd 6: (4 sc, inc) * 6 (36)
- Rd 7: (5 sc, inc) * 6 (42)
- Rd 8: (6 sc, inc) * 6 (48)
- Rd 9-12: sc in each st around (48) for 4 rounds
- Rd 13: (7 sc, inc) * 6 (54)
- Rd 14-18: sc in each st around (54) for 5 rounds
Eye Placement: Place safety eyes between rounds 13 and 14, leaving 8 stitches between them.
- Rd 19: (7 sc, dec) * 6 (48)
- Rd 20: (6 sc, dec) * 6 (42)
- Rd 21: (5 sc, dec) * 6 (36)
- Rd 22: (4 sc, dec) * 6 (30)
- Rd 23: (3 sc, dec) * 6 (24)
Stuff the head firmly and fasten off.
The Arms (Make 2)
Start with white yarn for the paws.
- Rd 1: 6 sc in MR (6)
- Rd 2: inc in each st around (12)
- Rd 3: (1 sc, inc) * 6 (18)
- Rd 4-6: sc in each st around (18) for 3 rounds
- Rd 7: (1 sc, dec) * 6 (12)
Change to the main ginger color.
- Rd 8-42: sc in each st around (12) for 35 rounds
Stuff only the white paw section. Fold the arm in half and crochet the two sides together to close the top. Fasten off, leaving a tail for sewing. The finished arm should be approximately 6 inches long.
The Legs (Make 2)
Start with white yarn for the paws.
- Rd 1: 6 sc in MR (6)
- Rd 2: inc in each st around (12)
- Rd 3: (1 sc, inc) * 6 (18)
- Rd 4: (2 sc, inc) * 6 (24)
- Rd 5-6: sc in each st around (24) for 2 rounds
- Rd 7: 6 sc, (dec) * 6, 6 sc (18)
- Rd 8: (4 sc, dec) * 3 (15)
Change to the main ginger color.
- Rd 9-22: sc in each st around (15) for 14 rounds
Shaping the legs: For the right leg, work 3 additional sc. For the left leg, work 11 additional sc. Fold the leg and crochet the two sides together to create a flat base. Stuff the white paw firmly and add a small amount of stuffing to the upper leg. Fasten off.
The Tail
Use the main ginger color. Stuff lightly as you go.
- Rd 1: 6 sc in MR (6)
- Rd 2: inc in each st around (12)
- Rd 3-9: sc in each st around (12) for 7 rounds
- Rd 10: dec, 10 sc (11)
- Rd 11: sc in each st around (11)
- Rd 12: dec, 9 sc (10)
- Rd 13: sc in each st around (10)
- Rd 14: dec, 8 sc (9)
- Rd 15: sc in each st around (9)
- Rd 16: dec, 7 sc (8)
- Rd 17-21: sc in each st around (8) for 5 rounds
Fold the end of the tail and crochet the sides together to close it. Fasten off.
The Ears (Make 2)
Use the main ginger color.
- Rd 1: 6 sc in MR (6)
- Rd 2: inc in each st around (12)
- Rd 3: (3 sc, inc) * 3 (15)
- Rd 4: (4 sc, inc) * 3 (18)
- Rd 5: sc in each st around (18)
- Rd 6: (2 sc, inc) * 6 (24)
- Rd 7: sc in each st around (24)
Fold the ear in half and crochet the sides together. Fasten off, leaving a tail for sewing.
Finishing & Assembly
Facial Details & Sculpting
To give the cat a realistic expression, we will use a technique called “eye indenting.” Using your yarn needle and a piece of ginger yarn, bring the needle up from the bottom of the head. Go around the base of the eye, pushing the fabric inward to create a socket, and pull tight. Repeat for the other eye and tie the threads together at the bottom of the head.
Embroidery:
- Use white floss to add a small vertical stitch above the pupil of each eye for a “sparkle.”
- Using black floss, embroider a small T-shaped nose and muzzle. The vertical part of the nose should be 4 stitches long, aligned with the bottom edge of the eyes.
- Embroider whiskers by starting 3 stitches away from the muzzle on each side.
Final Assembly
- Ears: Sew the ears between rounds 3 and 13 of the head. Ensure they are symmetrical by measuring the distance from the ear to the eye (approximately 8 stitches).
- Head to Body: Sew the head securely to the top of the body.
- Arms: Decide if your cat is for the right or left curtain. For a right-side cat, sew the right arm first at the level of the right eye. Then sew the left arm on the opposite side.
- Legs: Sew the legs slightly diagonally between rounds 5 and 11 of the body, roughly level with the arms.
- Tail: Sew the tail to the back of the body between rounds 9 and 10.
Tips for Success
- Tension is Key: If you see stuffing through your work, try dropping down a hook size. Amigurumi looks best when the stitches are dense.
- Use Pins: Always pin the ears, arms, and legs in place before sewing. This allows you to adjust the positioning for the perfect “hug” look.
- Customization: While this pattern is for a ginger cat, you can easily swap the colors to make a calico, tuxedo, or gray kitty!
- Perfecting the Hug: When sewing the arms, make sure they are long enough to wrap around your specific curtain fabric. You can add a few extra rounds of sc to the arms if your curtains are particularly thick.