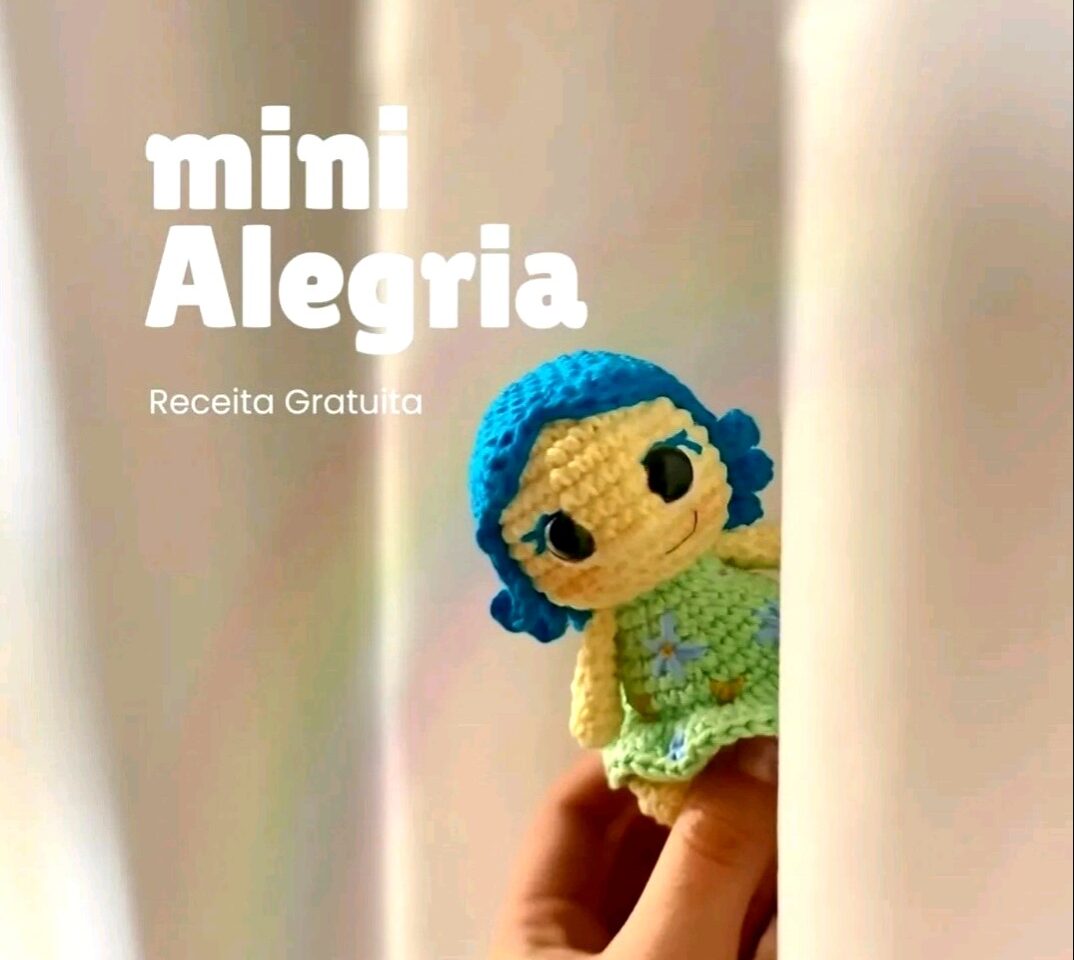
DIY Mini Joy Amigurumi: A Free and Easy Crochet Pattern
Hello, crochet friends! Are you ready to add a little extra sunshine to your day? Today, I am absolutely delighted to share a pattern that is all about positivity and smiles. We are making a Mini Alegria (inspired by our favorite personification of Joy)!
This tiny project is the perfect “pocket pal.” Because of its small size, it’s a wonderful way to use up those colorful yarn scraps you’ve been saving in your stash. Whether you’re a seasoned pro or just starting your amigurumi journey, this little lady is a joy to stitch up.
I love this pattern because it captures so much personality in such a small form. From her signature blue pixie cut to her cheerful green dress, she’s designed to be a constant reminder to look for the bright side. She makes a perfect gift for a friend who needs a pick-me-up or a sweet addition to a nursery shelf.
So, find a comfy spot, grab your favorite drink, and let’s start spreading some happiness, one stitch at a time
🧶 Materials & Tools
To bring your Mini Alegria to life, gather these supplies:
- Yarn: Cotton or mixed yarn in a “skin” tone, green, yellow, and blue.
- Hook: Crochet hook (choose a size appropriate for your yarn weight).
- Eyes: Safety eyes.
- Stuffing: Fiber filling.
- Notions: Tapestry needle and scissors
📝 Abbreviations
We will use these common crochet terms (translated for your convenience):
- MR: Magic Ring (Anel mágico)
- ch: Chain (Correntinha)
- sc: Single Crochet (Ponto baixo)
- dc: Double Crochet (Ponto alto)
- sl st: Slip Stitch (Ponto baixíssimo)
- inc: Increase (Aumento)
- dec: Decrease (Diminuição)
- BLO: Back Loop Only (Apenas nas alças de trás)
- FLO: Front Loop Only (Apenas nas alças da frente)
✨ The Mini Alegria Pattern
The Head
Use your chosen skin tone yarn.
- Round 1: 6 sc in a MR. (6)
- Round 2: 6 inc. (12)
- Round 3: 1 sc, 1 inc repeat 6 times. (18)
- Round 4: 2 sc, 1 inc repeat 6 times. (24)
- Round 5: 3 sc, 1 inc repeat 6 times. (30)
- Round 6: 4 sc, 1 inc repeat 6 times. (36)
- Rounds 7–11: 1 sc in each stitch around. (36)
- Round 12: 4 sc, 1 dec repeat 6 times. (30)
- Round 13: 3 sc, 1 dec repeat 6 times. (24)
- Round 14: 2 sc, 1 dec repeat 6 times. (18)
- Finishing: Place safety eyes between Rounds 9 and 10, spaced 5 stitches apart.
The Hair
Use blue yarn.
- Round 1: 6 sc in a MR. (6)
- Round 2: 6 inc. (12)
- Round 3: 1 sc, 1 inc repeat 6 times. (18)
- Round 4: 2 sc, 1 inc repeat 6 times. (24)
- Round 5: 3 sc, 1 inc repeat 6 times. (30)
- Round 6: 4 sc, 1 inc repeat 6 times. (36)
- Rounds 7–10: 1 sc in each stitch around. (36)
- The Bangs: Skip 2 sc, work 5 dc together in the next stitch, skip 2 sc, sl st. Skip 2 sc, 5 dc together in the next stitch, skip 2 sc.
- The Curls: Work 2 sc, then create the curls: 3 ch, skip one chain and work 2 increases back down, sl st. Repeat this curl sequence 9 times.
The Body
Use green yarn.
- Round 1: 6 sc in a MR. (6)
- Round 2: 6 inc. (12)
- Round 3: 1 sc, 1 inc repeat 6 times. (18)
- Round 4: 2 sc, 1 inc repeat 6 times. (24)
- Round 5: 3 sc, 1 inc repeat 6 times. (30)
- Rounds 6–8: 1 sc in each stitch around. (30)
- Round 9: 1 sc in each stitch around in BLO. (30)
- Rounds 10–11: 1 sc in each stitch around. (30)
- Round 12: 3 sc, 1 dec repeat 6 times. (24)
- Round 13: 1 sc in each stitch around. (24)
- Round 14: 2 sc, 1 dec repeat 6 times. (18)
- Rounds 15–16: 1 sc in each stitch around. (18)
The Skirt
Using green yarn, work into the front loops left from Round 9 of the body.
- Round 1: 30 increases using double crochet (dc). (60)
- Round 2: 1 dc in each stitch around. (60)
Arms (Make 2)
Use yellow yarn.
- Round 1: 6 sc in a MR. (6)
- Rounds 2–7: 1 sc in each stitch around. (6)
- Finish: Close with 3 sc.
Legs (Make 2)
- Round 1: 6 sc in a MR. (6)
- Round 2: 6 inc. (12)
- Round 3: 1 sc, 1 inc repeat 6 times. (18)
- Round 4: 3 sc, 6 dec, 3 sc. (12)
- Round 5: 12 sc. (12)
✨ Assembly & Finishing
- Face: Once the head is stuffed, make sure your safety eyes are secure. Embroider the details of her dress if desired.
- Hair: Place the hair cap onto the head, positioning the bangs and curls to frame her face.
- Attach: Sew the head to the body. Attach the arms to the sides and the legs to the bottom of the body.
You’re all finished! You now have a tiny bundle of joy ready to brighten up any space.
Happy Crocheting