Super Cute Mini Mushroom Amigurumi
Hello, crochet friends!
Today we are heading into the magical forest to make something truly adorable—a Mini Mushroom Amigurumi! whether you are a fan of woodland décor or you just need a cute charm for your keychain, this little fungi is the perfect quick project.
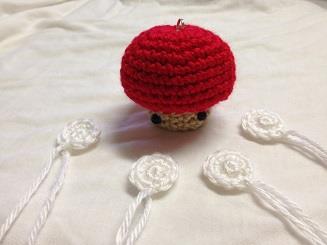
This pattern is fantastic for using up those small scraps of yarn you have lying around. Standing at approximately 2 inches tall, it works up in no time. The design features a classic red cap with white spots and a cute little beige stalk complete with safety eyes.
Let’s grab our hooks and get started on this forest friend!


🧶 Materials & Tools
To grow your own mushroom, you will need the following supplies:
- Yarn: Worsted weight yarn (the designer suggests Simply Soft) in Red, White, and Wheat (or light brown).
- Hook: Size E (3.5mm) crochet hook.
- Filling: Polyester fiber filling.
- Eyes: One pair of 6mm safety eyes.
- Tools: Tapestry needle and a stitch marker.
📝 Abbreviations
Here are the stitches and terms used in this pattern:
- sc: Single Crochet
- sl st: Slip Stitch
- ch: Chain
- st: Stitch
- inc: Increase (make 2 single crochet in the same stitch)
- dec: Decrease (make 1 single crochet over the next two stitches)
- BLO / bsc: Back Loop Only / Back Loop Single Crochet
- fo: Fasten off
🍄 The Mushroom Pattern
Part 1: The Cap (Red)
Using Red yarn
- Round 1: Start with a Magic Ring of 6 sc. (Or, chain 2 and make 6 sc into the first chain to make a circle) (6 sts).
- Round 2: Work an inc in every stitch around (12 sts).
- Round 3: 1 sc, inc. Repeat 6 times (18 sts).
- Round 4: 2 sc, inc. Repeat 6 times (24 sts).
- Round 5: 3 sc, inc. Repeat 6 times (30 sts).
- Rounds 6 – 10: Make 1 sc in each stitch around (30 sts).
- Round 11: 3 sc, dec. Repeat 6 times (24 sts).
- Round 12: 1 sc, dec. Repeat 8 times (16 sts).
- Finish: Slip stitch, fasten off, and stuff the cap.
Part 2: The Stalk (Stem)
Using Light Brown or Wheat yarn
- Round 1: Start with a Magic Ring of 8 sc (or chain 2 and make 8 sc into the first chain). Join with a slip stitch and chain 1 (8 sts).
- Round 2: Work an inc 8 times. Join with a sl st and ch 1 (16 sts).
- Round 3: Work in BLO (Back Loop Only). Make 1 sc in the back loop of each stitch around (16 sts).
- Rounds 4 – 5: Work 1 sc (normal) in each stitch around (16 sts).
- Finish: Slip stitch and fasten off. Leave a long tail (about 12 inches) for sewing.
Part 3: The Spots (Make 4)
Using White yarn
- Round 1: Start with a Magic Ring of 6 sc (or chain 2 and make 6 sc into the first chain) (6 sts).
- Round 2: Work an inc 6 times (12 sts).
- Finish: Slip stitch, fasten off, and leave a tail to sew onto the top of the mushroom.
✨ Assembly Instructions
Now it’s time to put your mushroom together!
- Prepare the Stalk: Insert and secure the 6mm safety eyes onto the stalk (light brown part). Lightly stuff the stalk.
- Attach Stalk to Cap: Using the long tail from the stalk, sew it to the opening of the red cap. Sew stitch by stitch (since both pieces ended with 16 stitches, they should line up perfectly!).
- Add the Spots: Take your four white circles and sew them onto the red cap.
And there you have it! Your tiny mushroom is complete. You can add a jump ring to turn it into a keychain or just let it sit on your desk to keep you company.
Happy Crocheting