Fluffy Cinnamoroll Amigurumi – A Sweet Crochet Project
Hello, crochet friends! Get your hooks ready, because today we are making something incredibly sweet.
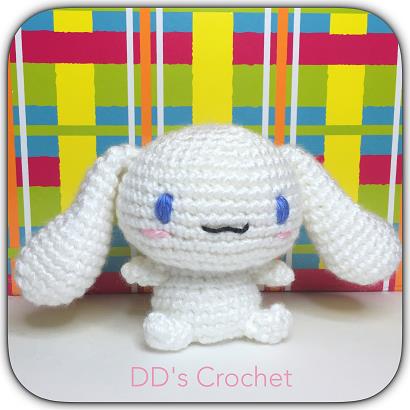
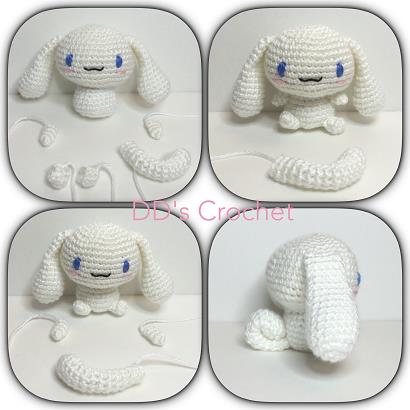
If you love cute, floppy-eared puppies, you are going to adore this Cinnamoroll Amigurumi pattern! This little guy stands about 3½ inches tall, making him the perfect desk companion or a thoughtful handmade gift. Whether you are looking to use up some leftover white yarn or just need a smile, this pattern by DD’s Crochet is just the thing.
This project uses basic stitches and clever shaping to create those signature long ears and that cute cinnamon-roll tail. Let’s grab our supplies and start stitching!
🧶 Materials & Tools
To get started, you will need the following items:
- Hook: Size E (3.5mm) crochet hook.
- Yarn: Worsted weight yarn (such as Simply Soft) in White, Blue, and Pink.
- Filling: Polyester fiber filling.
- Tools: Tapestry needle and a stitch marker.
- Optional: You can use felt for the eyes, or simply embroider them with yarn.
- For the mouth: Black floss (and optional craft glue to help shape the smile).
📝 Abbreviations & Notes
Here are the terms used in this pattern:
- MR: Magic Ring
- sc: Single Crochet
- sl st: Slip Stitch
- ch: Chain
- inc: Increase (make 2 single crochet into the same stitch)
- dec: Decrease (make 1 single crochet over the next two stitches)
- fo: Fasten off
- ( ): The number inside the parentheses indicates the total stitch count for that round.
Important Note: Each round is continuous; do not slip-stitch at the end of the round unless indicated.
☁️ The Pattern
The Head
Using White Yarn
- R1: Create a Magic Ring of 6 sc (6).
- R2: Inc in each stitch around (12).
- R3: 1 sc, 1 inc. Repeat 6 times (18).
- R4: 2 sc, 1 inc. Repeat 6 times (24).
- R5: 3 sc, 1 inc. Repeat 6 times (30).
- R6 (Part A): 4 sc, 1 inc. Repeat 6 times (36).
- R6 (Part B): 5 sc, 1 inc. Repeat 6 times (42). (Note: Please check your stitch count here as you progress to R7).
- R7 – R12: Sc in each stitch around (42).
- R13: 19 sc, 1 dec. Repeat 2 times (40).
- R14: 3 sc, 1 dec. Repeat 8 times (32).
- R15: 2 sc, 1 dec. Repeat 8 times (24).
- R16: Begin stuffing with fiber filling. 1 sc, 1 dec. Repeat 8 times (16). Fasten off.
The Body
Using White Yarn
- R1: Create a Magic Ring of 8 sc (8).
- R2: Inc in every stitch around (16).
- R3: 1 sc, 1 inc. Repeat 8 times (24).
- R4 – R6: Sc in each stitch around (24).
- R7: 4 sc, 1 dec. Repeat 4 times (20).
- R8: Sc in each stitch around (20).
- R9: 3 sc, 1 dec. Repeat 4 times (16). Fasten off and stuff the body.
The Ears (Make 2)
Using White Yarn
- R1: Create a Magic Ring of 6 sc (6).
- R2: Inc 6 times (12).
- R3: 1 sc, 1 inc. Repeat 6 times (18).
- R4 – R6: Sc in each stitch around (18).
- R7: 7 sc, 1 dec. Repeat 2 times (16).
- R8: Sc in each stitch around (16).
- R9: 6 sc, 1 dec. Repeat 2 times (14).
- R10: Sc in each stitch around (14).
- R11: 5 sc, 1 dec. Repeat 2 times (12).
- R12: Sc in each stitch around (12).
- R13: 5 sc, 1 dec, 6 sc (11).
- R14: Sc in each stitch around (11).
- R15: 9 sc, 1 dec (10).
- R16: Sc in each stitch around (10).
- R17: Make 5 sc (only crochet half the round). Fasten off.
- Finish: Stuff both ears.
The Hands (Make 2)
Using White Yarn
- R1: Create a Magic Ring of 5 sc (5).
- R2: 2 sc, 1 inc, 2 sc (6).
- R3: Sc in each stitch around (6). Fasten off.
The Feet (Make 2)
Using White Yarn
- R1: Create a Magic Ring of 8 sc (8).
- R2: Sc in each stitch around (8).
- R3: 2 sc, 2 dec, 2 sc (6). Fasten off.
- Finish: Stuff lightly.
The Tail
Using White Yarn
- R1: Create a Magic Ring of 6 sc (6).
- R2: 1 sc, 1 inc. Repeat 3 times (9).
- R3 – R4: Sc in each stitch around (9).
- R5: 7 sc, 1 dec (8).
- R6 – R7: Sc in each stitch around (8).
- Stuff: Stuff the tail.
- R8: 6 sc, 1 dec (7).
- R9 – R12: Sc in each stitch around (7).
- Stuff: Stuff lightly.
- R13: 5 sc, 1 dec (6).
- R14 – R15: Sc in each stitch around (6). Fasten off.
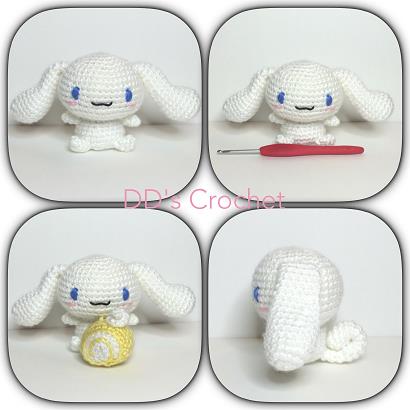
✨ Assembly Instructions
Now it is time to bring your Cinnamoroll to life!
- Ears: Attach the ears to the head.
- Eyes: Using blue yarn, embroider the eyes between Rounds 9 and 11, spacing them about 9 stitches apart.
- Cheeks: Embroider a small pink line just one row under the eyes.
- Mouth: Use black floss to embroider the mouth. Pro Tip: You can use a little glue to help shape the little wave of the mouth; let it dry thoroughly.
- Body: Attach the head to the body.
- Limbs: Attach both hands and feet to the body.
- Tail: Attach the tail to the back of the body. Important: When sewing, make sure to curve the tail so it looks like a cinnamon roll!.
And there you have it! A super cute, chubby little puppy ready to be loved. Happy crocheting