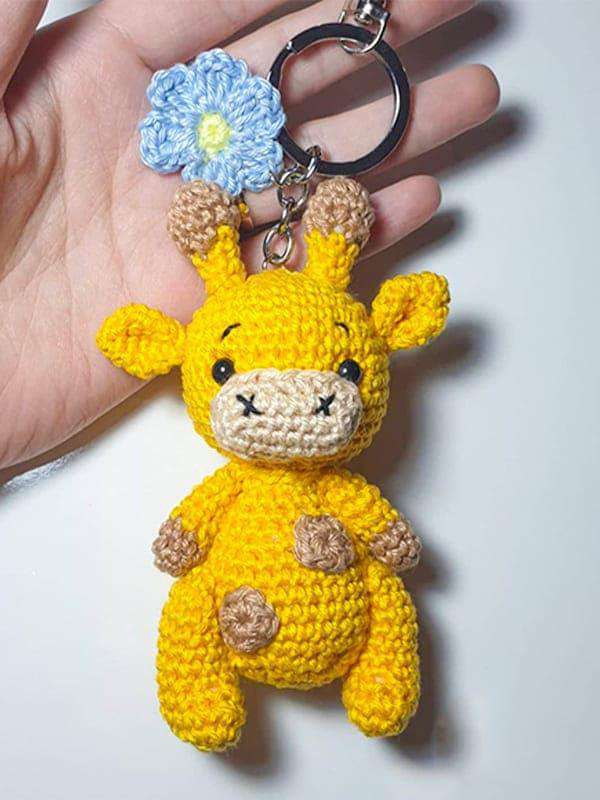
Free Giraffe Amigurumi Keychain Pattern
Materials for Your Crochet Project
To begin crafting this adorable amigurumi, gather the following materials:
- Worsted weight yarn in your chosen Main Color (MC) and a Contrast Color (CC) for details.
- A 2.75mm (C) crochet hook, ideal for achieving tight stitches in amigurumi.
- 6mm safety eyes to bring your creation to life.
- Polyester fiberfill for stuffing, ensuring a soft, cuddly finish.
- A yarn needle for seamless assembly and weaving in ends.
- A stitch marker to help you keep track of your rounds, a must-have for spiral crochet.
Crochet Abbreviations Explained
Familiarize yourself with these common crochet abbreviations used throughout the pattern:
- ch: chain
- sc: single crochet
- inc: increase (make 2 single crochet stitches in the same stitch)
- dec: decrease (single crochet 2 together, often an invisible decrease for amigurumi)
- sl st: slip stitch
- FO: fasten off
- st(s): stitch(es)
- MR: magic ring (also known as a magic circle or adjustable ring)
- Rnd: round
Gauge for Amigurumi
While precise gauge isn’t always critical for amigurumi, maintaining consistent tension is key to achieving the intended look. For reference, your tension should result in approximately:
- 5 sc and 5 rows = 1 inch
The main goal is to create a dense fabric that prevents the stuffing from showing through. Don’t worry if your exact gauge varies slightly, as long as your stitches are tight.
Finished Size
Upon completion, your charming crochet creation will stand approximately:
- 5 inches tall
This compact size makes it perfect for a desk buddy, a keychain, or a small gift.
Step-by-Step Crochet Instructions
Follow these clear, detailed instructions to crochet each part of your amigurumi. Work in a continuous spiral unless otherwise specified, using a stitch marker to denote the beginning of each round.
Head (Main Color – MC)
The head forms the main structure of your amigurumi.
- Rnd 1: Start with a Magic Ring (MR) and work 6 sc into it. (6 stitches)
- Rnd 2: [Increase (inc)] x 6 times around. (12 stitches)
- Rnd 3: [Sc in next st, inc in next st] x 6 times around. (18 stitches)
- Rnd 4: [Sc in next 2 sts, inc in next st] x 6 times around. (24 stitches)
- Rnd 5: [Sc in next 3 sts, inc in next st] x 6 times around. (30 stitches)
- Rnd 6-10: Sc in each st around for 5 rounds. (30 stitches)
- Eye Placement: Insert the 6mm safety eyes between Rnd 7 and 8, spaced approximately 5 stitches apart.
- Rnd 11: [Sc in next 3 sts, decrease (dec) over next 2 sts] x 6 times around. (24 stitches)
- Rnd 12: [Sc in next 2 sts, dec over next 2 sts] x 6 times around. (18 stitches)
- Begin stuffing the head firmly with polyester fiberfill, shaping as you go.
- Rnd 13: [Sc in next st, dec over next 2 sts] x 6 times around. (12 stitches)
- Fasten Off (FO), leaving a long tail for sewing the head to the body.
Body (Main Color – MC)
The body provides the base for your amigurumi.
- Rnd 1: 6 sc in MR. (6 stitches)
- Rnd 2: [Inc] x 6 times around. (12 stitches)
- Rnd 3: [Sc in next st, inc in next st] x 6 times around. (18 stitches)
- Rnd 4: [Sc in next 2 sts, inc in next st] x 6 times around. (24 stitches)
- Rnd 5-8: Sc in each st around for 4 rounds. (24 stitches)
- Stuff the body firmly with fiberfill.
- Fasten Off (FO), leaving a long tail for sewing.
Ears (Contrast Color – CC, Make 2)
These small details add character to your amigurumi.
- Rnd 1: 4 sc in MR. (4 stitches)
- Rnd 2: [Sc in next st, inc in next st] x 2 times around. (6 stitches)
- Rnd 3: Sc in each st around. (6 stitches)
- Fasten Off (FO), leaving a long tail for sewing. Do not stuff the ears; flatten them instead.
Assembly & Finishing Touches
Bringing all the pieces together is where your amigurumi truly comes to life.
- Attach Head to Body: Using the long tail from the head and your yarn needle, carefully sew the head to the body. Ensure it’s centered and securely attached for stability. Take small, neat stitches.
- Attach Ears: Position the flattened ears on top of the head, typically between Rnd 2 and Rnd 4, making sure they are evenly spaced. Use the tails from the ears to firmly sew them in place.
- Weave in Ends: Using your yarn needle, carefully weave in all remaining yarn ends into the inside of your amigurumi pieces. This creates a clean and professional finish.
Tips for Crochet Beginners
If you’re new to amigurumi or crochet, these tips will help you create a beautiful project:
- Stitch Markers are Your Friend: Always use a stitch marker to keep track of the beginning of each round, especially when working in a spiral. It prevents you from losing your place and helps maintain an accurate stitch count.
- Tight Stitches for Amigurumi: Don’t be afraid to pull your stitches tight! A dense fabric is crucial for amigurumi to ensure that the stuffing doesn’t show through the gaps in your crochet work.
- Stuffing Techniques: Stuff your pieces gradually and firmly to achieve the desired shape and stability. Use small pieces of fiberfill to avoid lumps and create a smooth, even surface.
- Practice Makes Perfect: Increases (inc) and decreases (dec) are fundamental to shaping amigurumi. Practice these stitches until they look neat and consistent. For decreases, consider using the “invisible decrease” technique for a smoother finish.
- Visual Guidance: If you’re struggling with a particular technique, such as the magic ring or invisible decrease, don’t hesitate to watch online video tutorials. Visual demonstrations can be incredibly helpful for new crocheters.